The Bayeux Tapestry (c. 1070)
[Bayeux Museum version]
[Created: 16 August, 2023]
[Updated: August 17, 2023 ] |
Source
"Official digital representation of the Bayeux Tapestry – 11th century. Credits: City of Bayeux, DRAC Normandie, University of Caen Normandie, CNRS, Ensicaen, Photos: 2017 – La Fabrique de patrimoines en Normandie." [Link]
Introduction
The Bayeux Museum has a detailed and high resolution image of the complete tapestry which it has labelled as 58 "Scenes" or panels. They have provided a transcripion of the accompanying Latin descriptions of the scenes, as well as translations into English and French. What follows below are screen snapshots of this very large image.
See another arrangement of the panels based upon the work of Carolyn Schriber here.
The 58 Scenes in the Tapestry
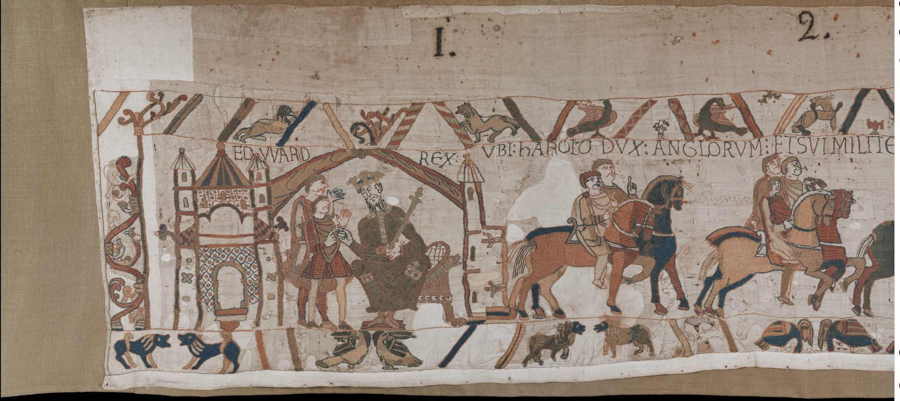 |
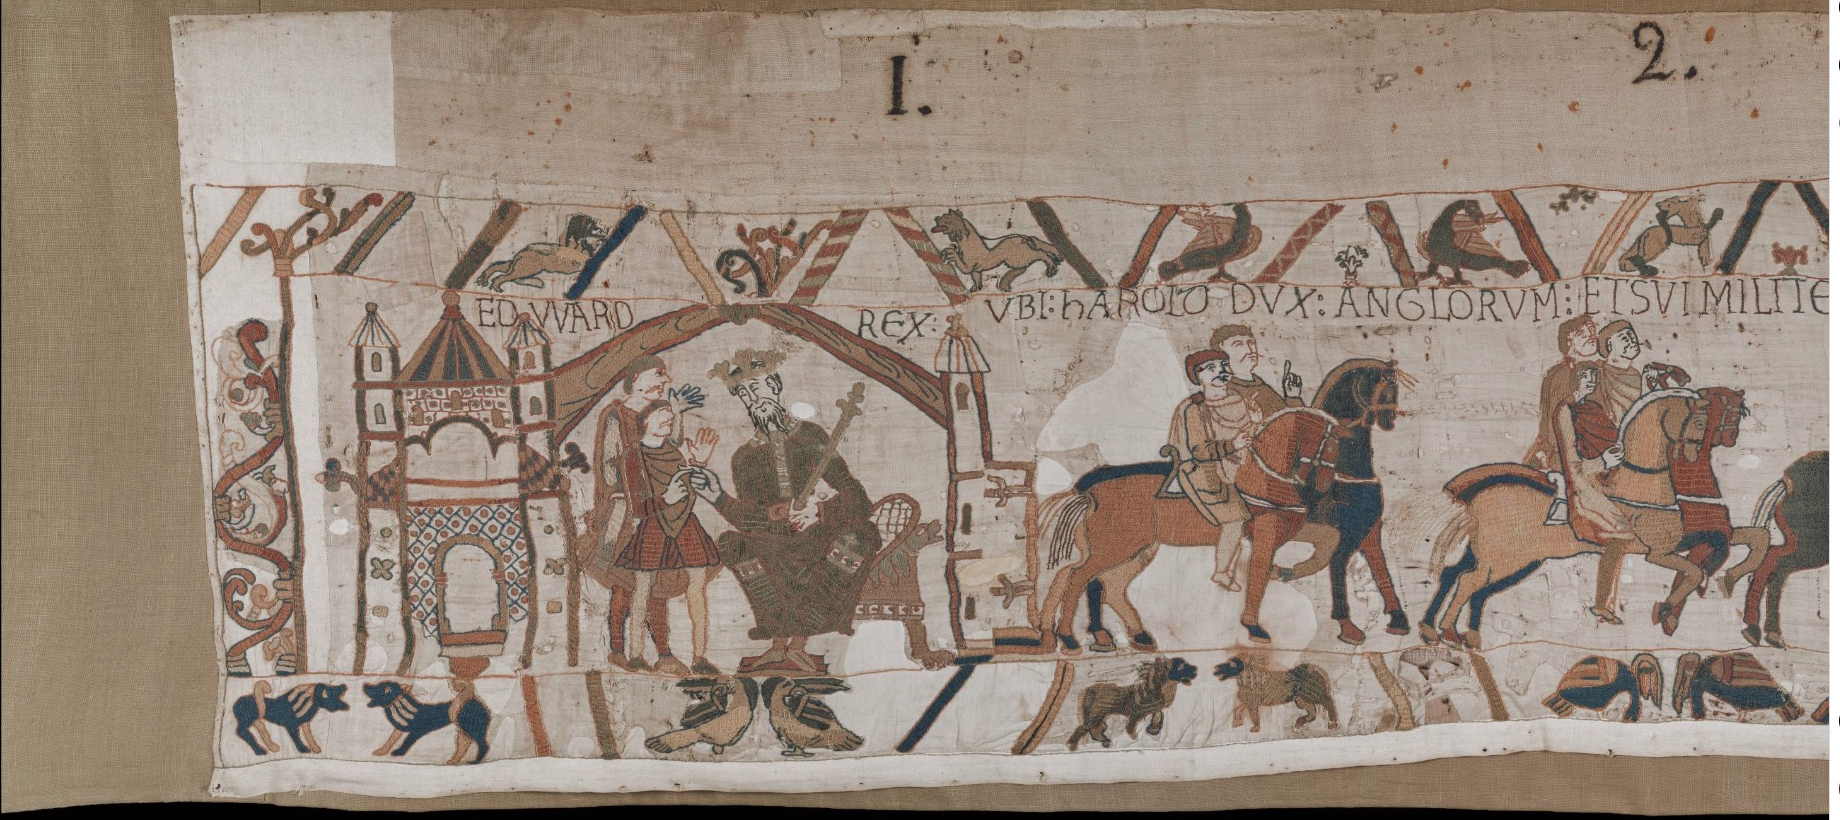
| Scene 1: EDVVARD RЄX | King Edward | Le roi Édouard [See a larger version of the image] |
 |
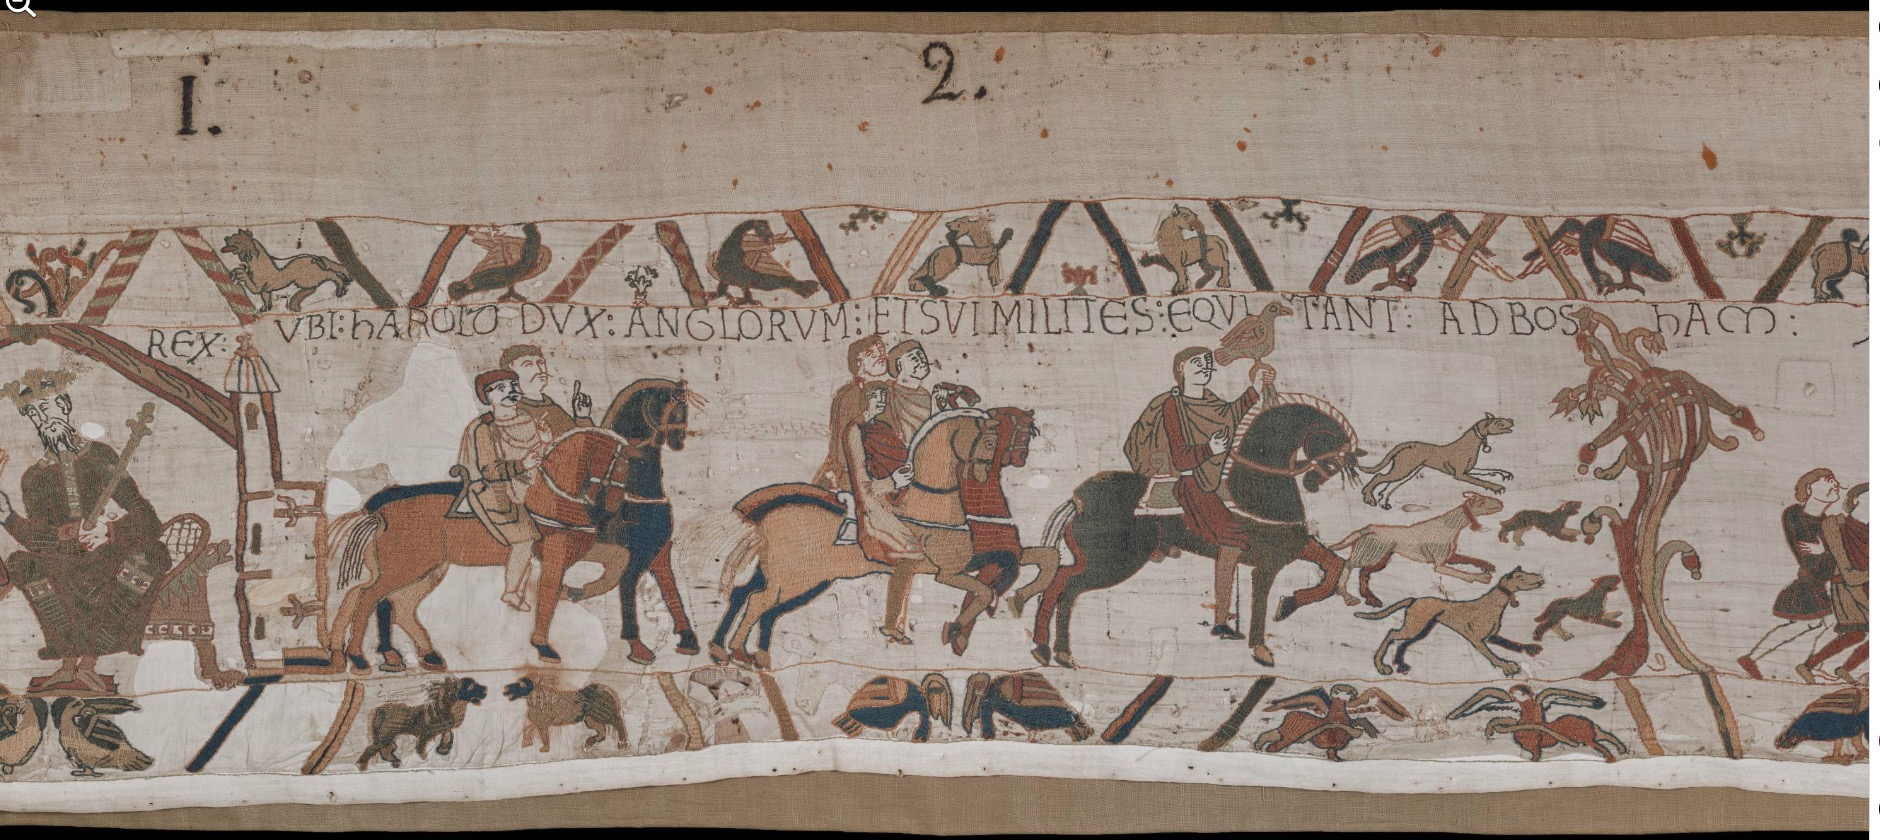
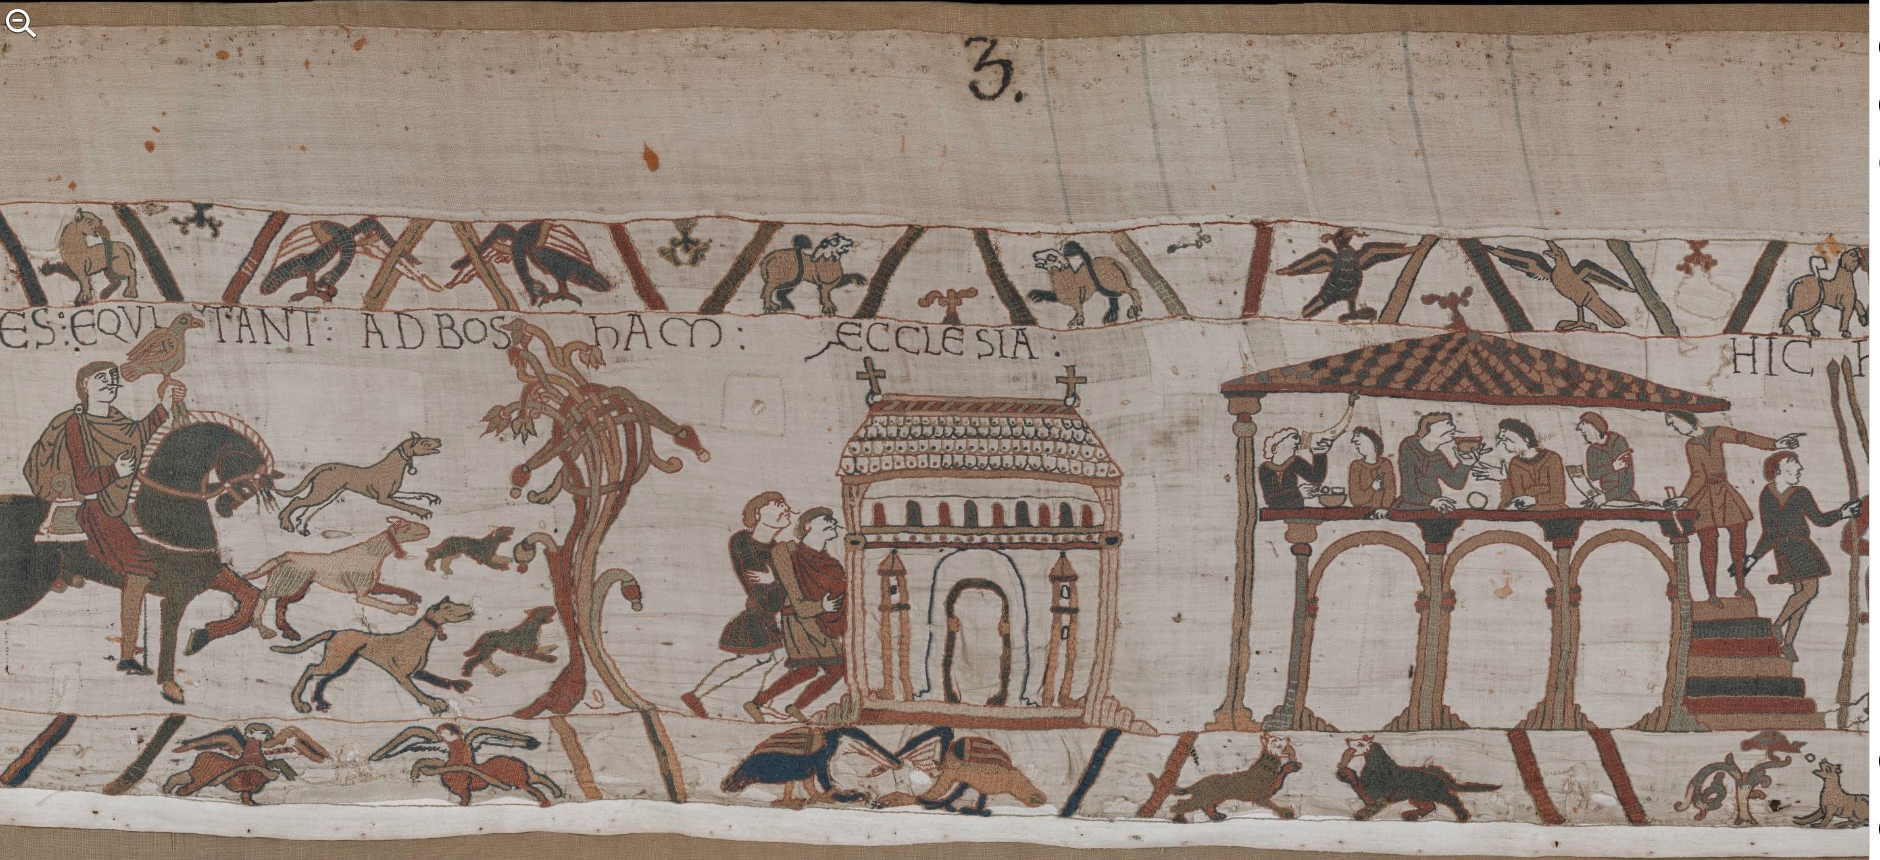
| Scene 2: VBI hAROLD DVX ANGLORVM ET SVIMILITЄS ЄQVITANT AD BOShAM | Where Harold, an earl of the English, and his soldiers ride to Bosham | Harold duc des Anglais et ses chevaliers se rendent à cheval à Bosham [See a larger version of the image] |
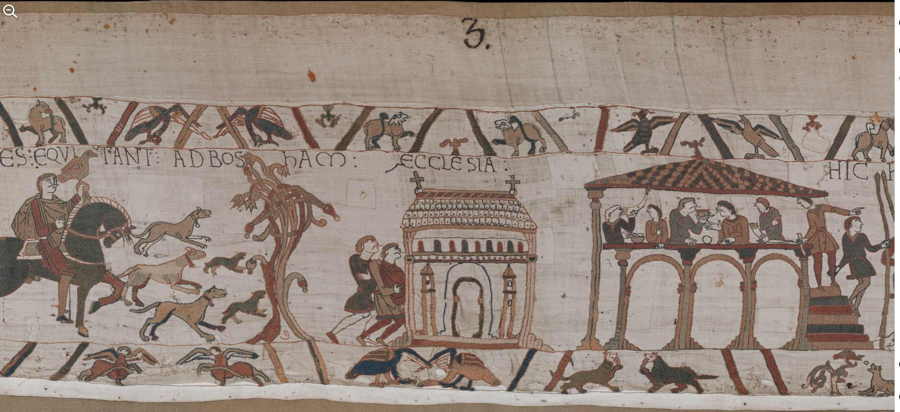 |
| Scene 3: ЄCCLЄSIA | The church | L'église [See a larger version of the image] |
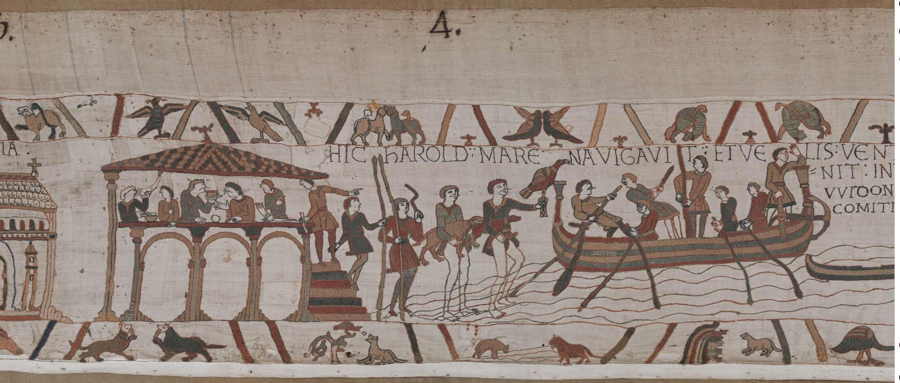 |
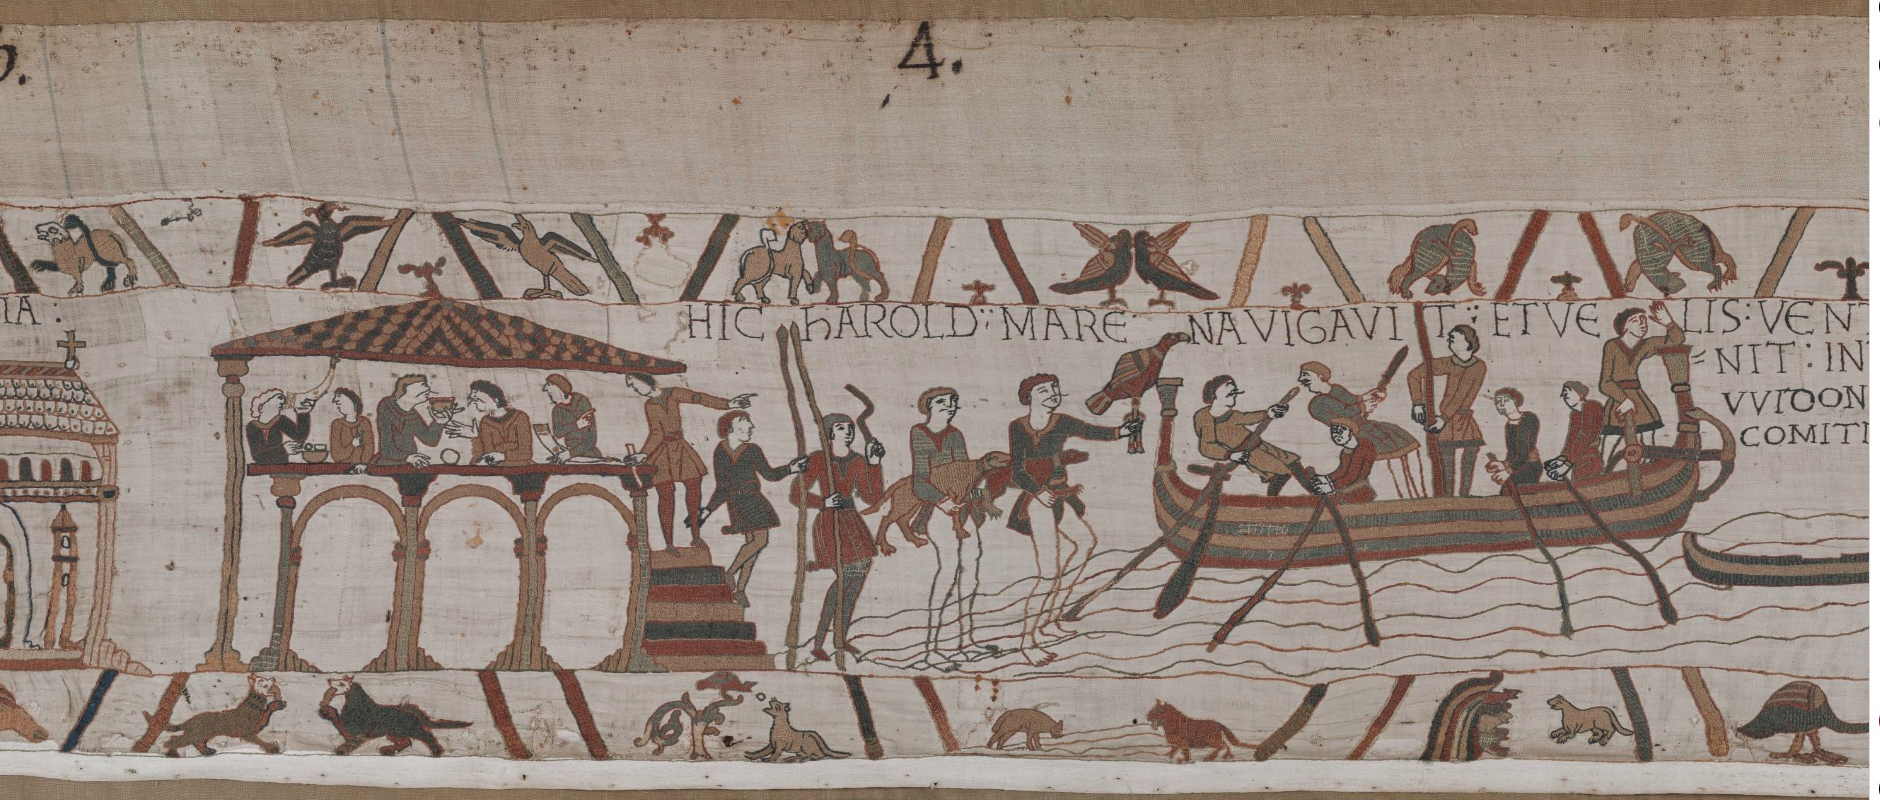
| Scene 4: HIC hAROLD MARЄ NAVIGAVIT | Here Harold sailed the sea | Ici Harold navigua sur la mer [See a larger version of the image] |
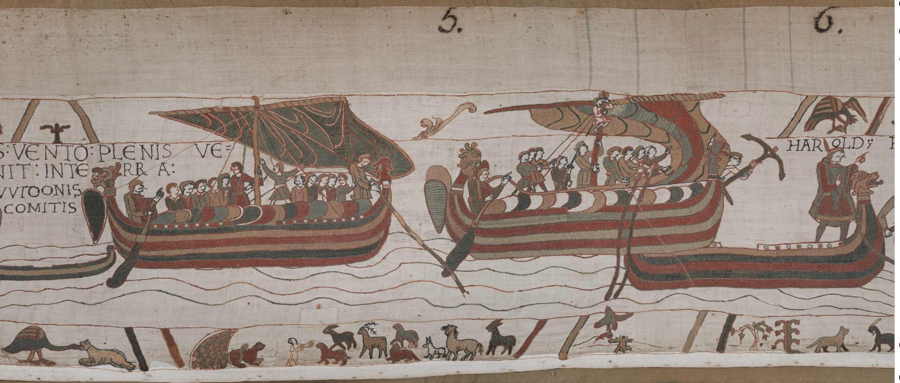 |
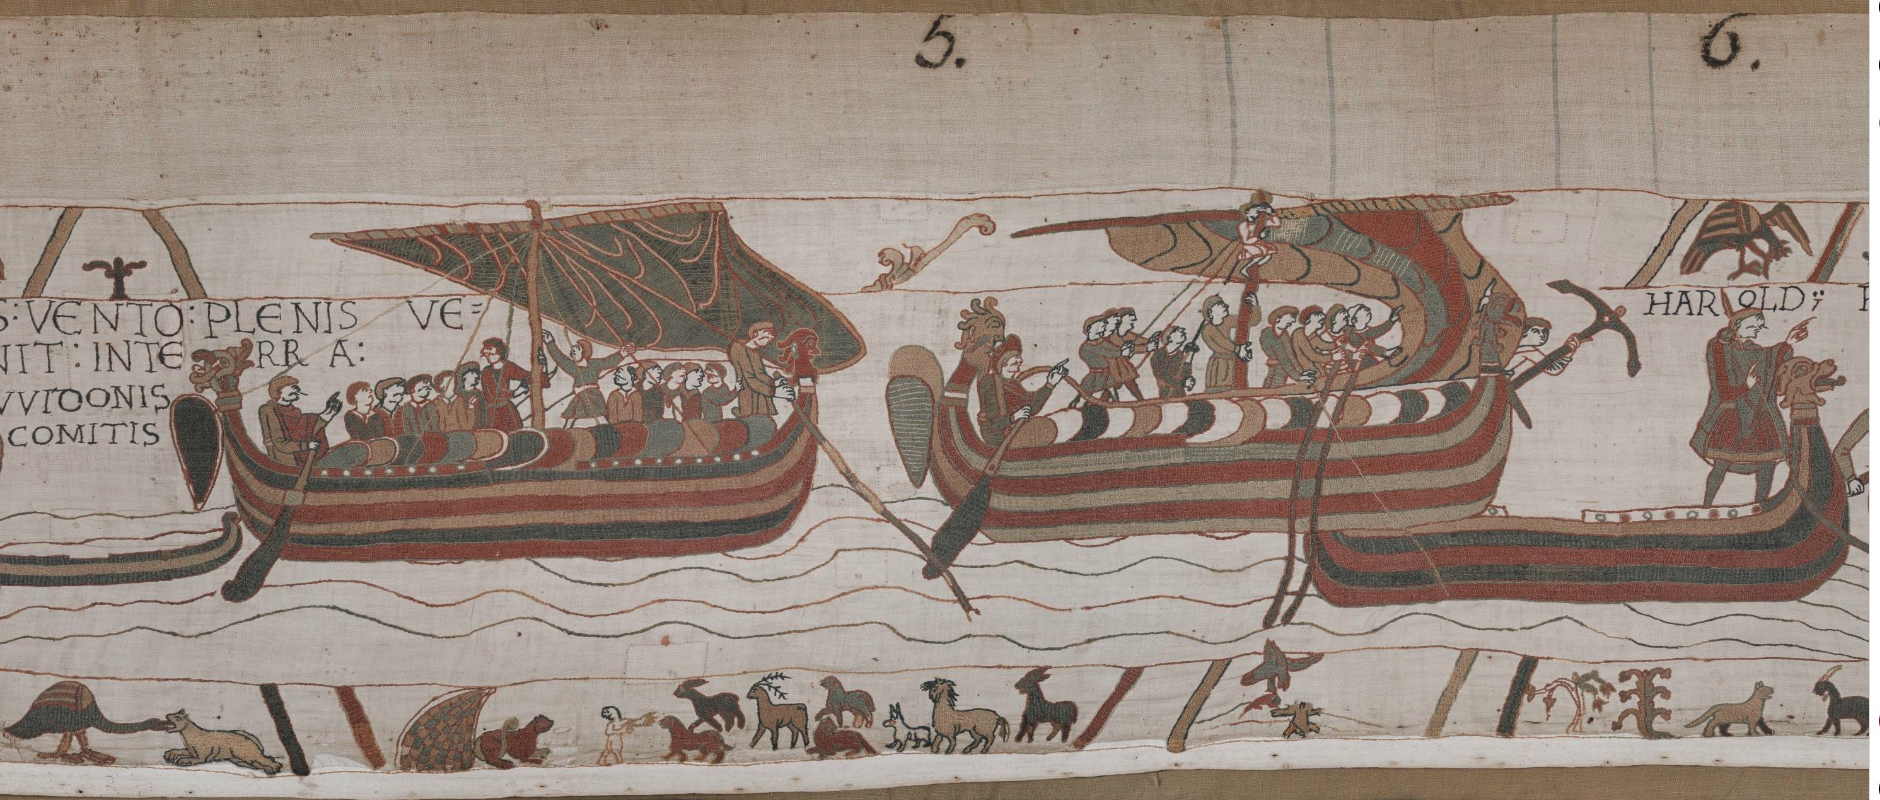
| Scene 5: ET VЄLIS VЄNTO PLЄNIS VЄNIT IN TERRAM VVIDONIS COMITIS | And, the wind full in his sails, he came to the country of Count Guy | Et, ses voiles remplies par le vent, il vint dans la terre du comte Guy [See a larger version of the image] |
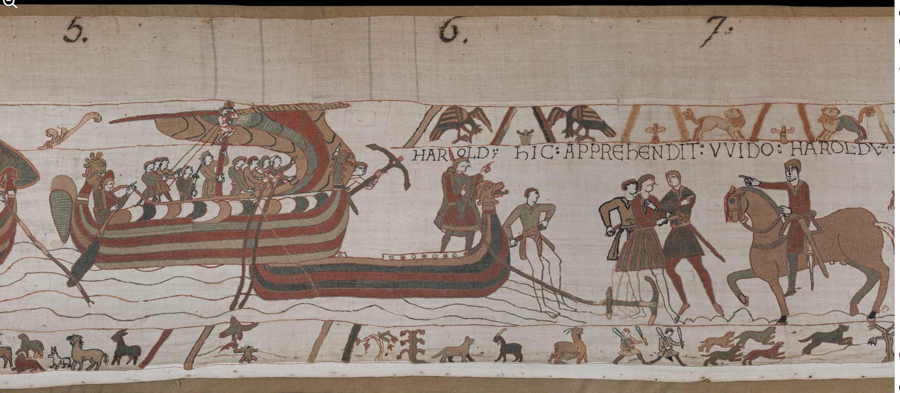 |
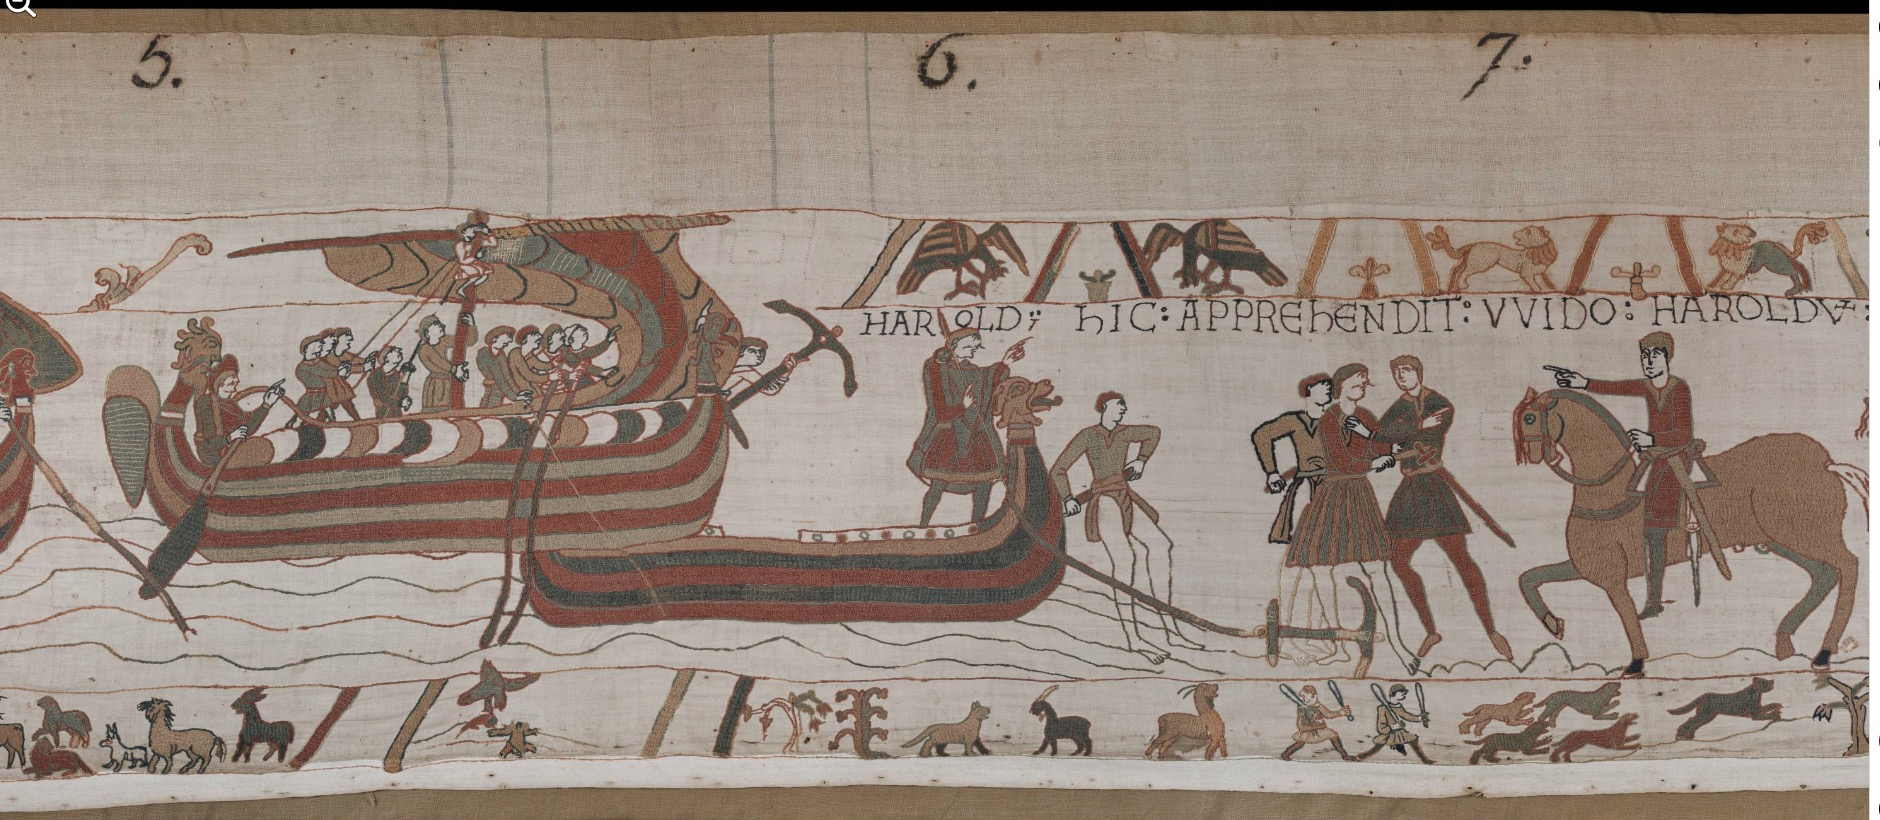
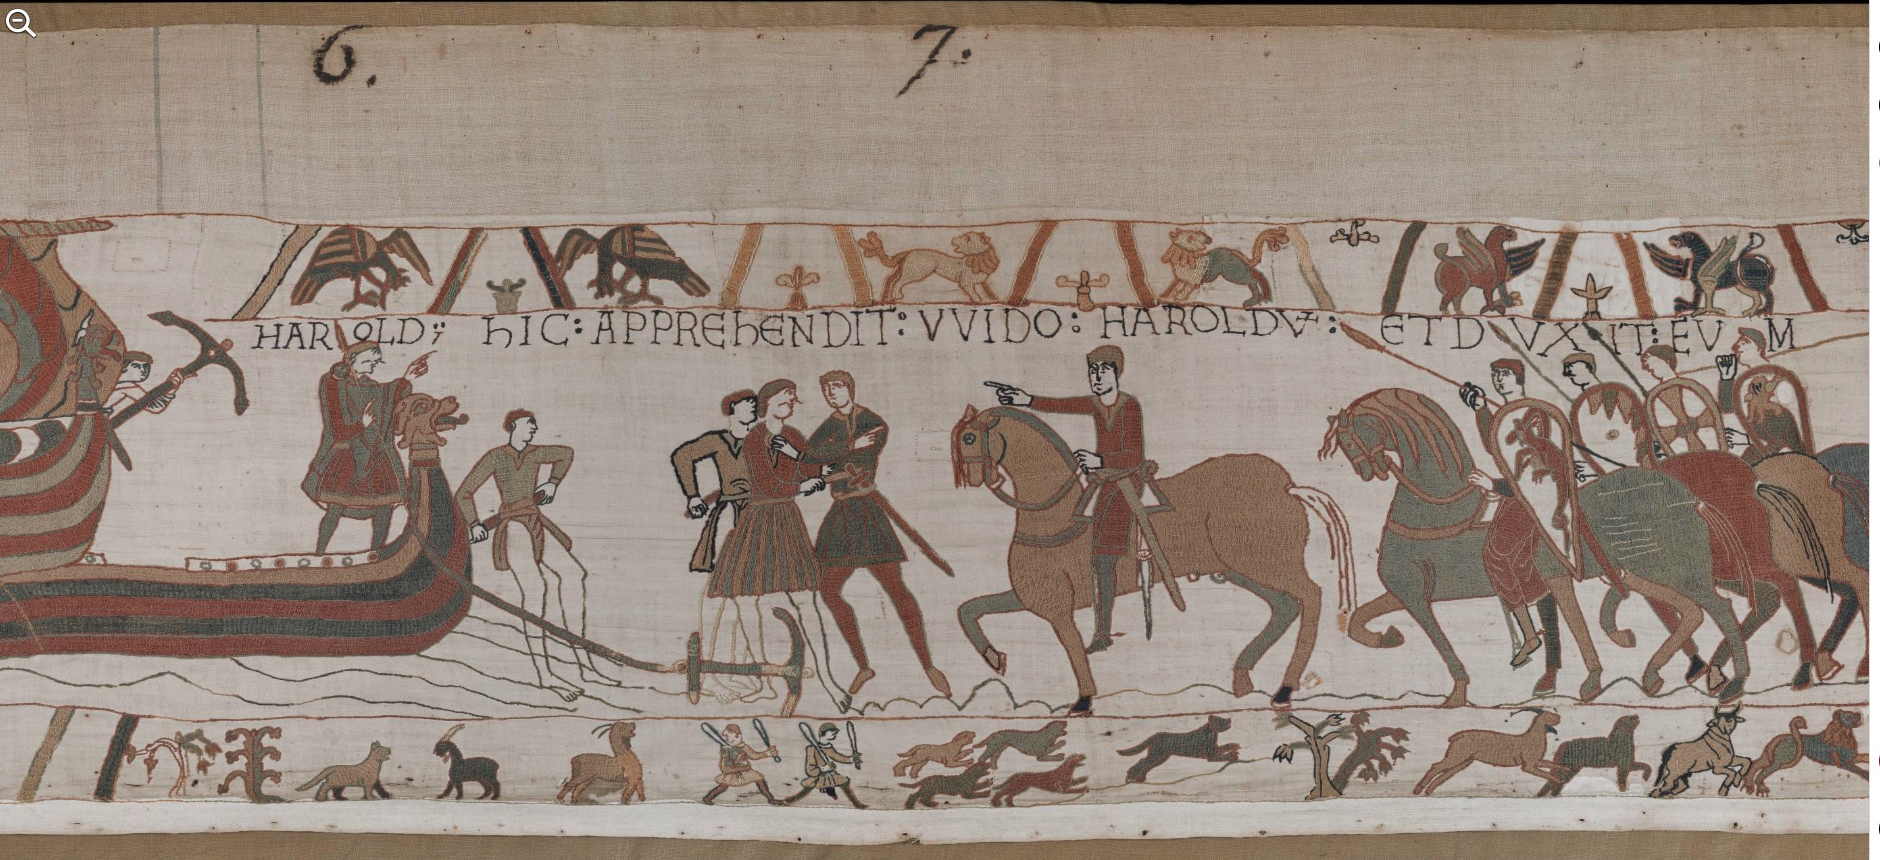
| Scene 6: HAROLD | Harold | Harold [See a larger version of the image] |
 |
| Scene 7: hIC APRЄhЄNDIT VVIDO HAROLDUM | Here Guy arrests Harold | Ici Guy se saisit de Harold [See a larger version of the image] |
 |
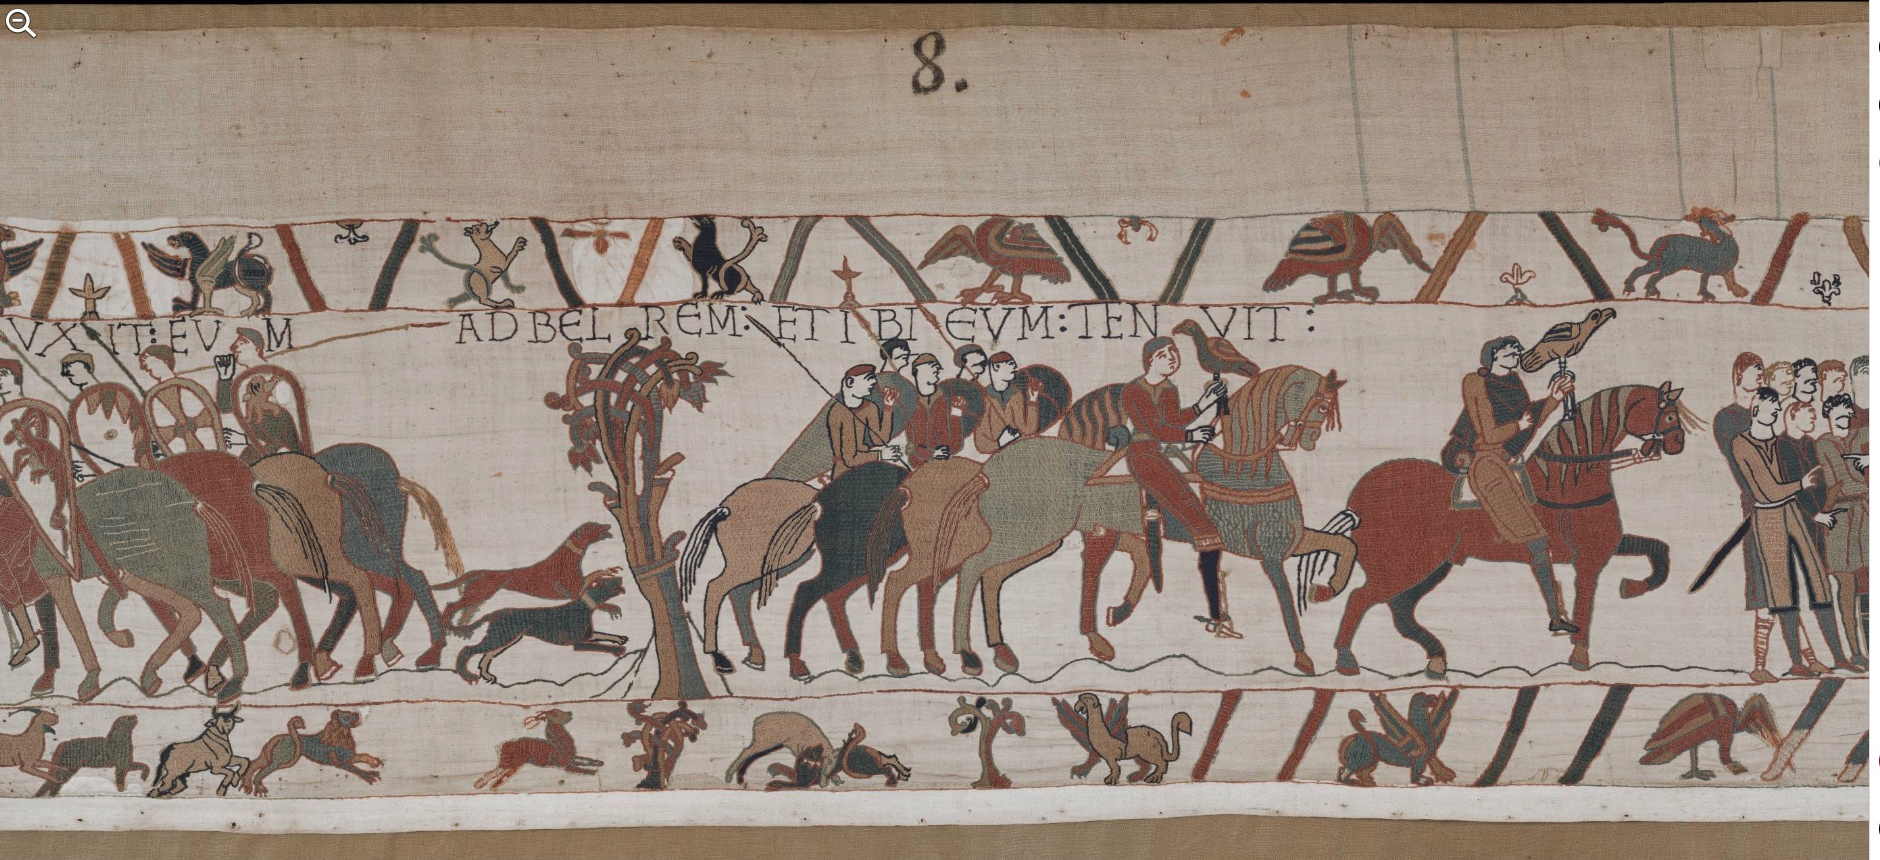
| Scene 8: ЄT DVXIT EVM AD BЄLRЄM ET IBI ЄVM TENVIT | And led him to Beaurain and kept him there | Et le mena à Beaurain et l’y retint [See a larger version of the image] |
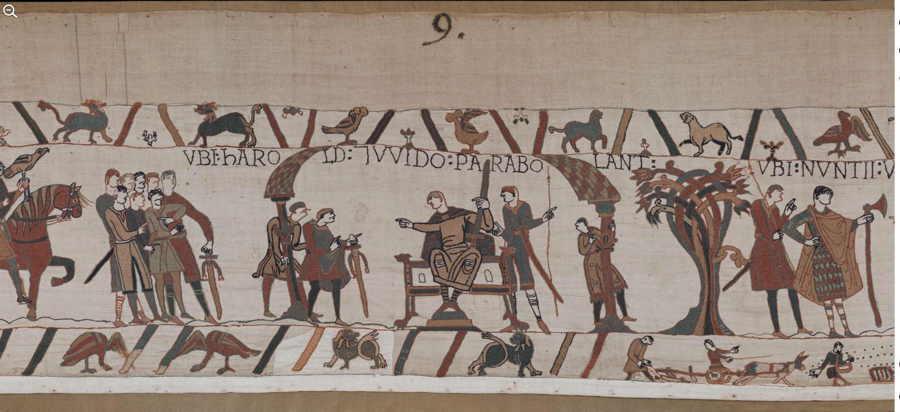 |
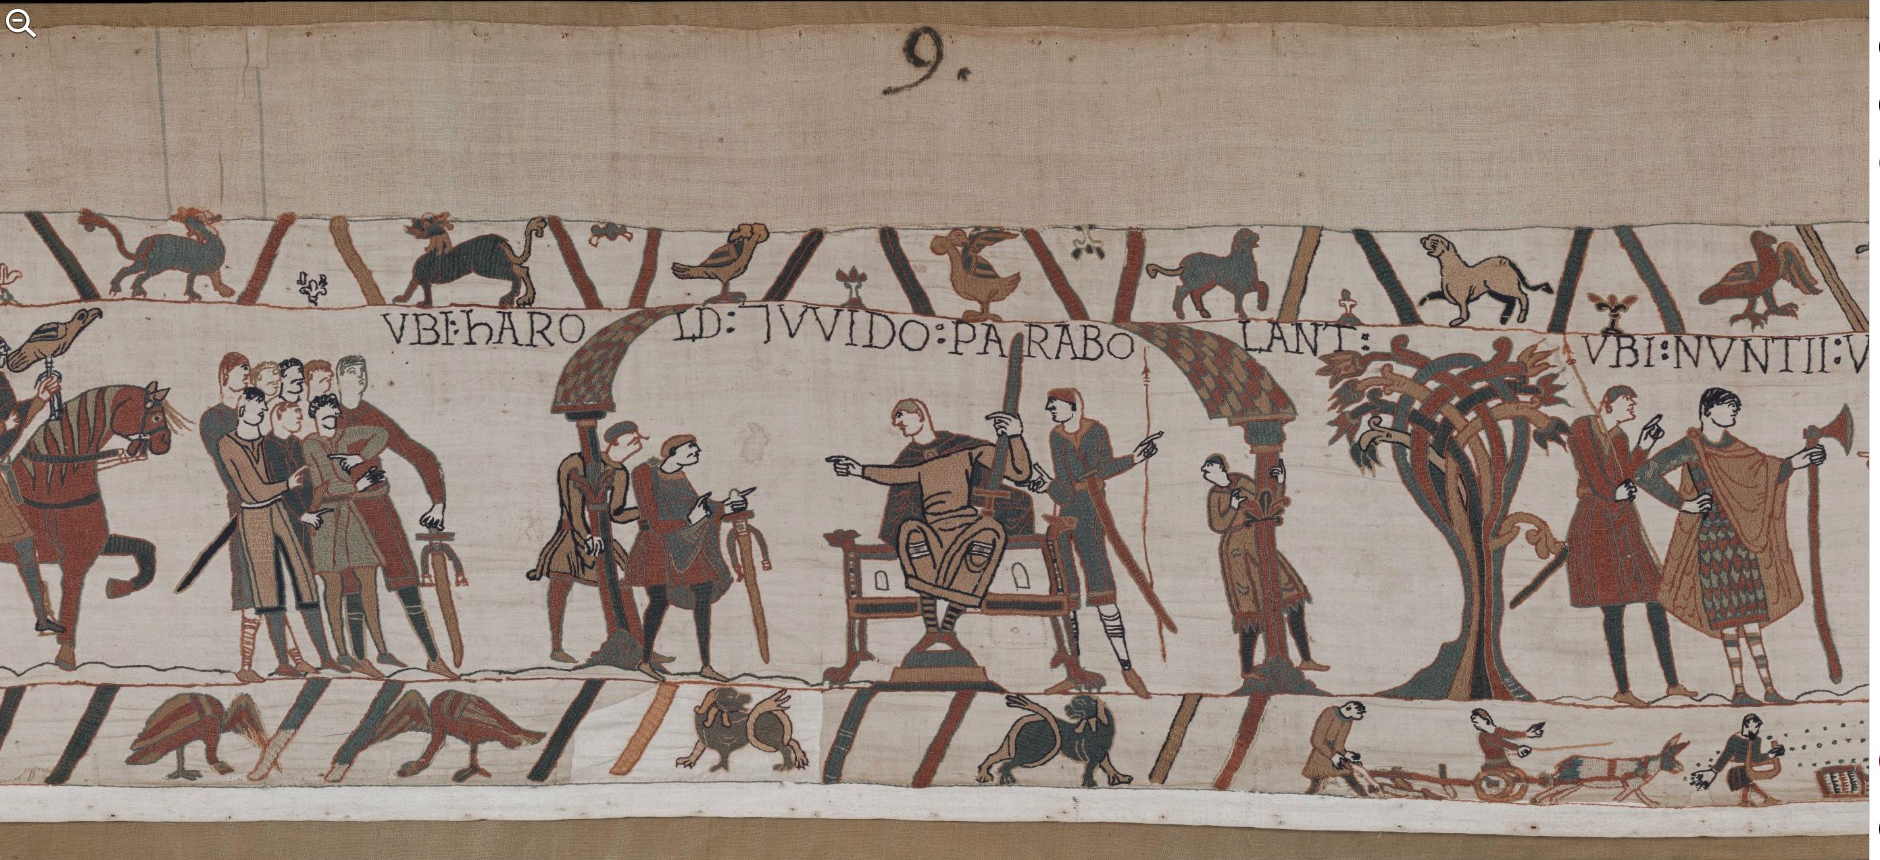
| Scene 9: VBI hAROLD ET VVIDO PARABOLANT | Where Harold and Guy talk | Où Harold et Guy parlent [See a larger version of the image] |
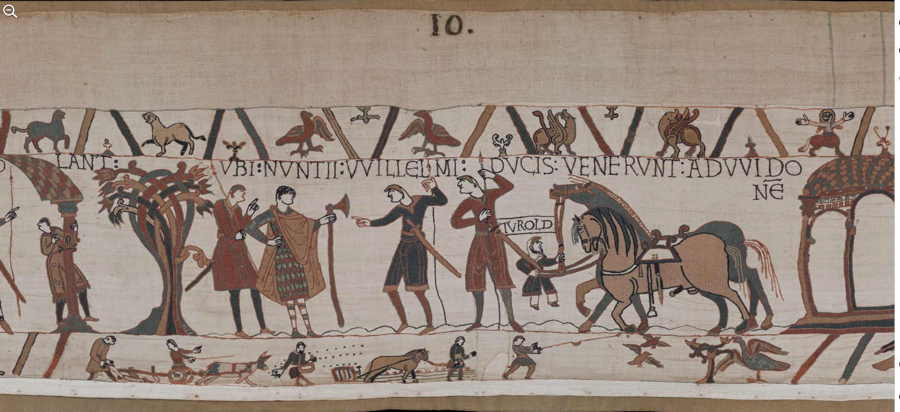 |
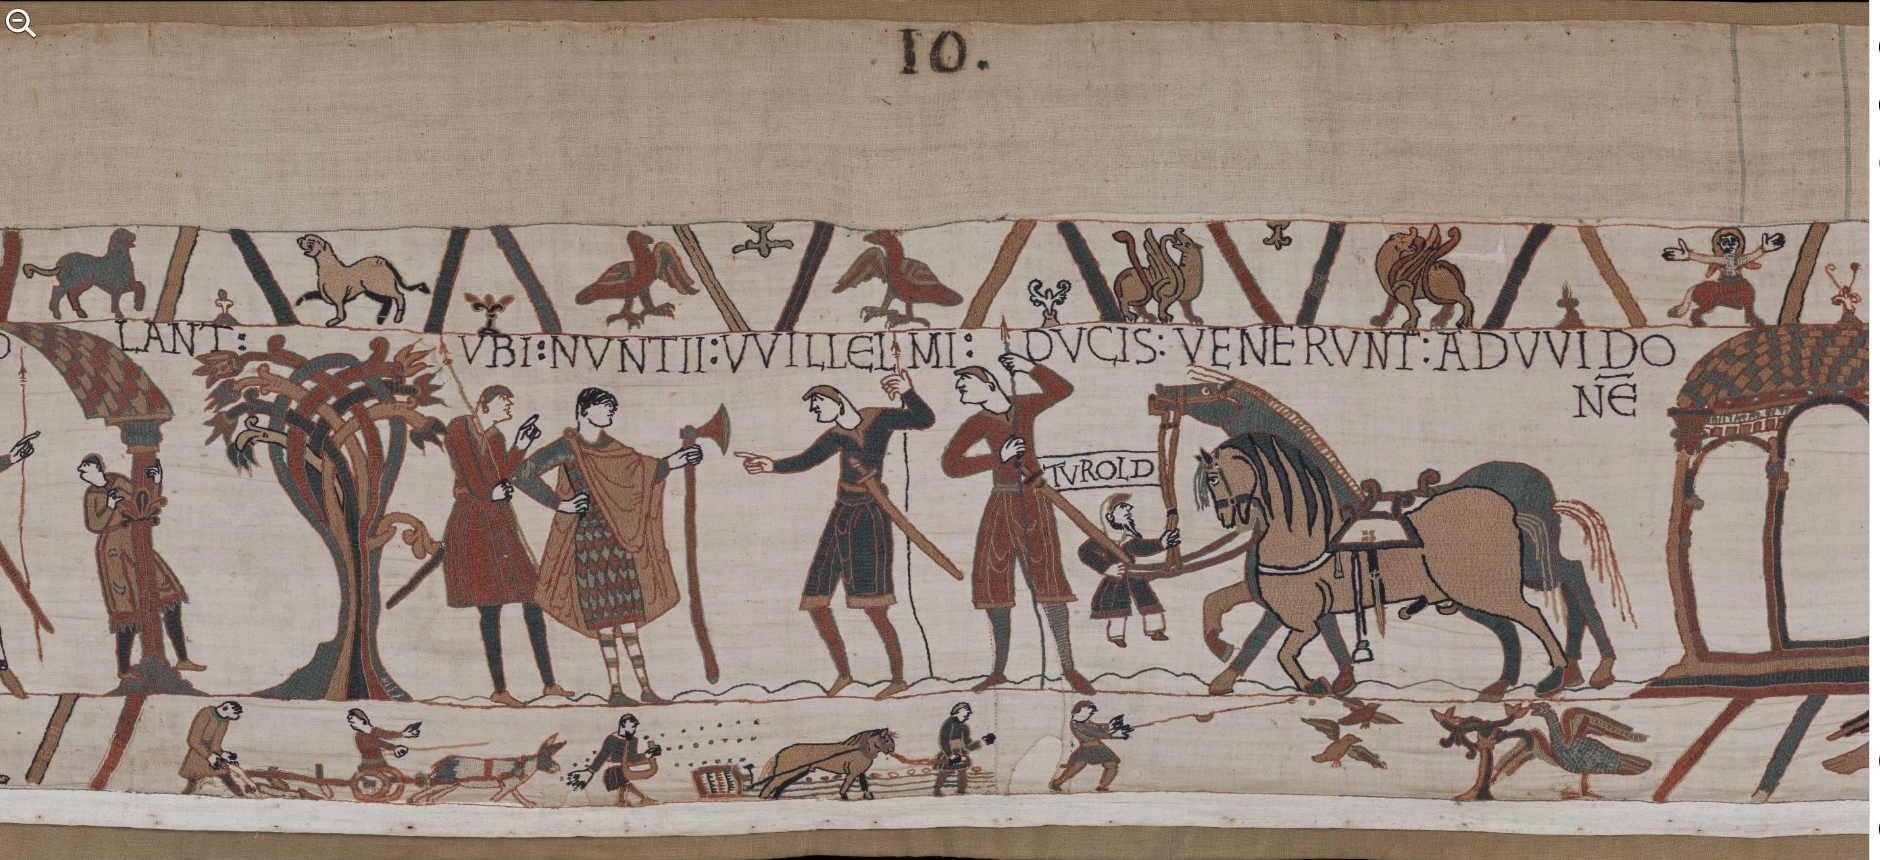
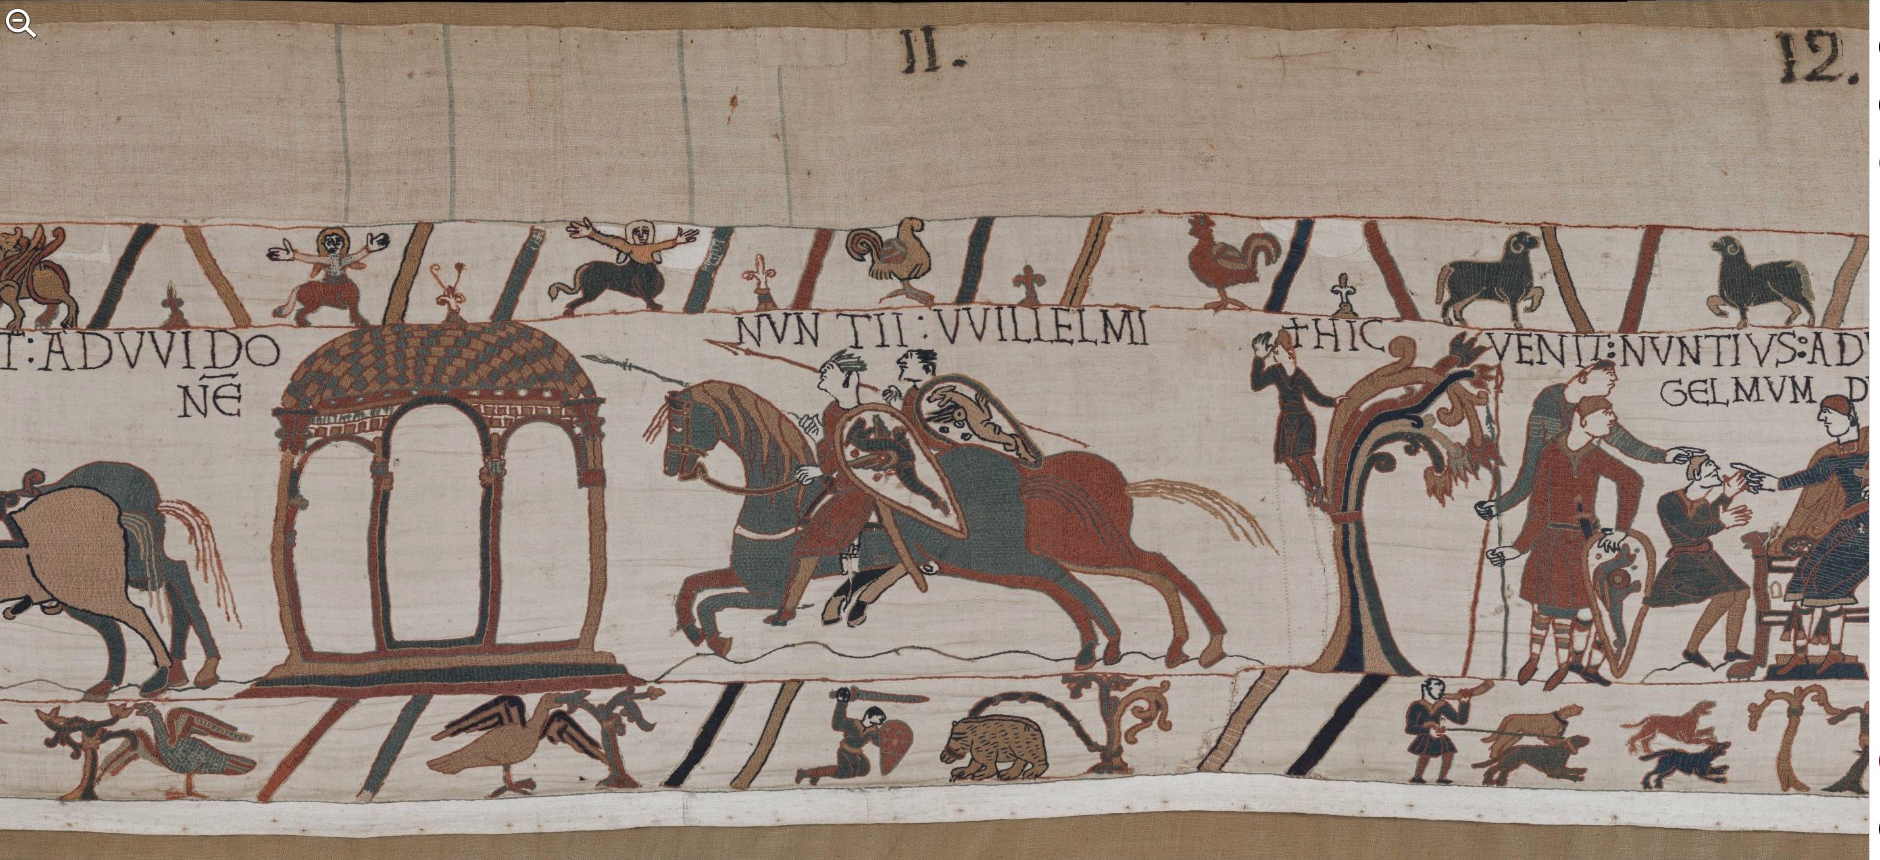
| Scene 10: VBI NVNTII VVILLELMI DVCIS VENERVNT AD VVIDONЄM TVROLD | Where the messengers of Duke William came to Guy Turold | Où les envoyés du duc Guillaume vinrent (trouver) Guy Turold [See a larger version of the image] |
 |
| Scene 11: NVNTII VVILLELMI | The messengers of William | Les messagers de Guillaume [See a larger version of the image] |
 |
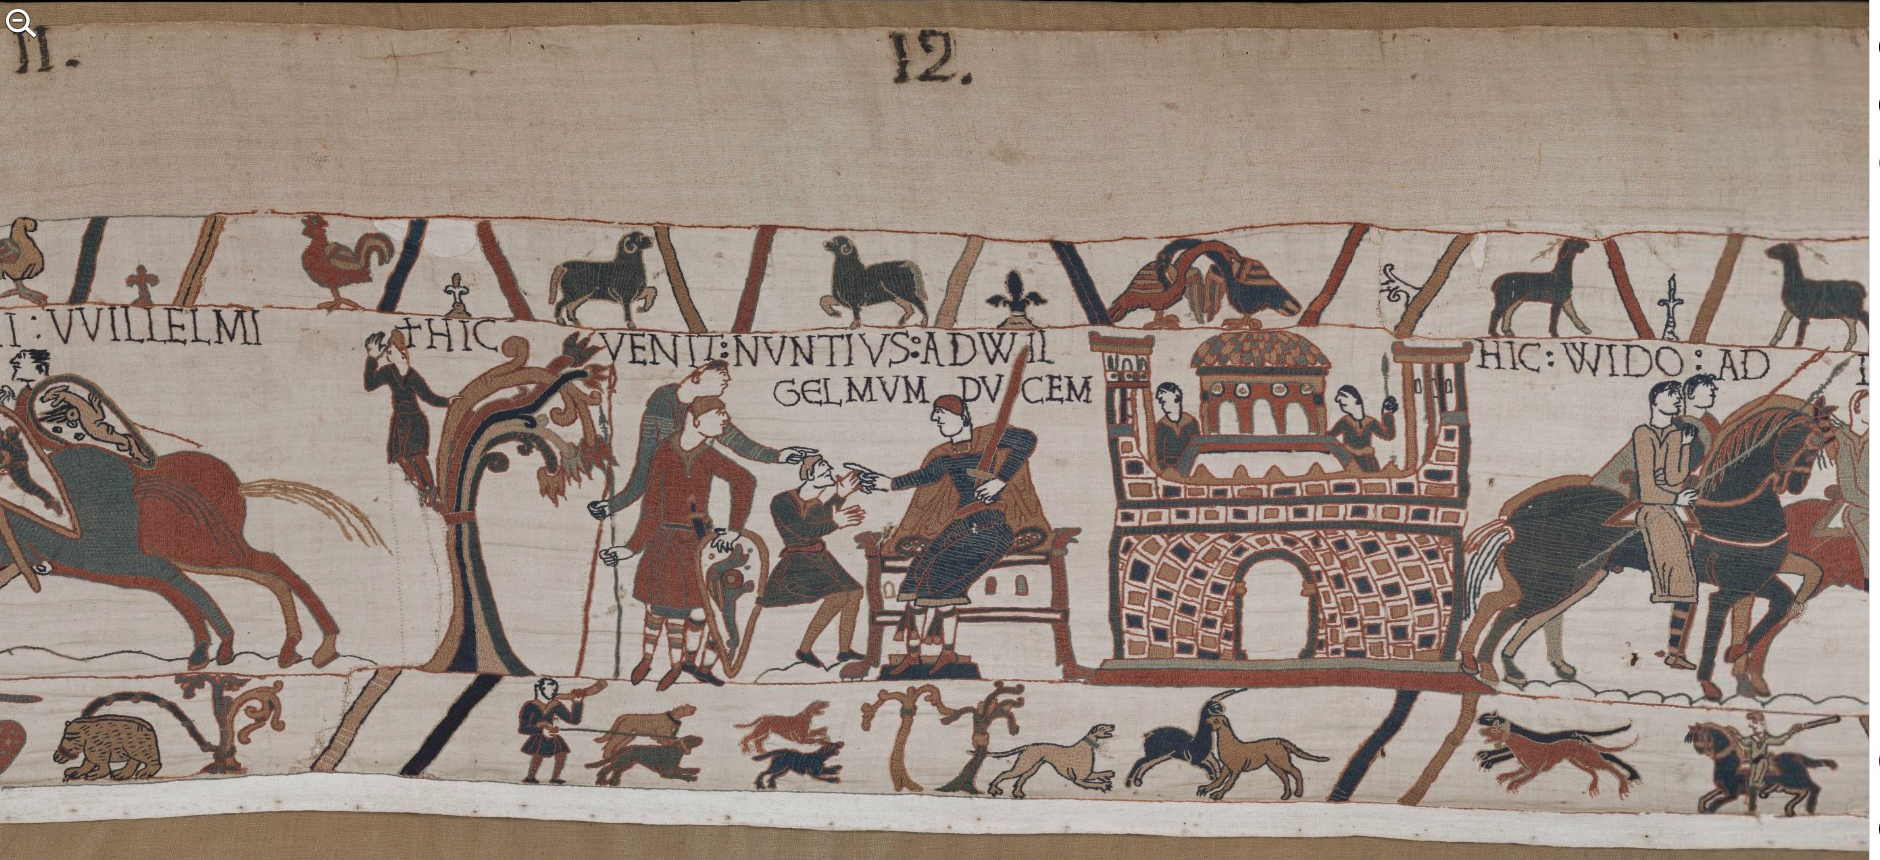
| Scene 12: † HIC VENIT NVNTIVS AD WILGЄLMVM DVCEM | † Here came a messenger to Duke William | † Ici un messager vint (auprès du) duc Guillaume [See a larger version of the image] |
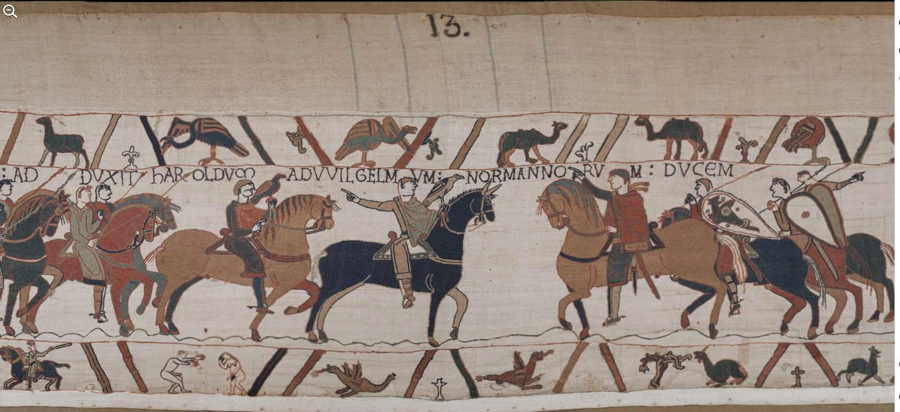 |
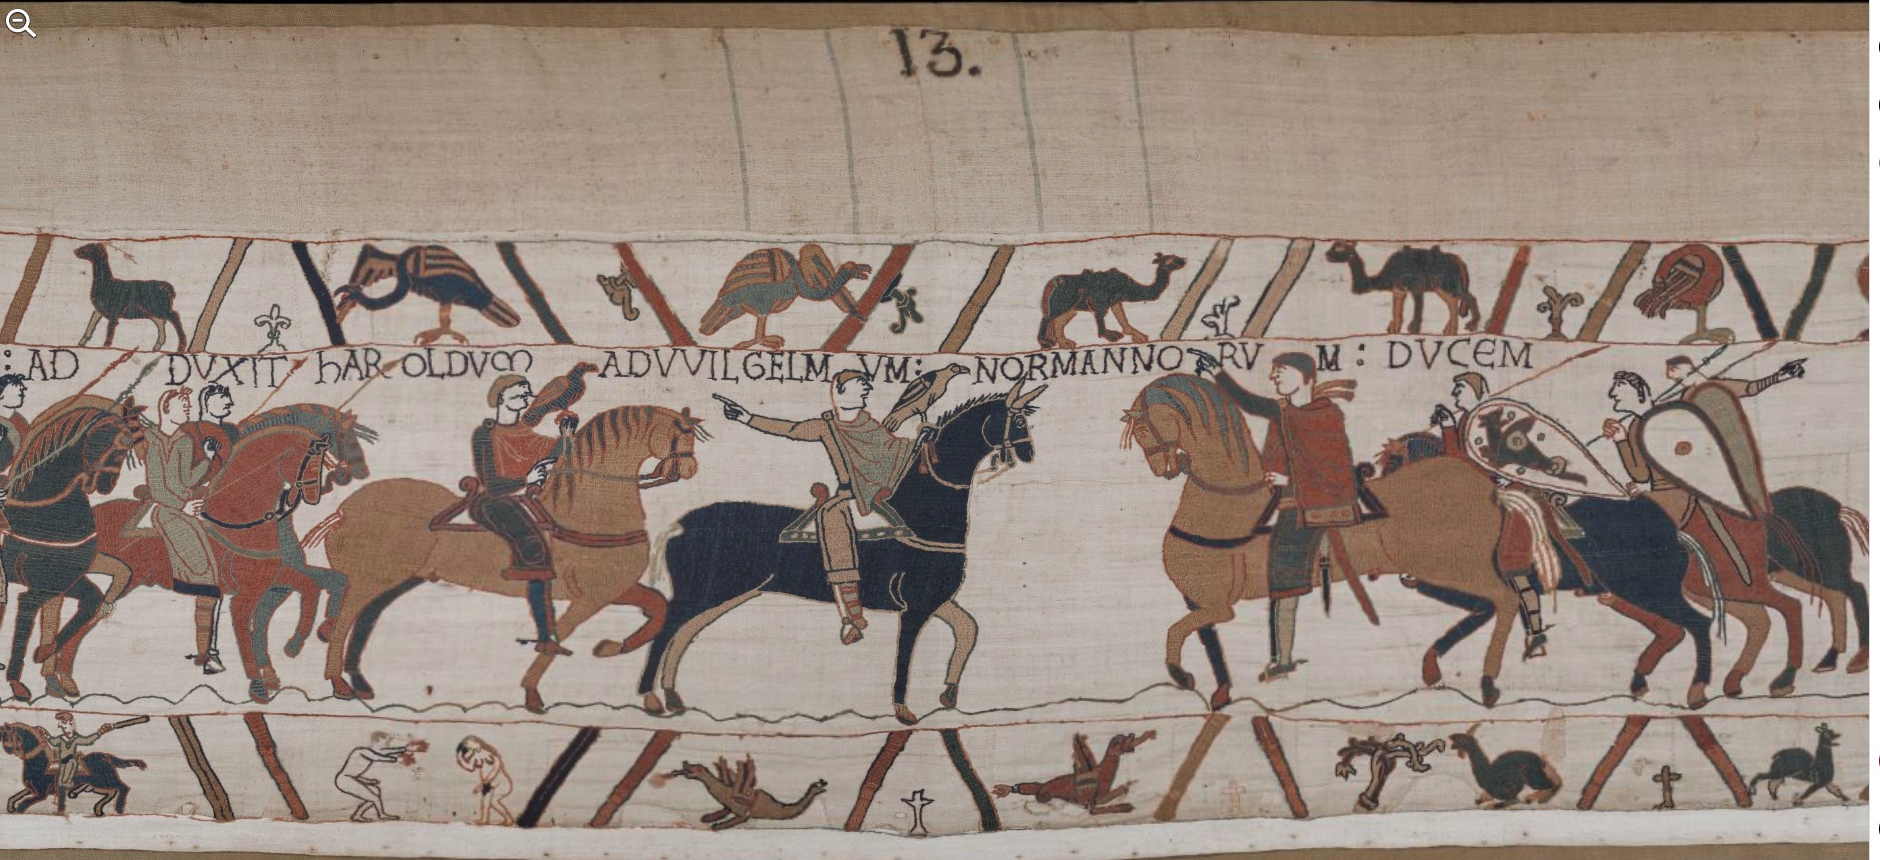
| Scene 13: HIC WIDO AD DVXIT hAROLDVM ADVVILGЄLMVM NORMANNORVM DVCЄM | Here Guy brought Harold to William Duke of the Normans | Ici Guy amena Harold à Guillaume duc des Normands [See a larger version of the image] |
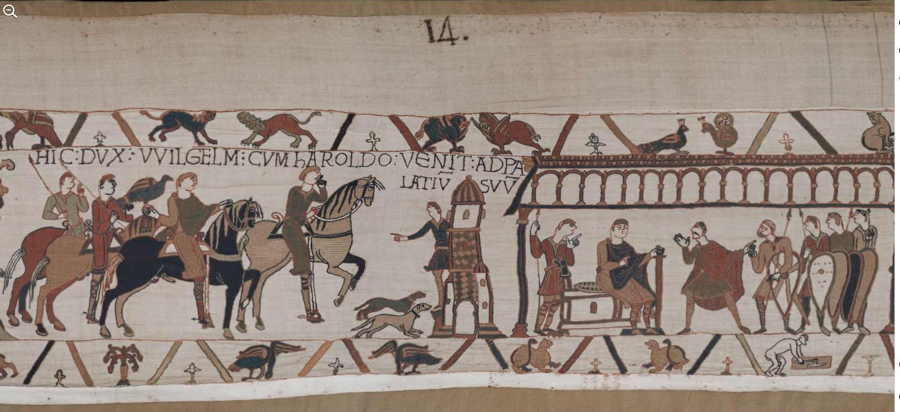 |
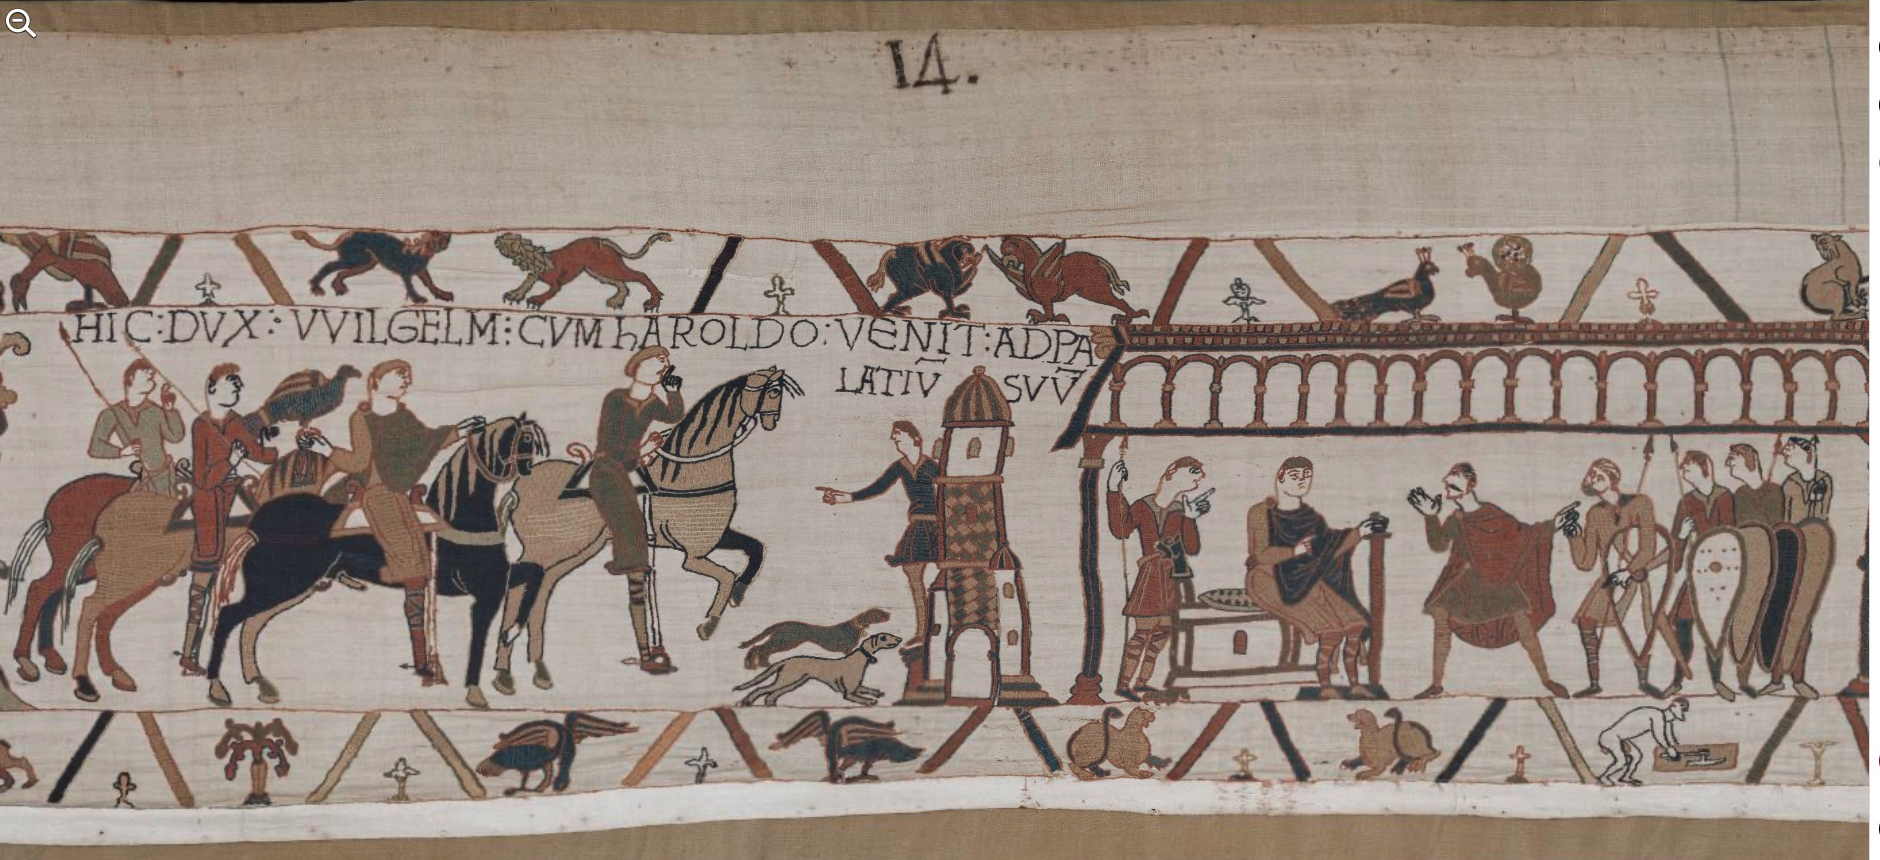
| Scene 14: HIC DVX VVILGELM CVM hAROLDO VЄNIT AD PALATIUM SVVM | Here Duke William came with Harold to his palace | Ici le duc Guillaume, avec Harold, vint à son palais [See a larger version of the image] |
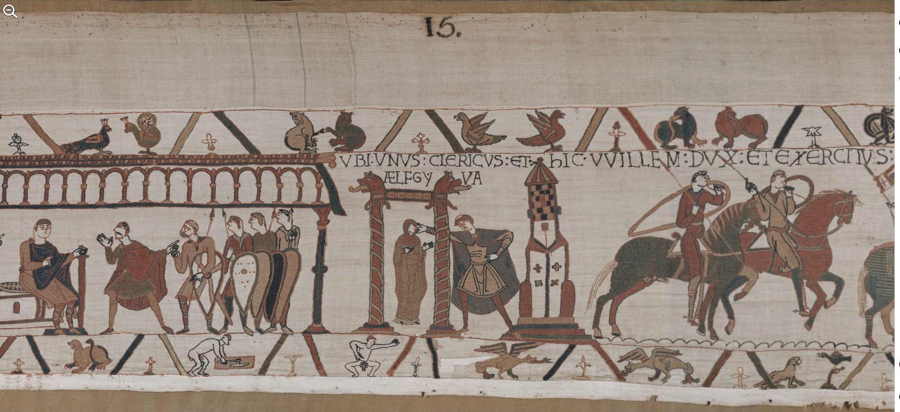 |
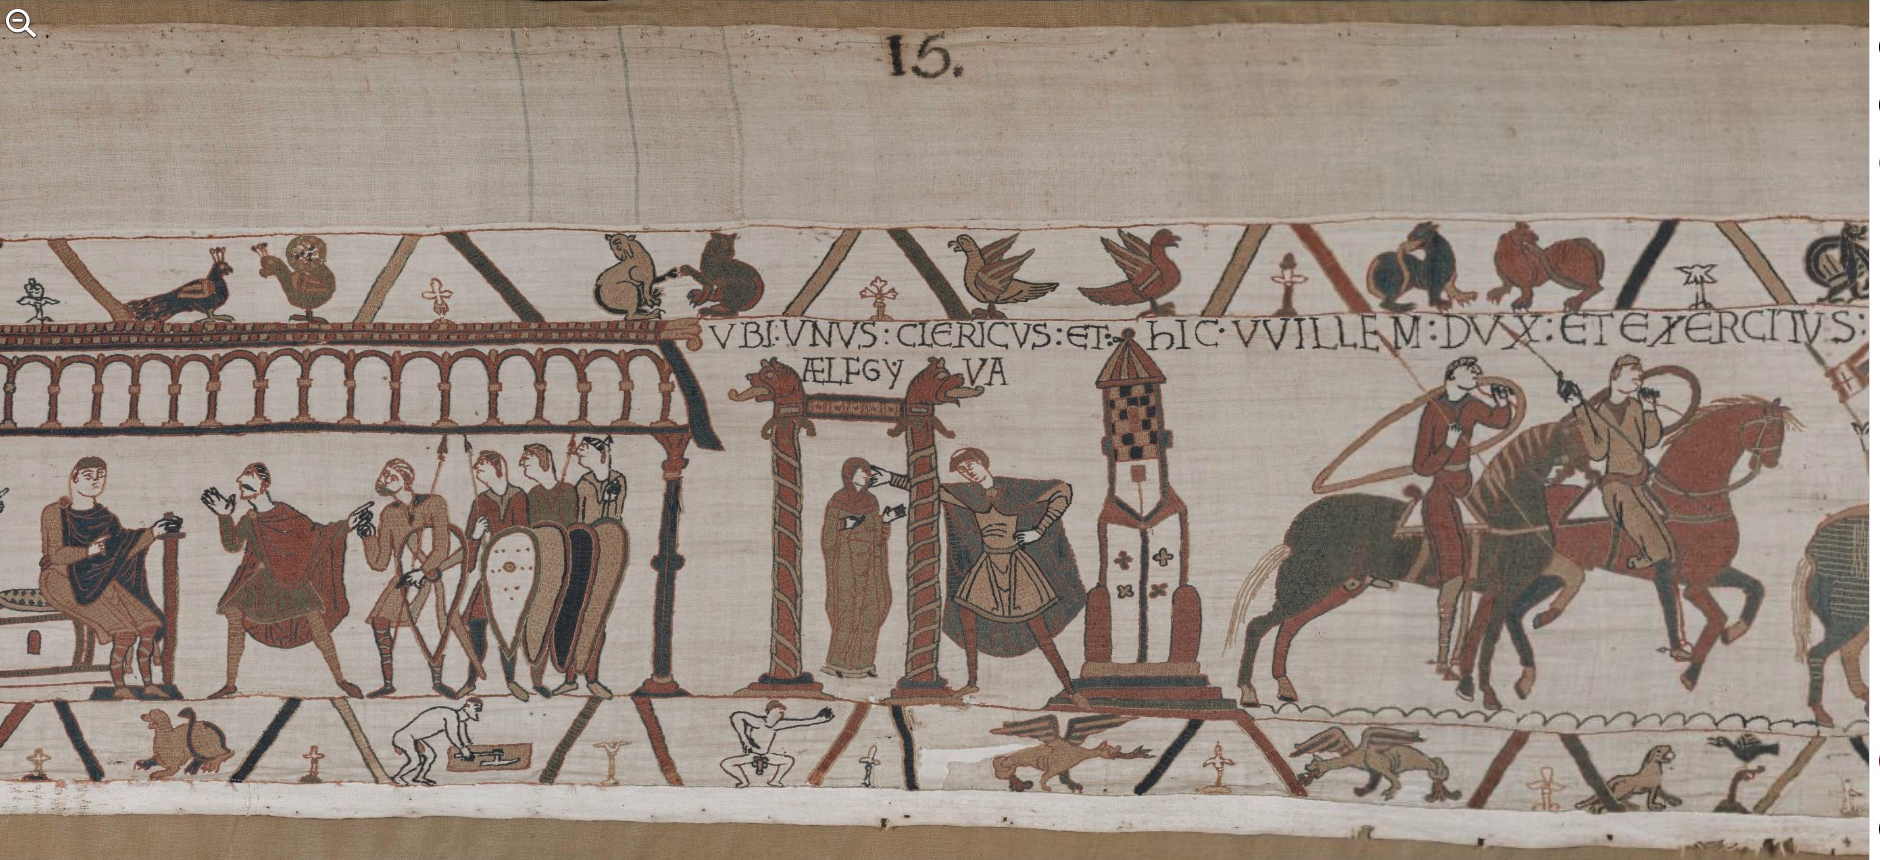
| Scene 15: VBI VNVS CLЄRICVS ЄT ÆLFGYVA | Where a certain cleric and Ælfgyva | Où un clerc et Ælfgyva [See a larger version of the image] |
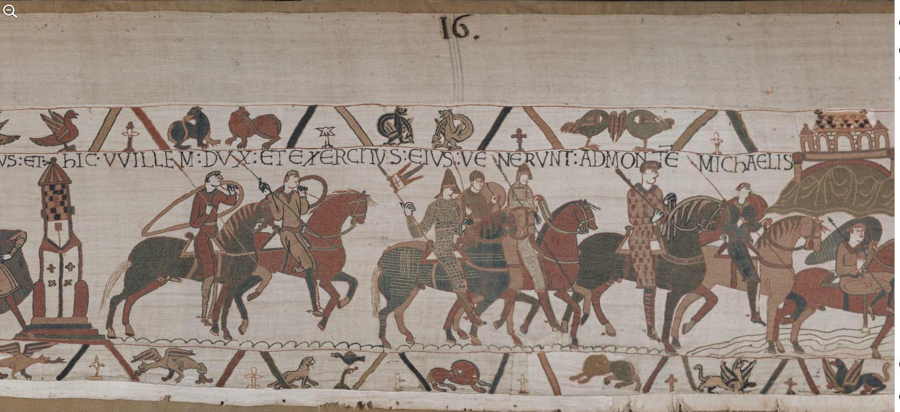 |
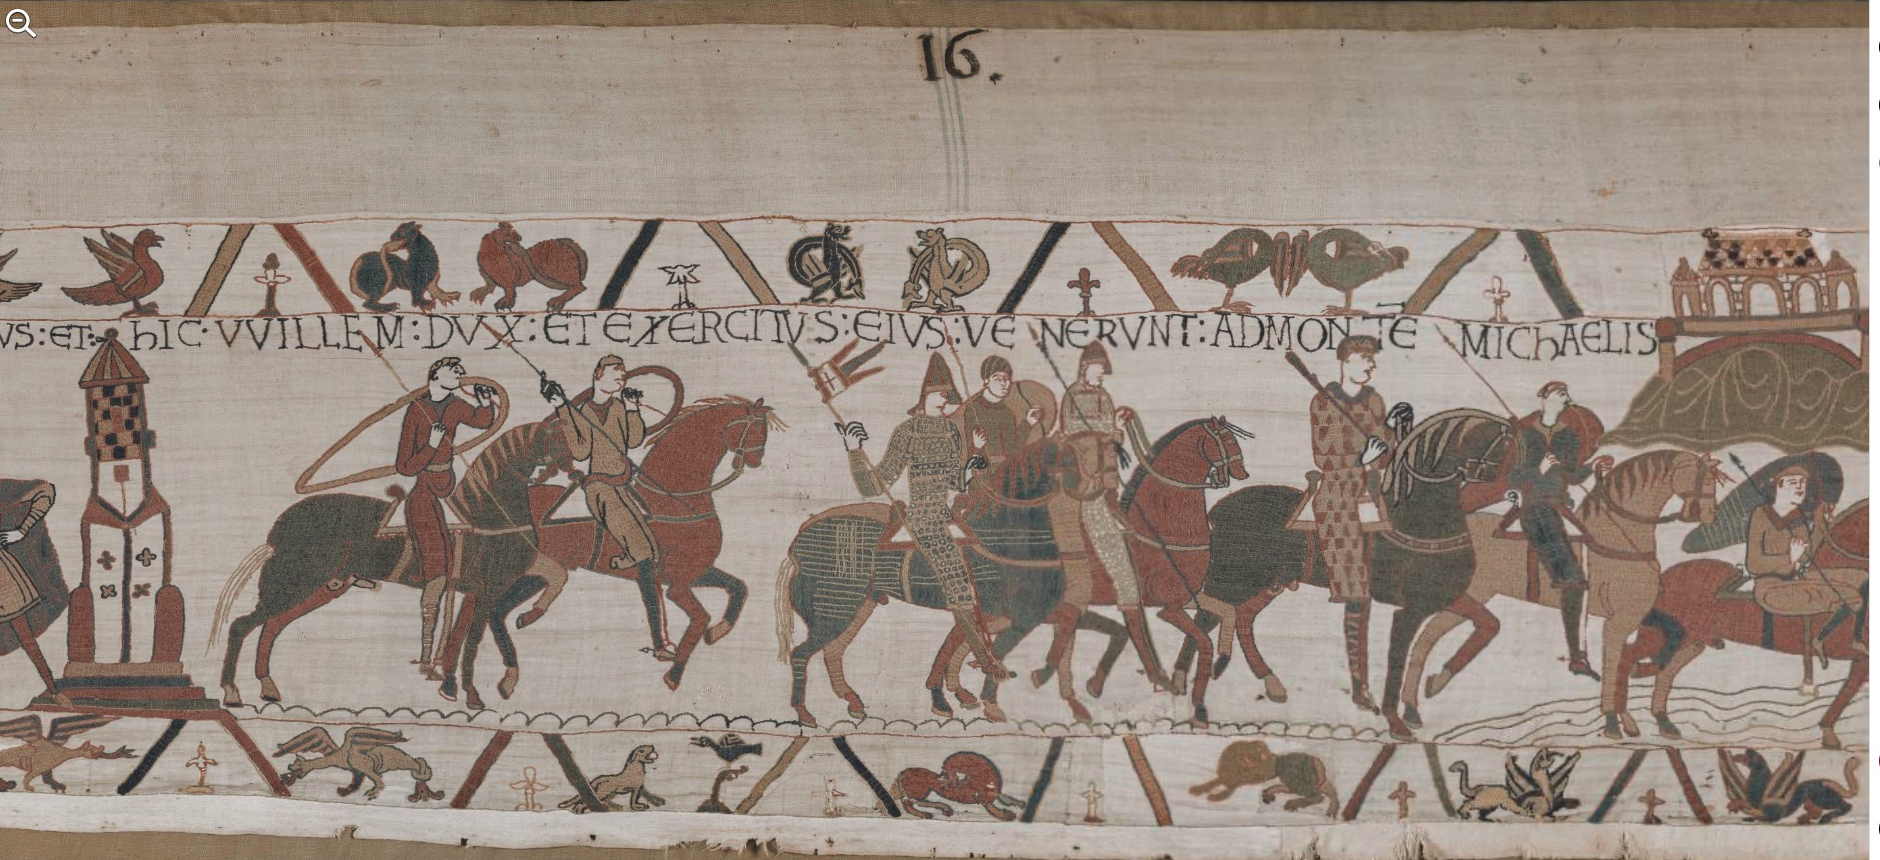
| Scene 16: HIC VVILLEM DVX ЄT ЄXЄRCITVS EIVS VЄNЄRVNT AD MONTЄ MIChAЄLIS | Here Duke William and his army came to Mont St Michel | Ici le duc Guillaume et son armée vinrent au Mont (Saint) Michel [See a larger version of the image] |
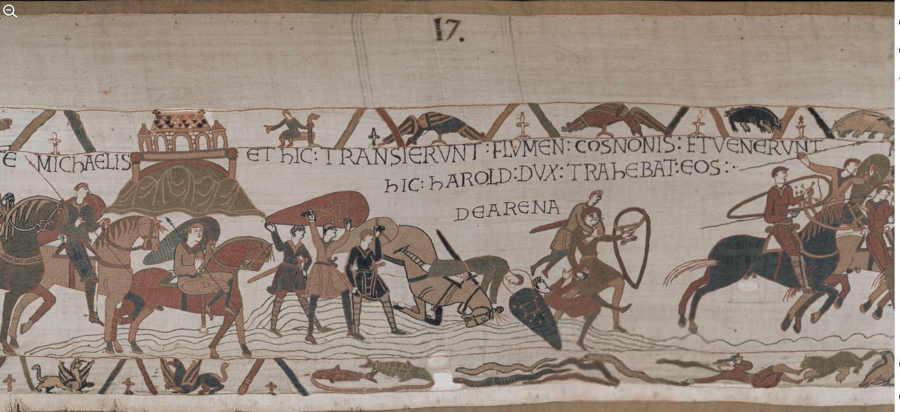 |
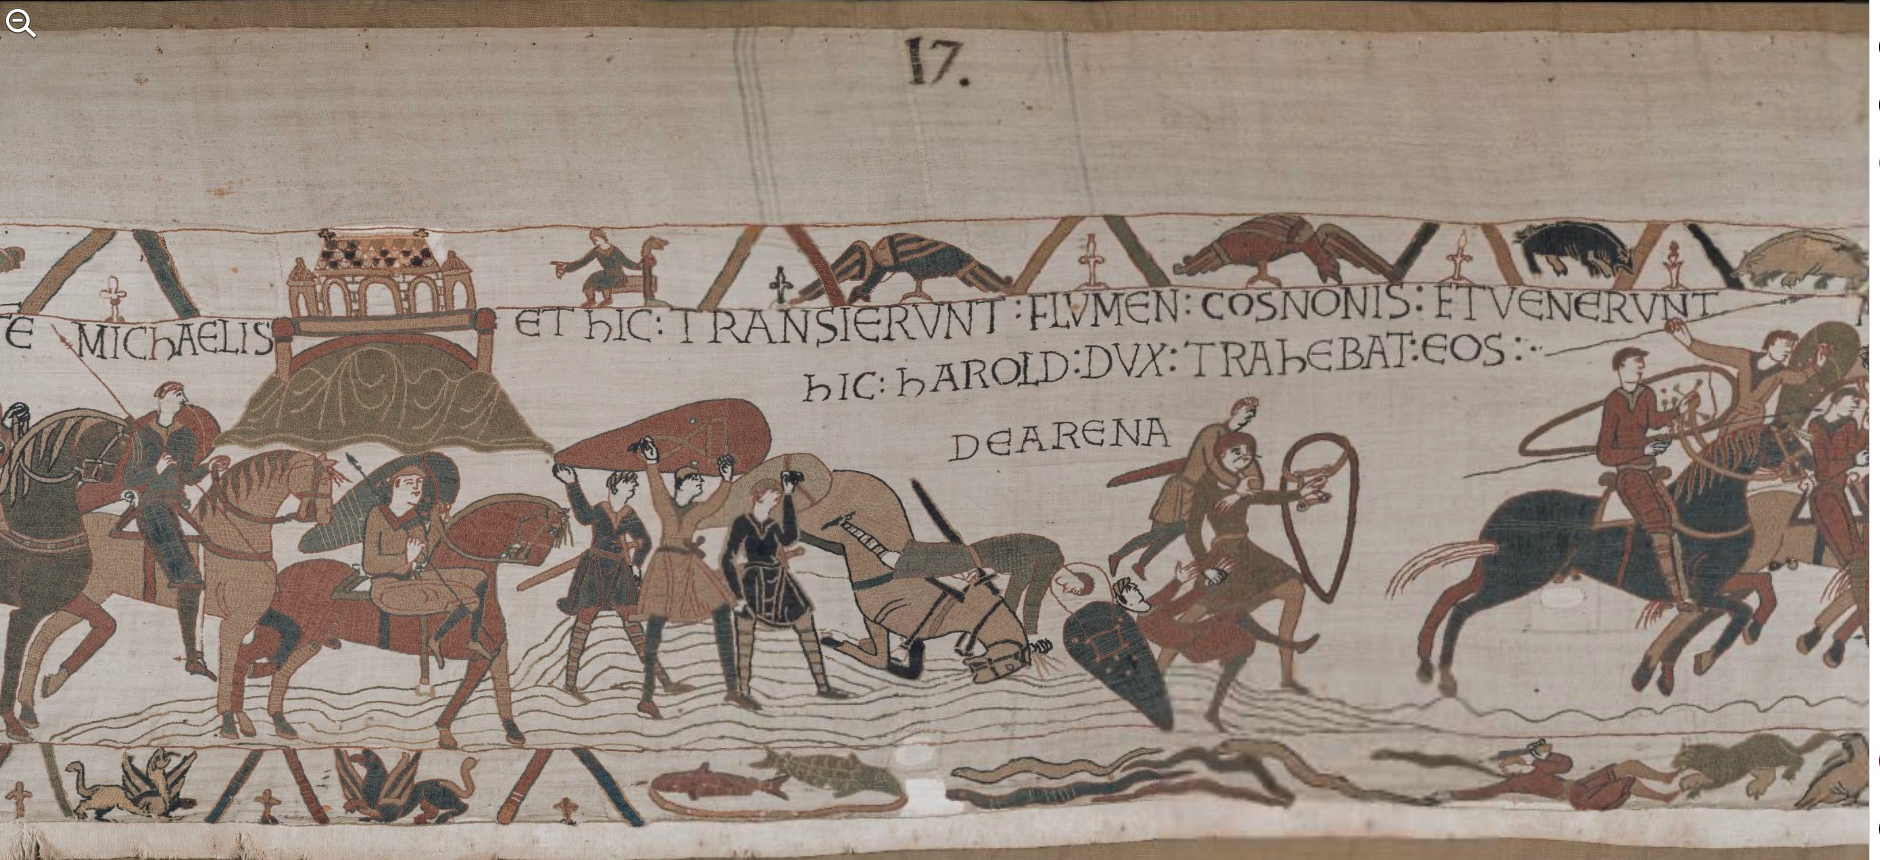
| Scene 17: ЄT HIC TRANSIЄRVNT FLVMЄN COSNONIS HIC hAROLD DVX TRAhЄBAT ЄOS DЄ ARЄNA | And here they crossed the river Couesnon Here Duke Harold pulled them out of the sand | Et ici, ils franchirent le fleuve du Couesnon Ici, le duc Harold les retirait du sable [See a larger version of the image] |
 |
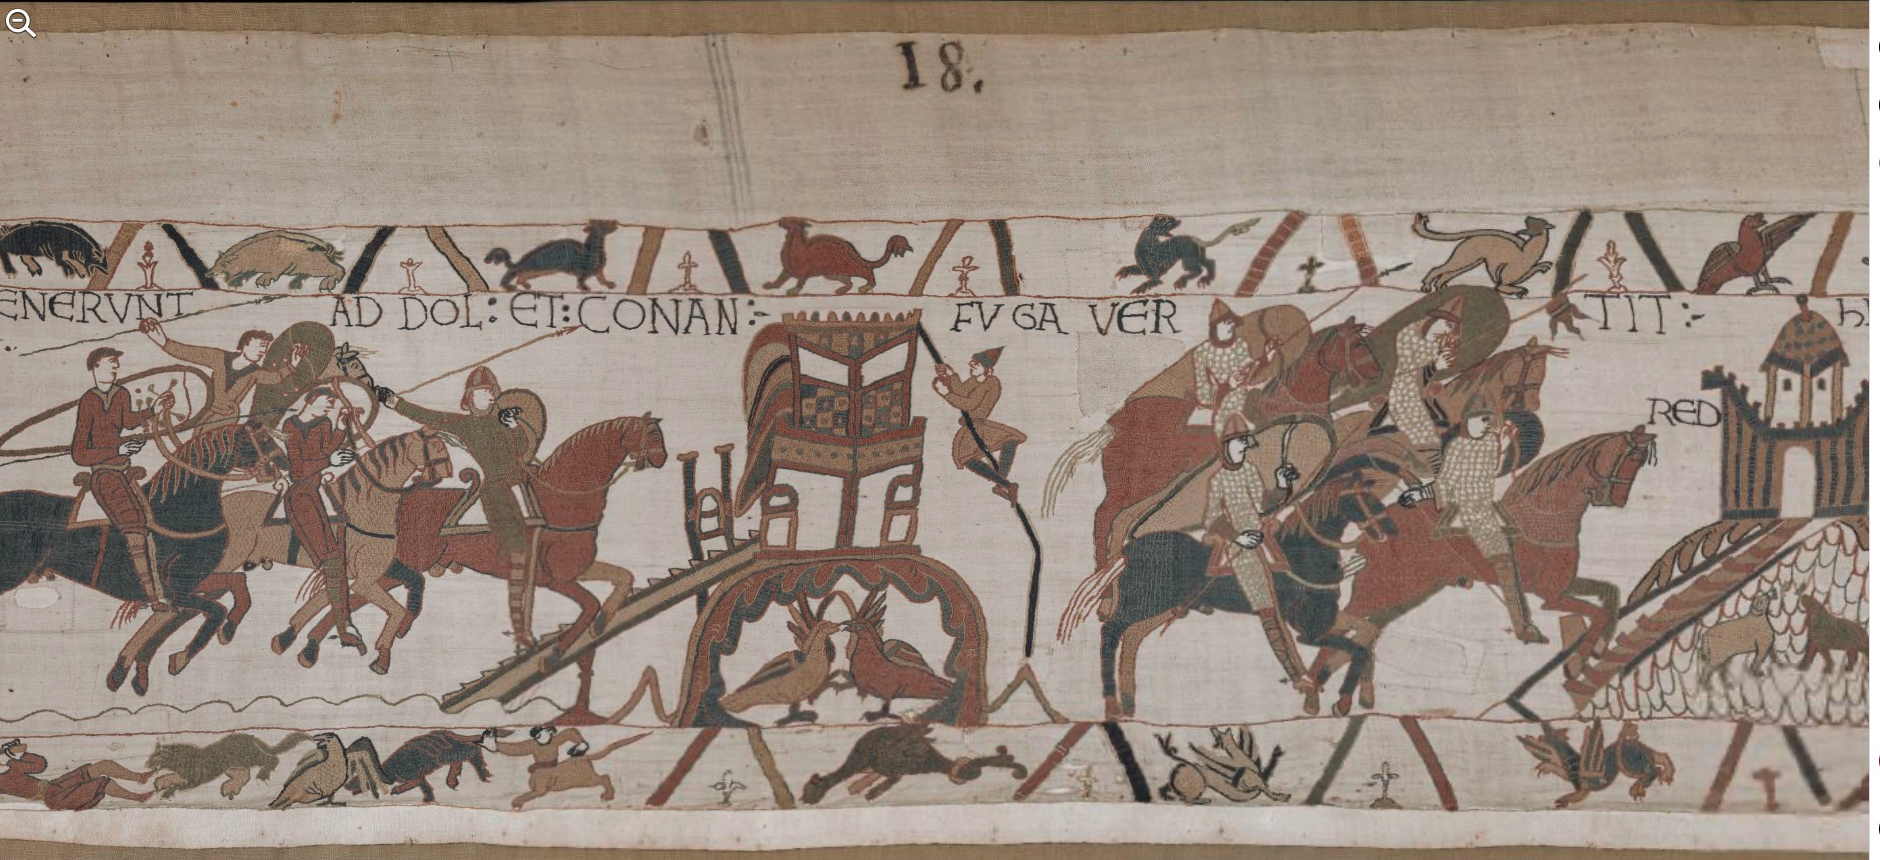
| Scene 18: ЄT VЄNЄRVNT AD DOL ЄT CONAN FVGA VЄRTIT RЄDNЄS | And they came to Dol and Conan turned to flight Rennes | Et ils vinrent à Dol, et Conan prit la fuite Rennes [See a larger version of the image] |
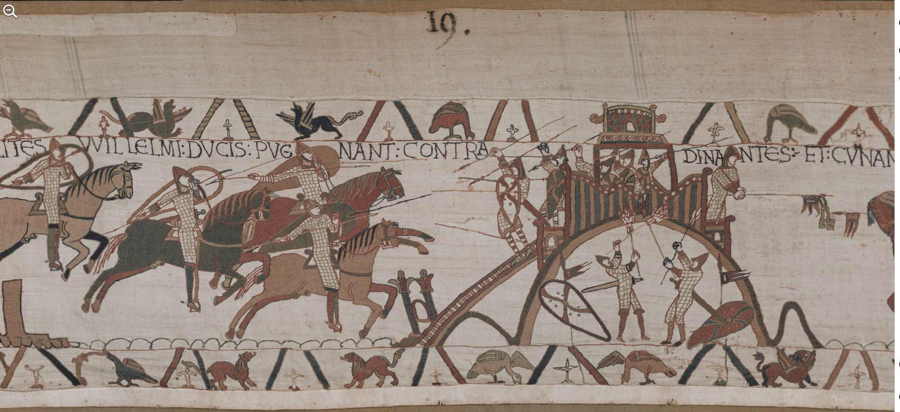 |
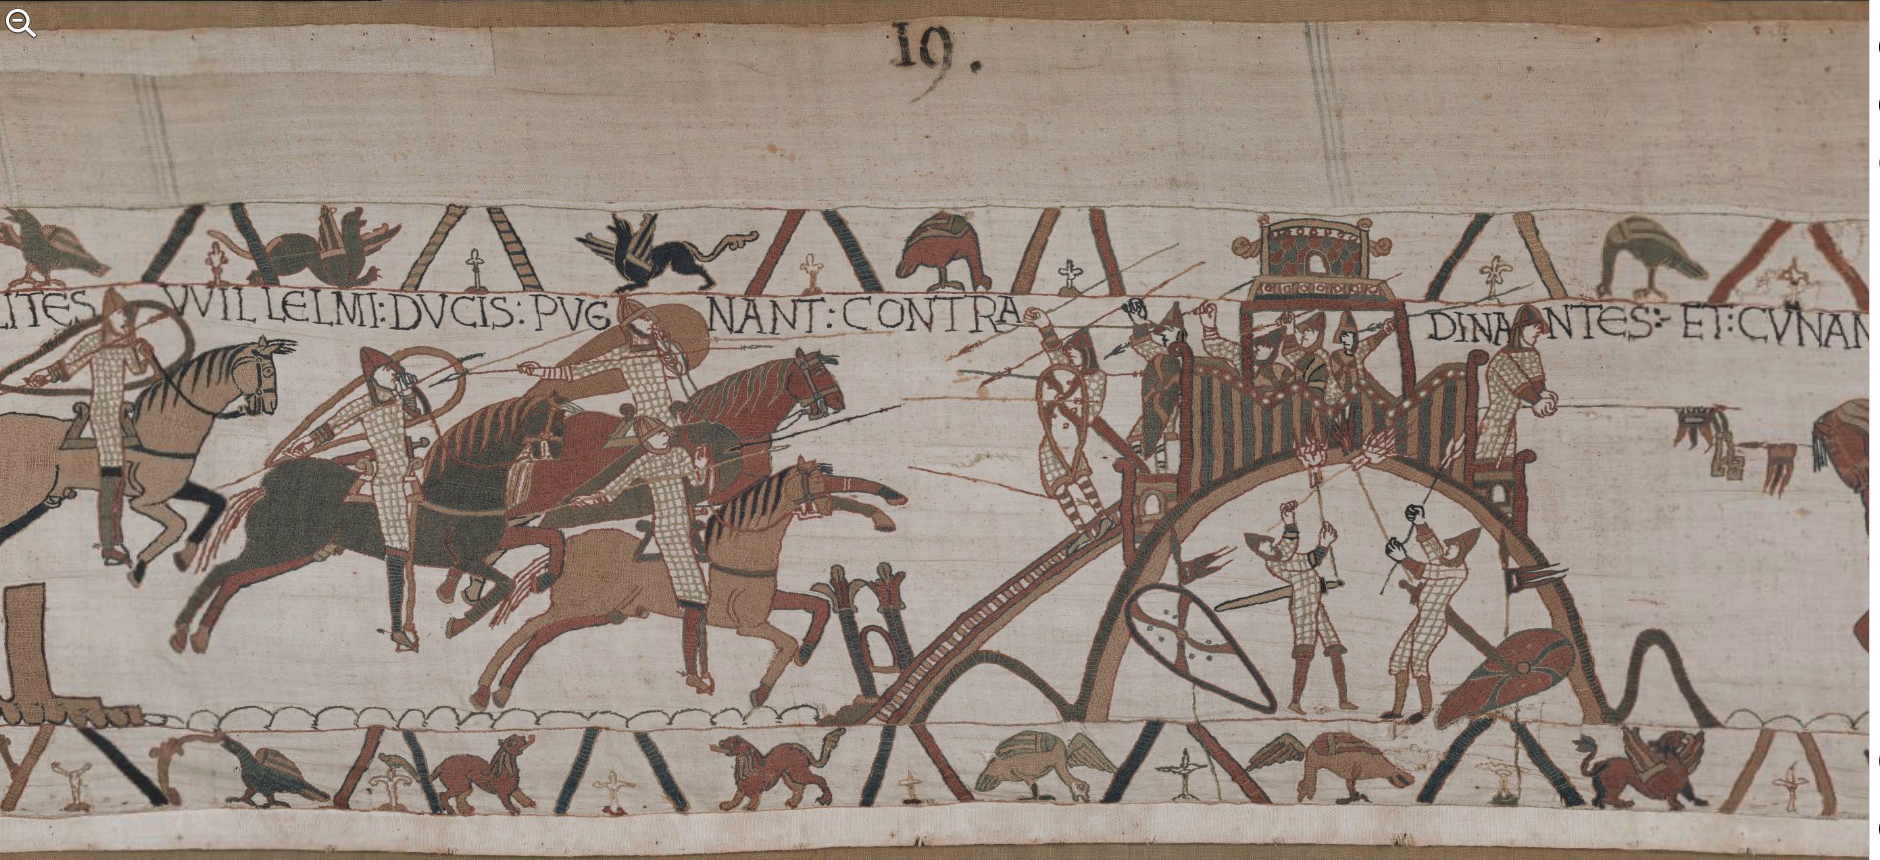
| Scene 19: hIC MILITЄS VVILLЄLMI DVCIS PVGNANT CONTRA DINANTЄS | Here Duke William’s soldiers fight against the men of Dinan | Ici les chevaliers du duc Guillaume combattent contre Dinan [See a larger version of the image] |
 |
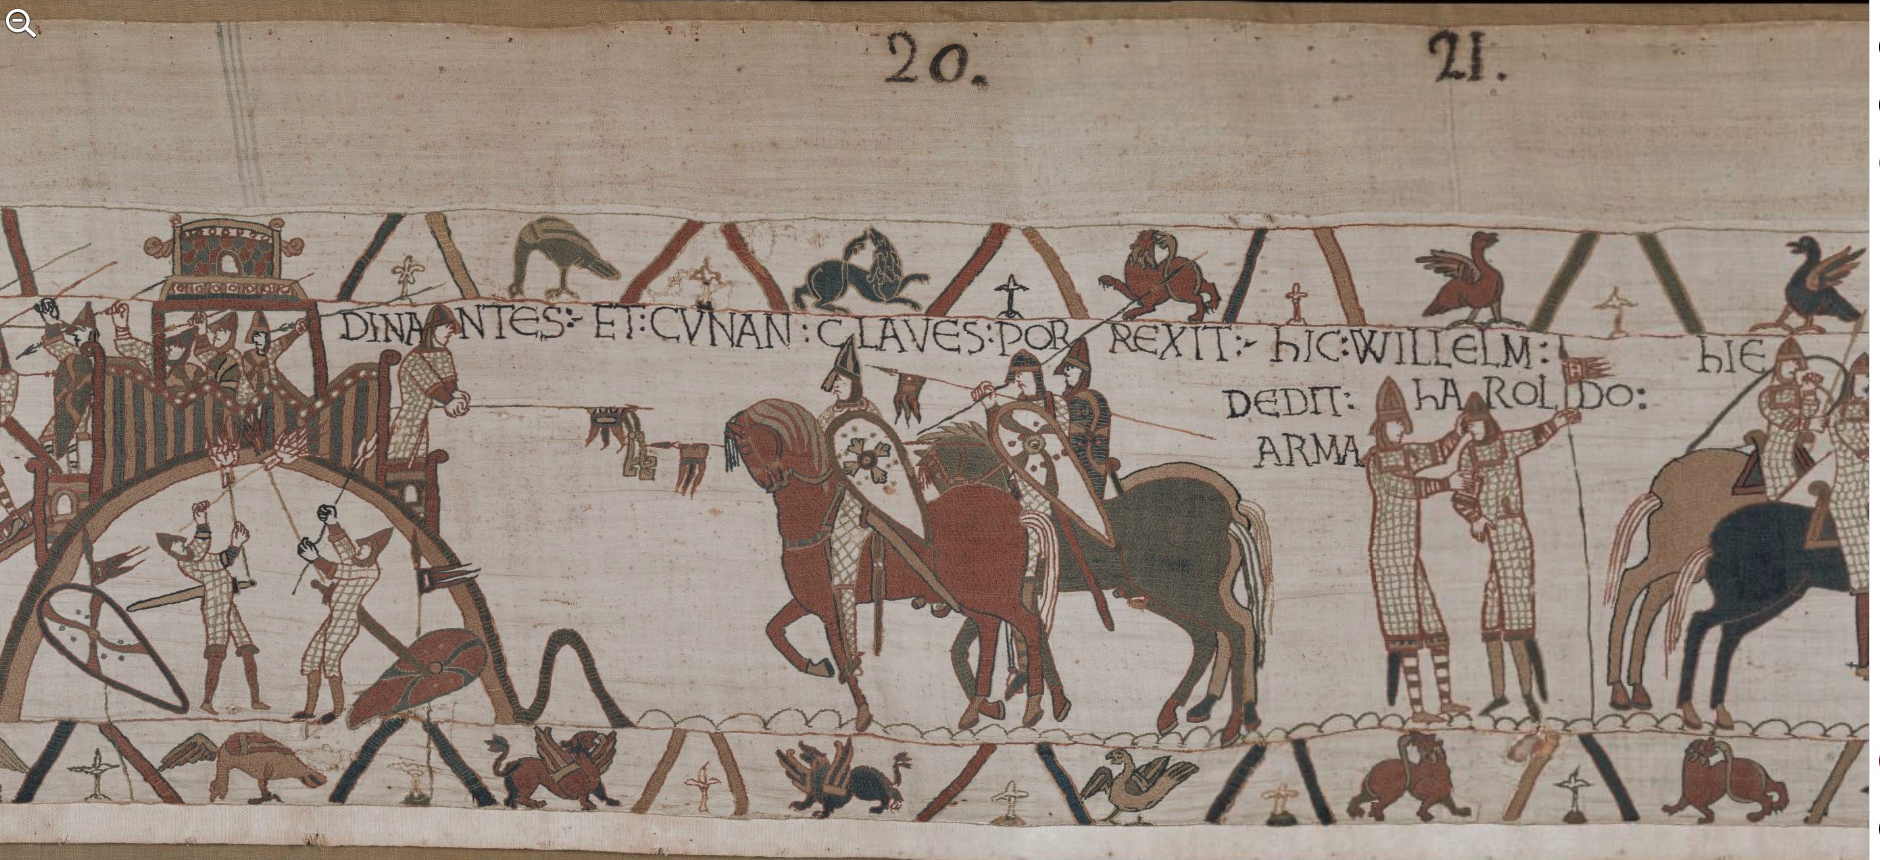
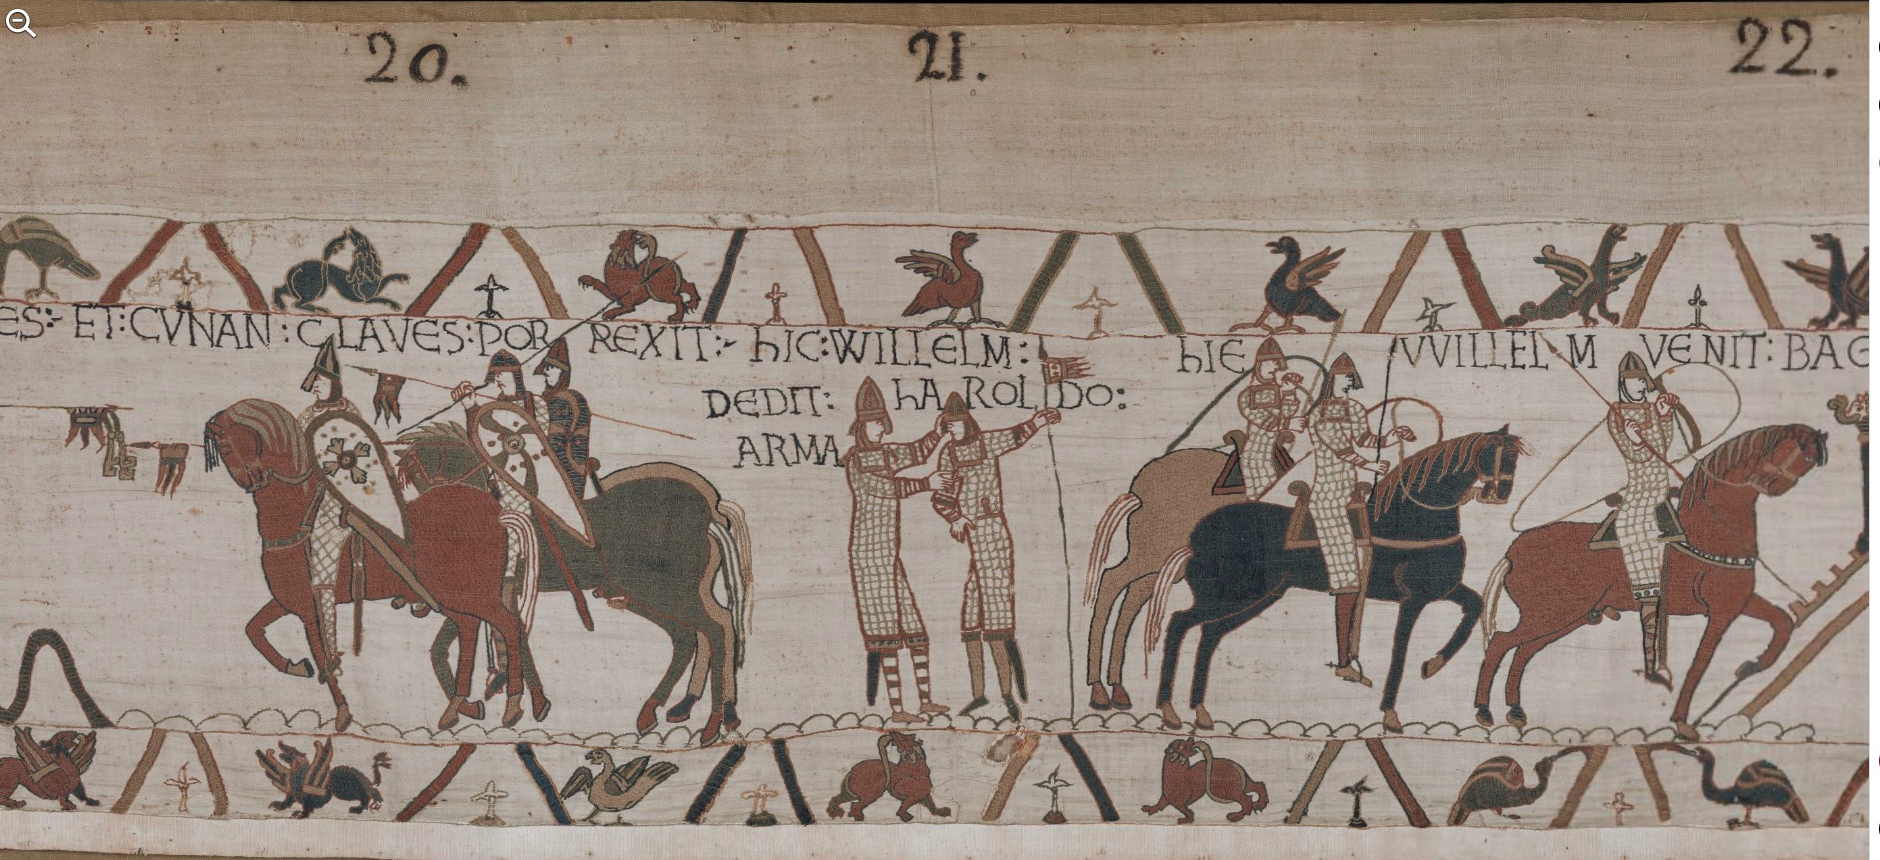
| Scene 20: ET CVNAN CLAVЄS PORRЄXIT | And Conan surrendered the keys | Et Conan tend les clefs [See a larger version of the image] |
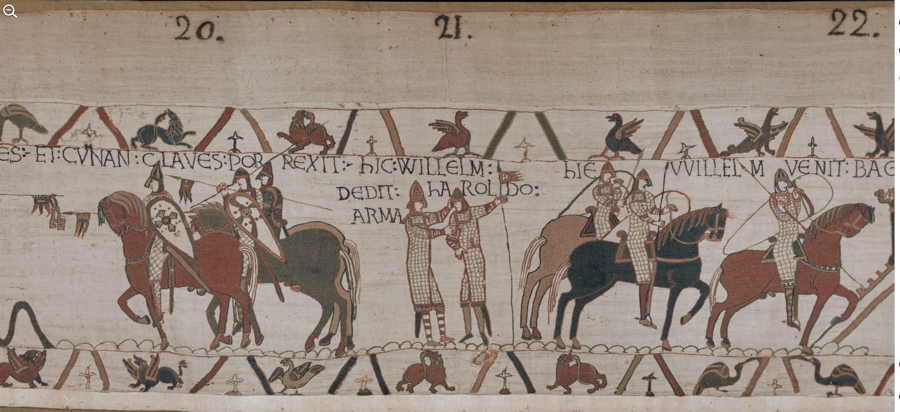 |
| Scene 21: hIC VVILLЄLM DЄDIT hAROLDO ARMA | Here William gave arms to Harold | Ici Guillaume donna les armes à Harold [See a larger version of the image] |
 |
| Scene 22: hIЄ VVILLELM VЄNIT BAGIAS | Here William came to Bayeux | Ici Guillaume vint à Bayeux [See a larger version of the image] |
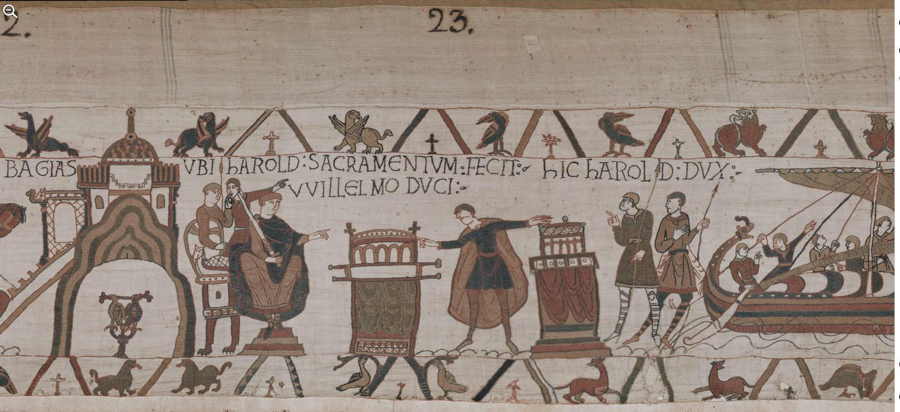 |
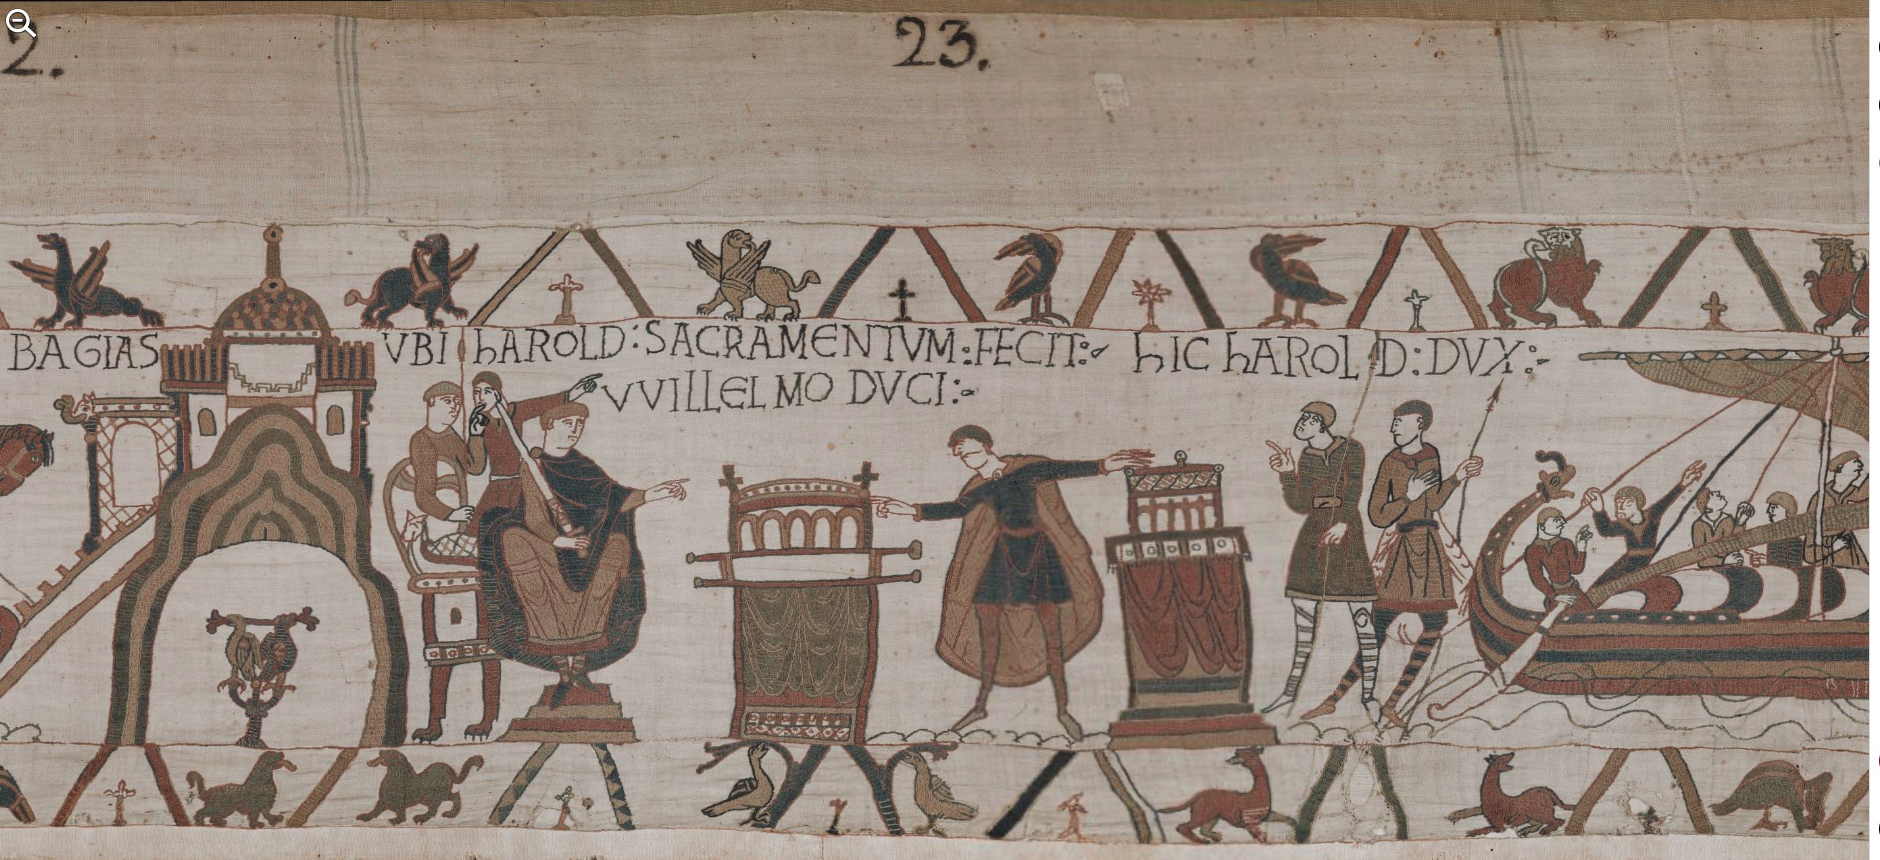
| Scene 23: VBI hAROLD SACRAMЄNTVM FECIT VVILLELMO DVCI | Where Harold made an oath to Duke William | Où Harold fit un serment au duc Guillaume [See a larger version of the image] |
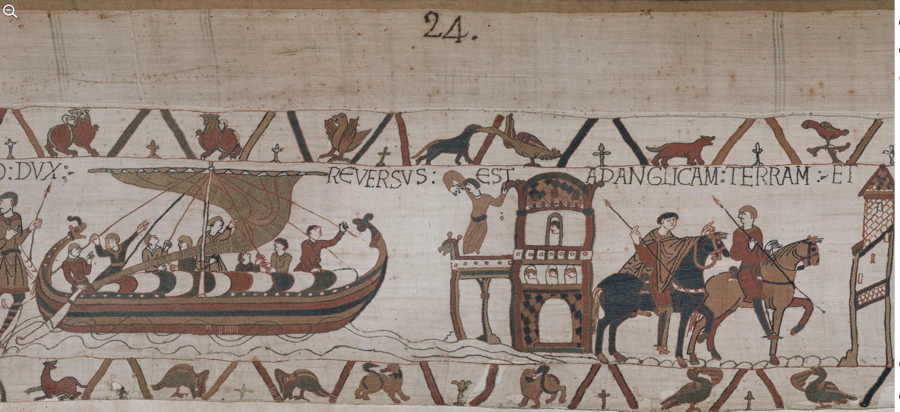 |
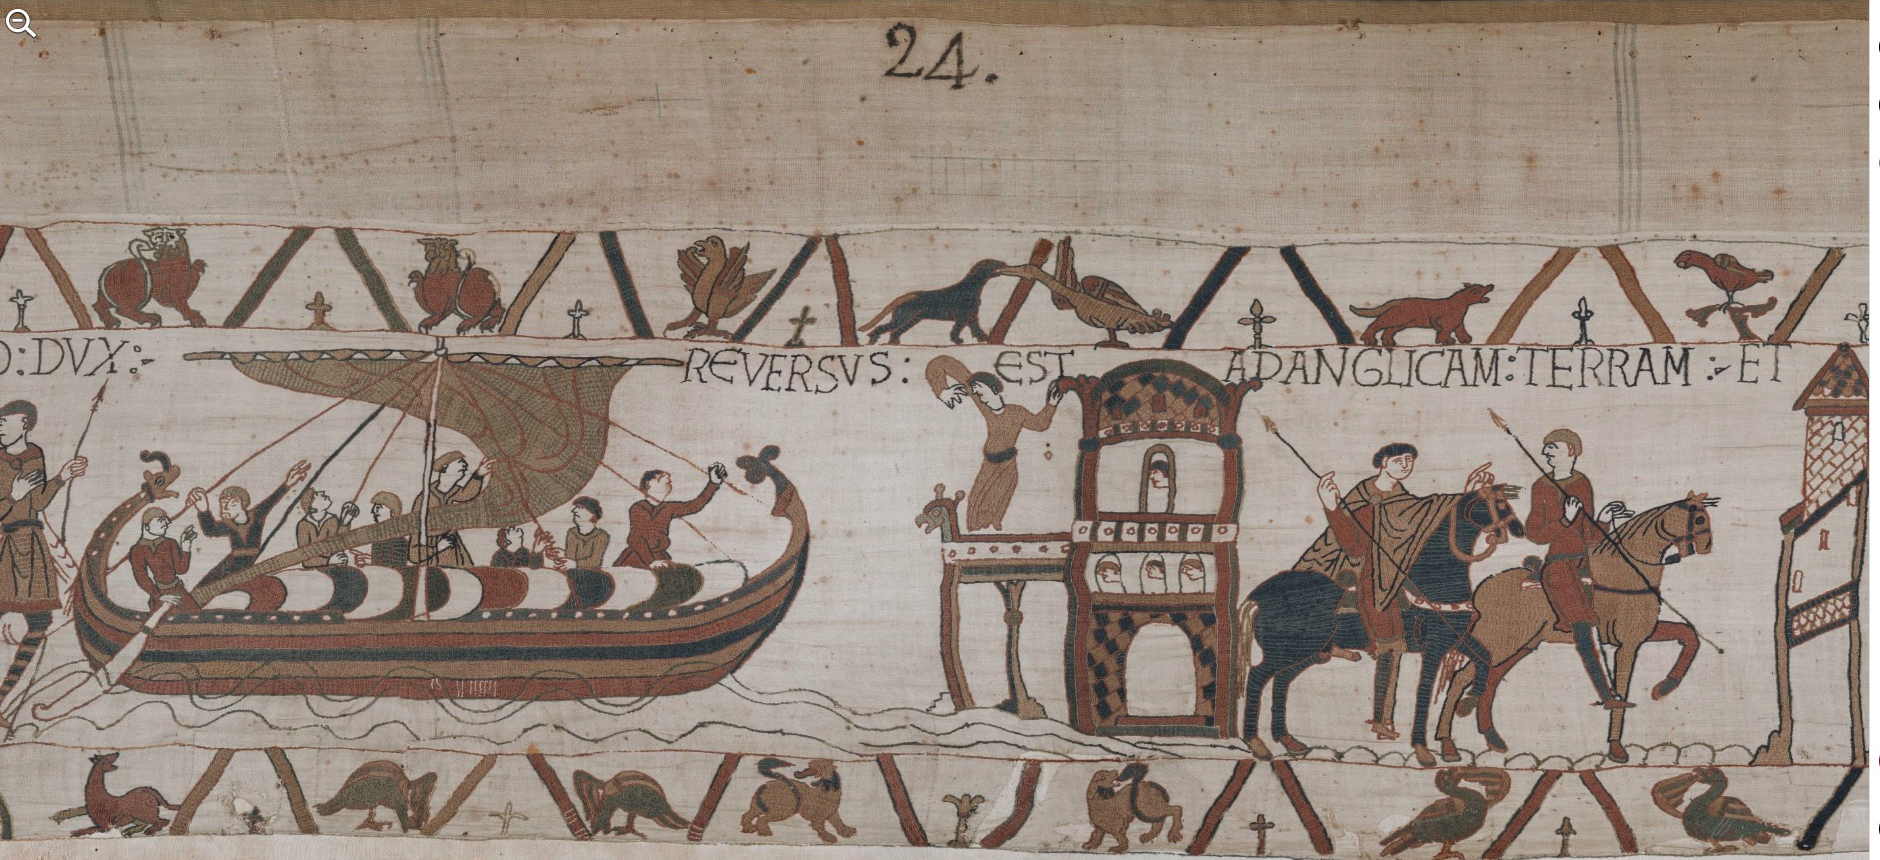
| Scene 24: hIC hAROLD DVX RЄVERSVS EST AD ANGLICAM TERRAM | Here Duke Harold returned to the English country | Ici le duc Harold revint en Angleterre [See a larger version of the image] |
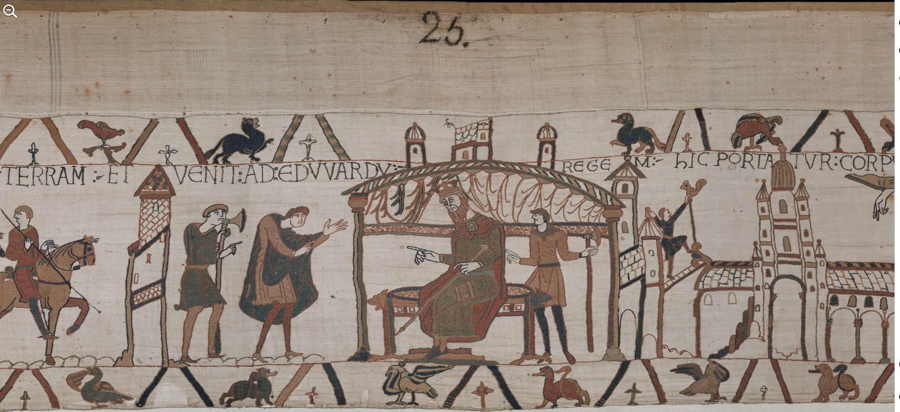 |
| Scene 25: ET VЄNIT AD EDVVARDVM REGEM | And came to King Edward | Et vint (trouver) le roi Édouard [See a larger version of the image] |
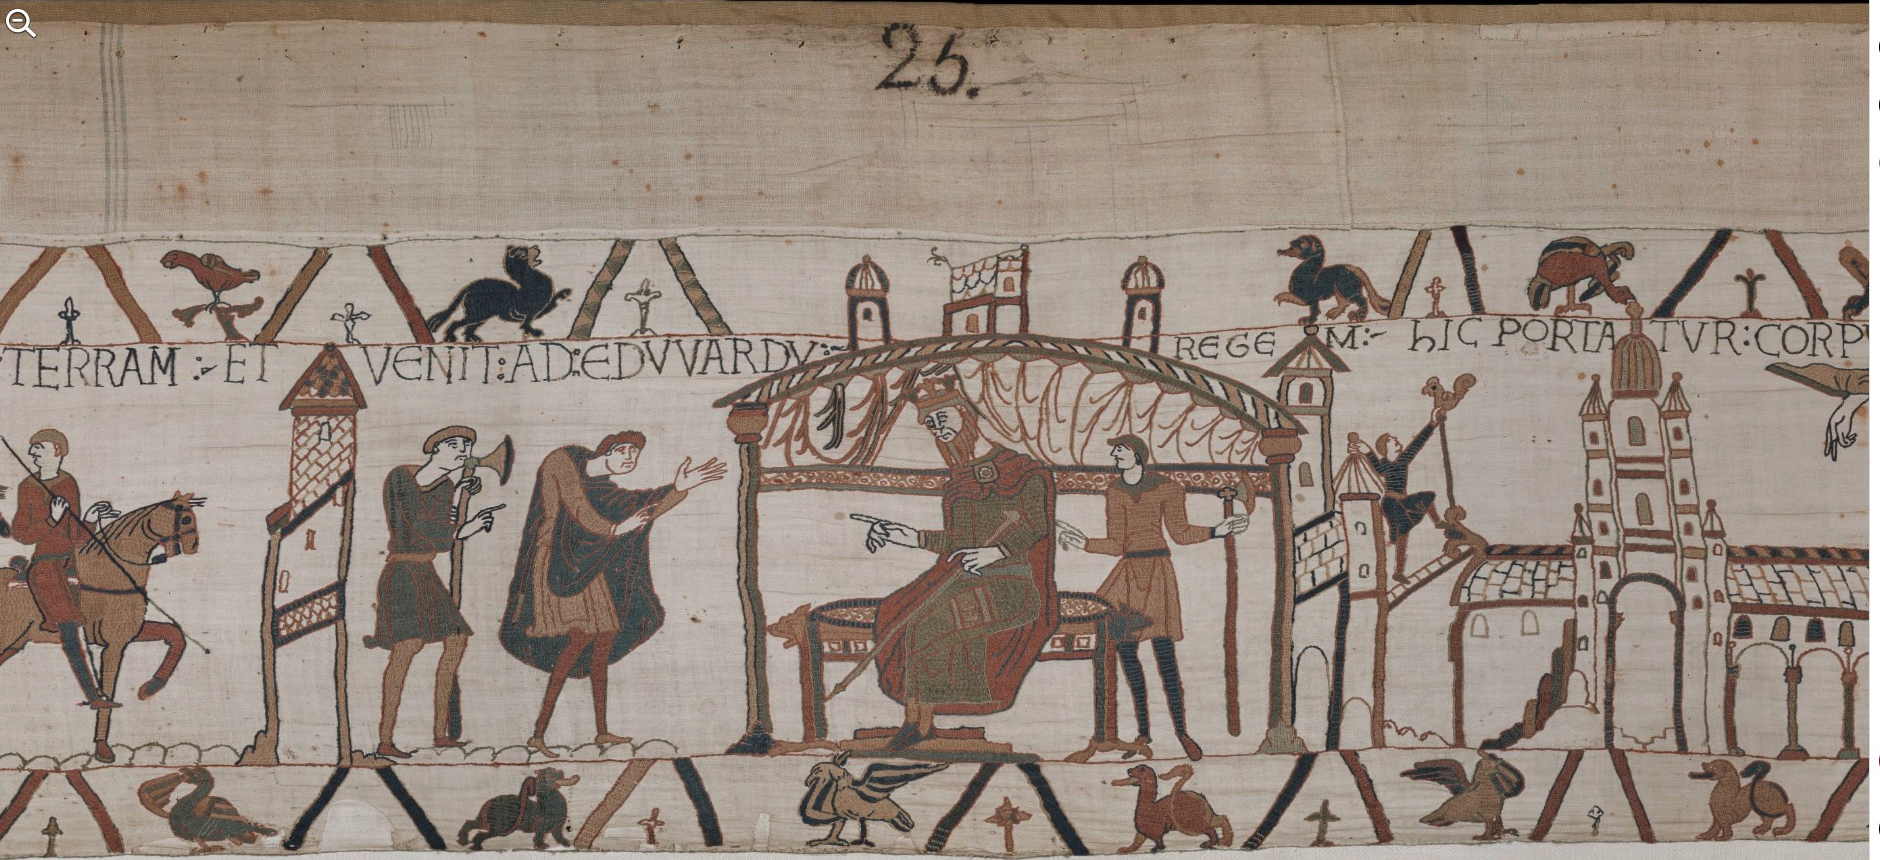
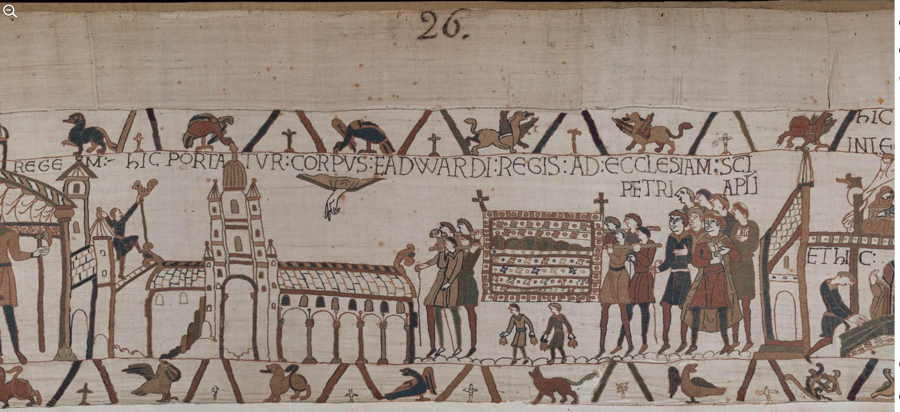 |
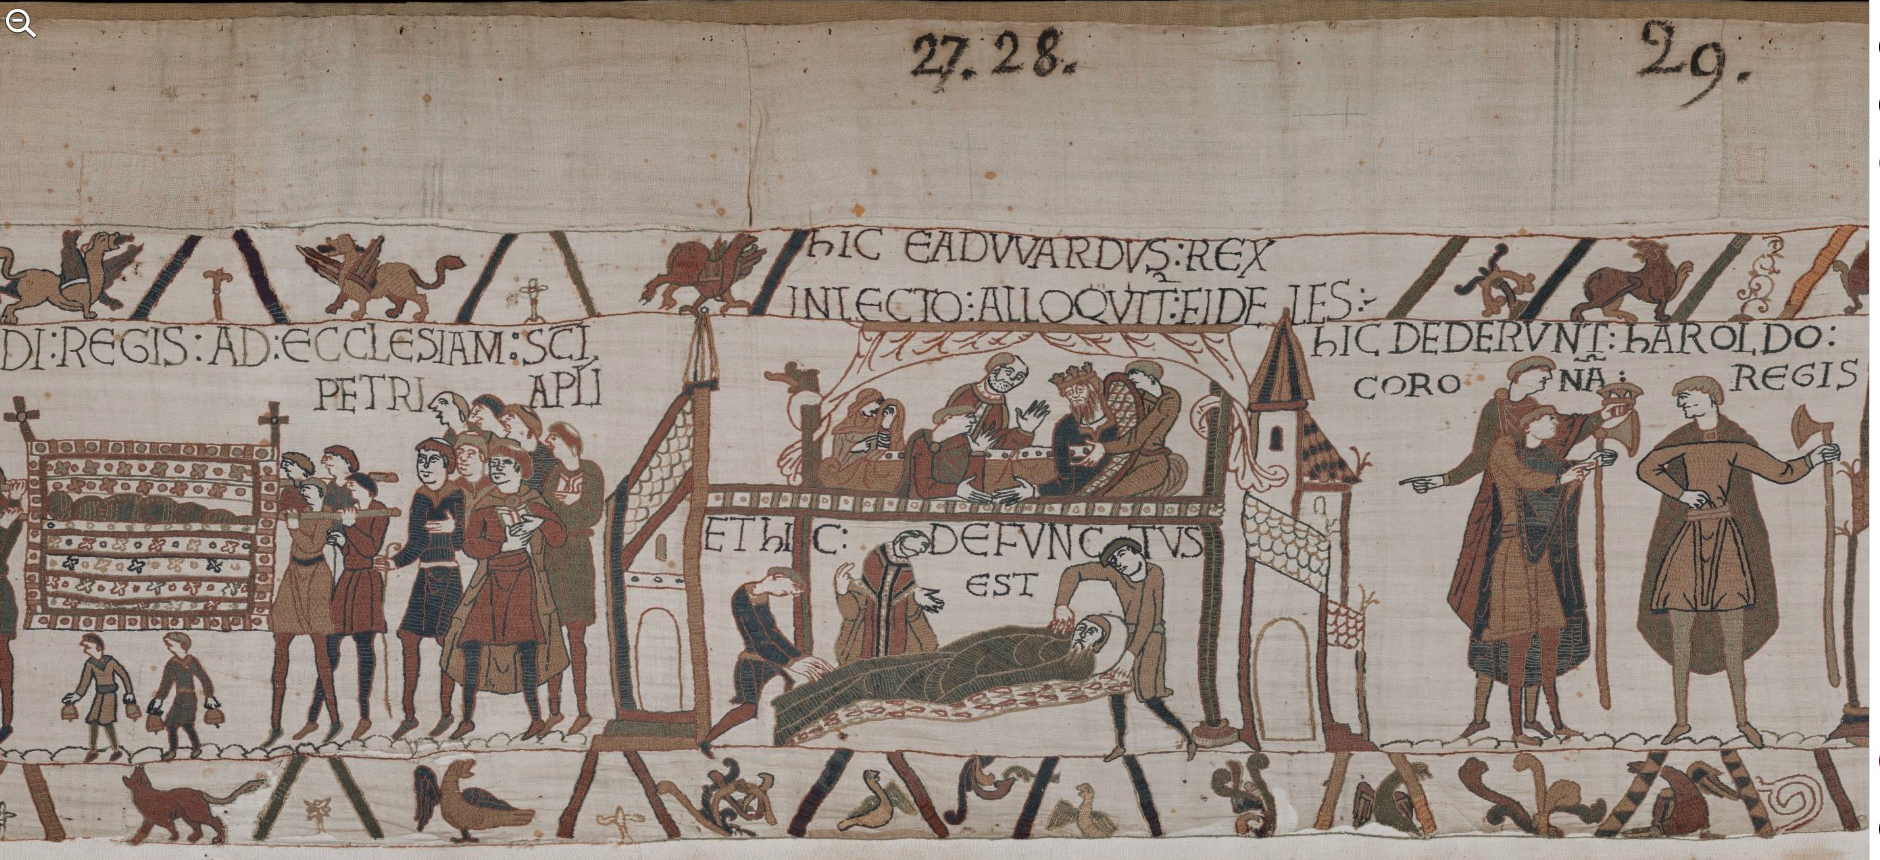
| Scene 26: hIC PORTA TVR CORPVS EADVVARDI RЄGIS AD ЄCCLЄSIAM SANCTI PETRI APOSTOLI | Here the body of King Edward is carried to the church of St Peter the Apostle | Ici le corps du roi Édouard est porté à l’église de Saint Pierre Apôtre [See a larger version of the image] |
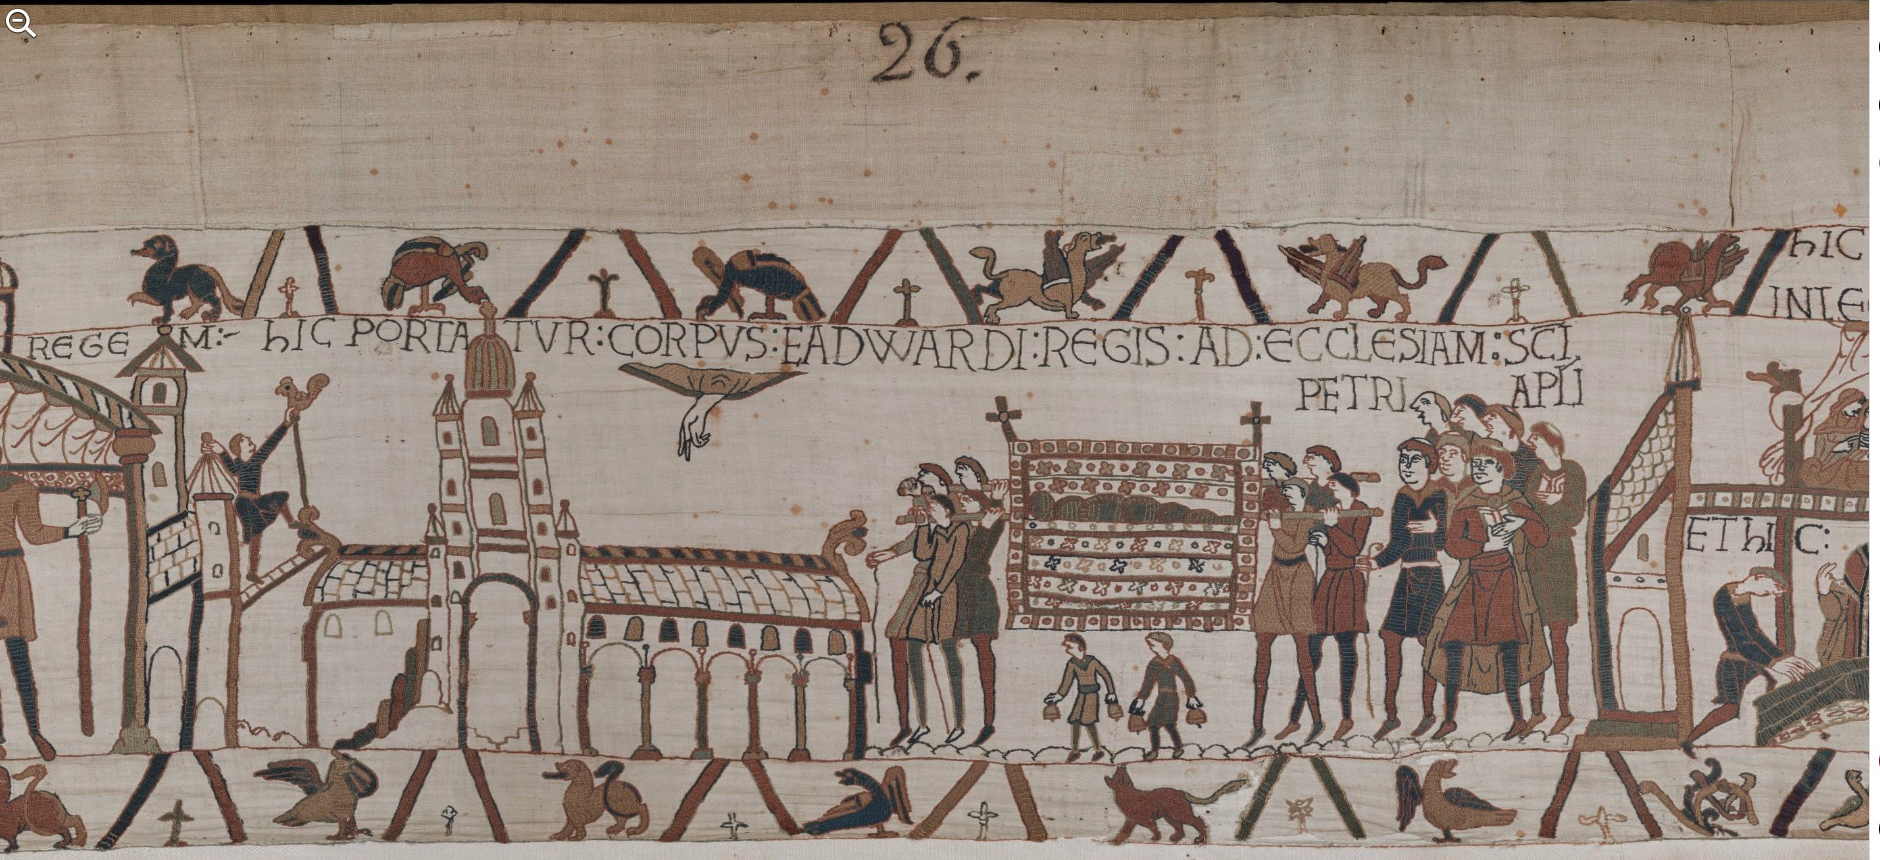
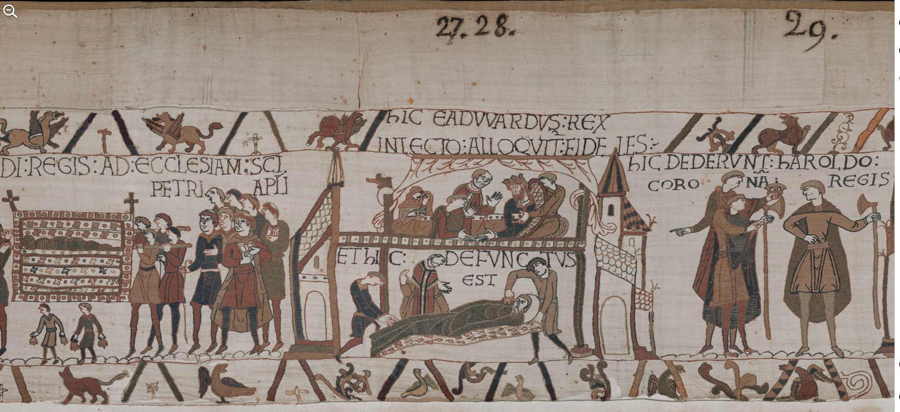 |
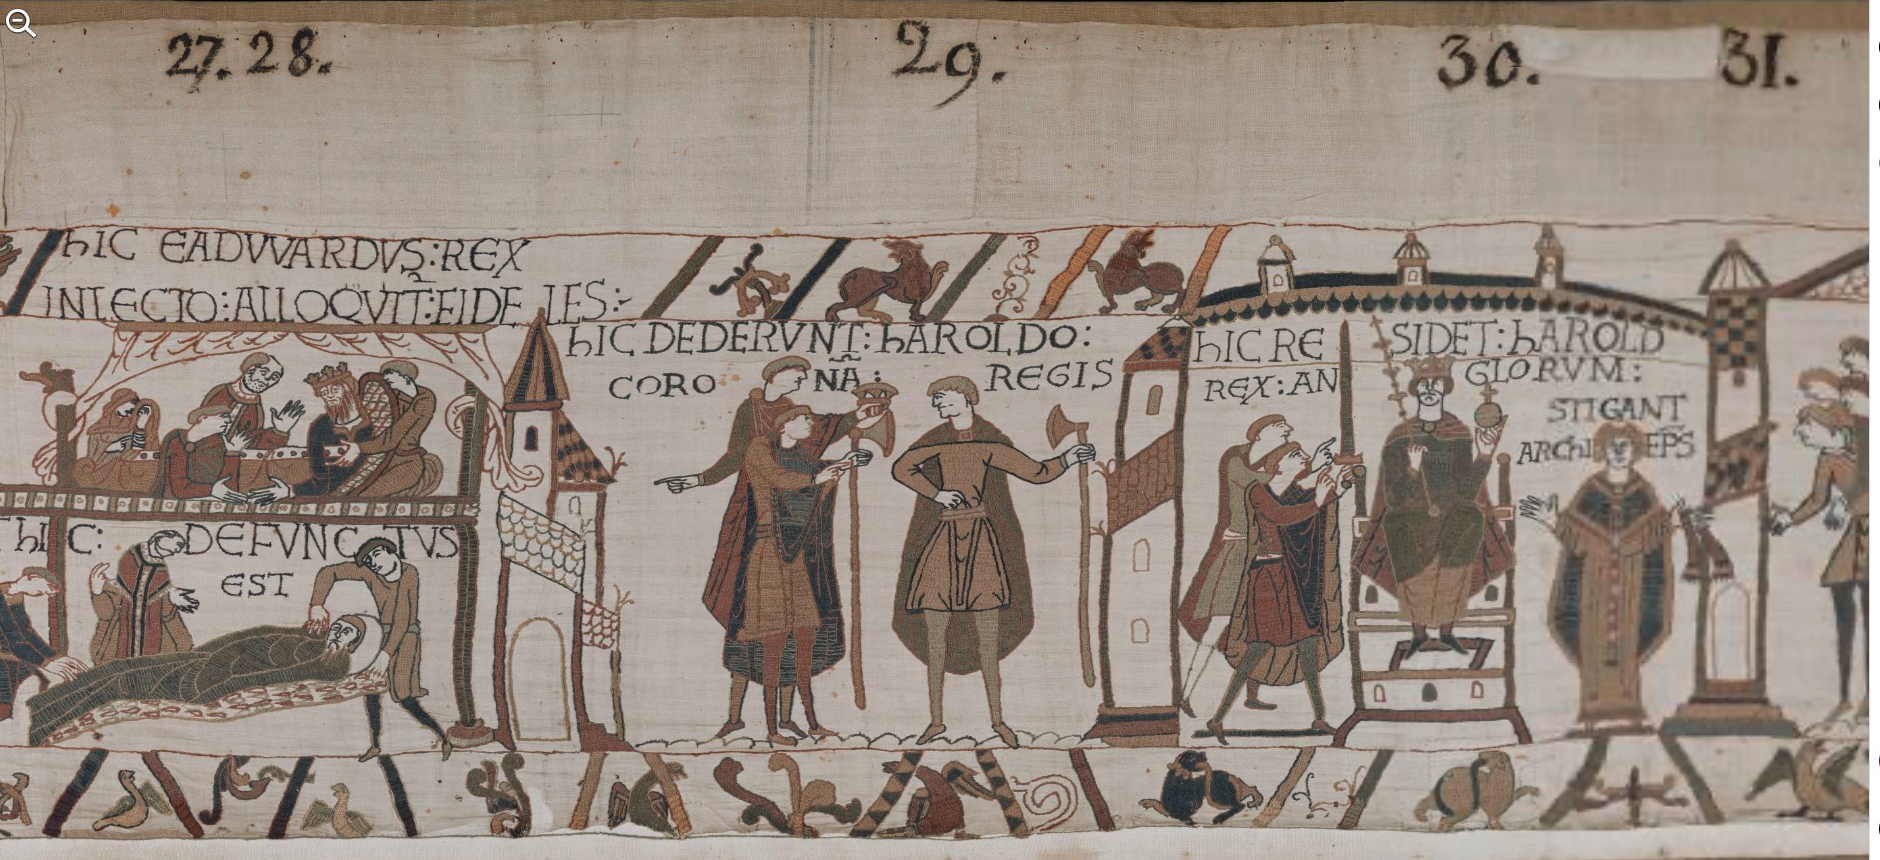
| Scene 27: hIC EADVVARDVS REX IN LЄCTO ALLOQVIT FIDELES | Here King Edward in bed speaks to his faithful followers | Ici le roi Édouard, dans son lit, parle à ses fidèles [See a larger version of the image] |
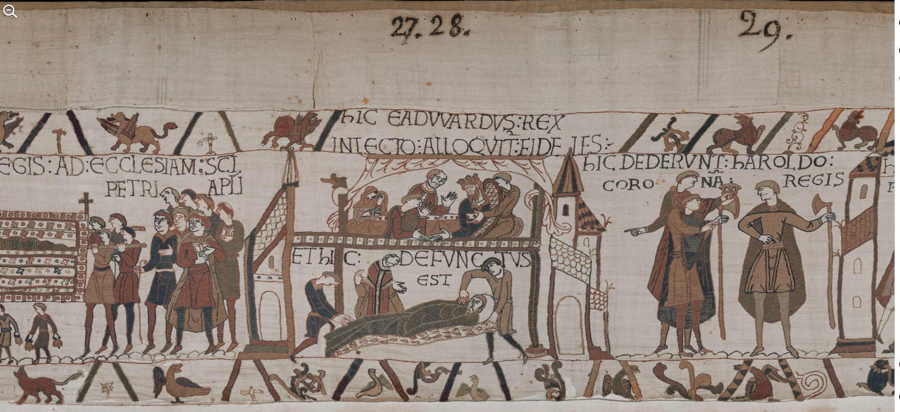 |
| Scene 28: ET HIC DЄFVNCTVS ЄST | And here he is died | Et ici il est mort [See a larger version of the image] |
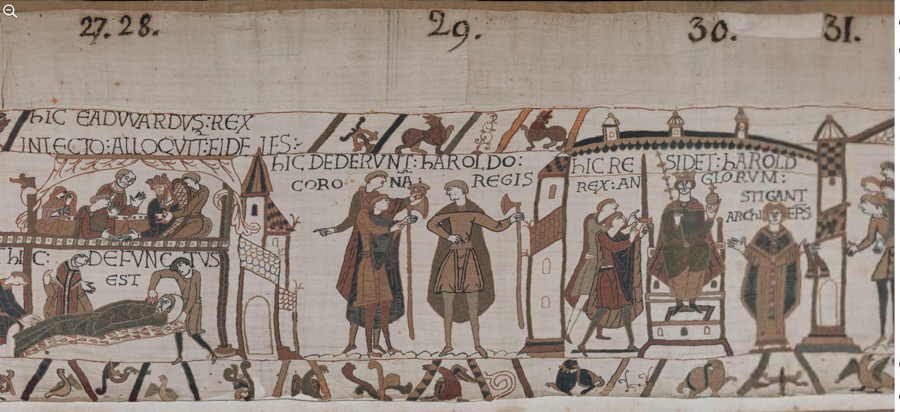 |
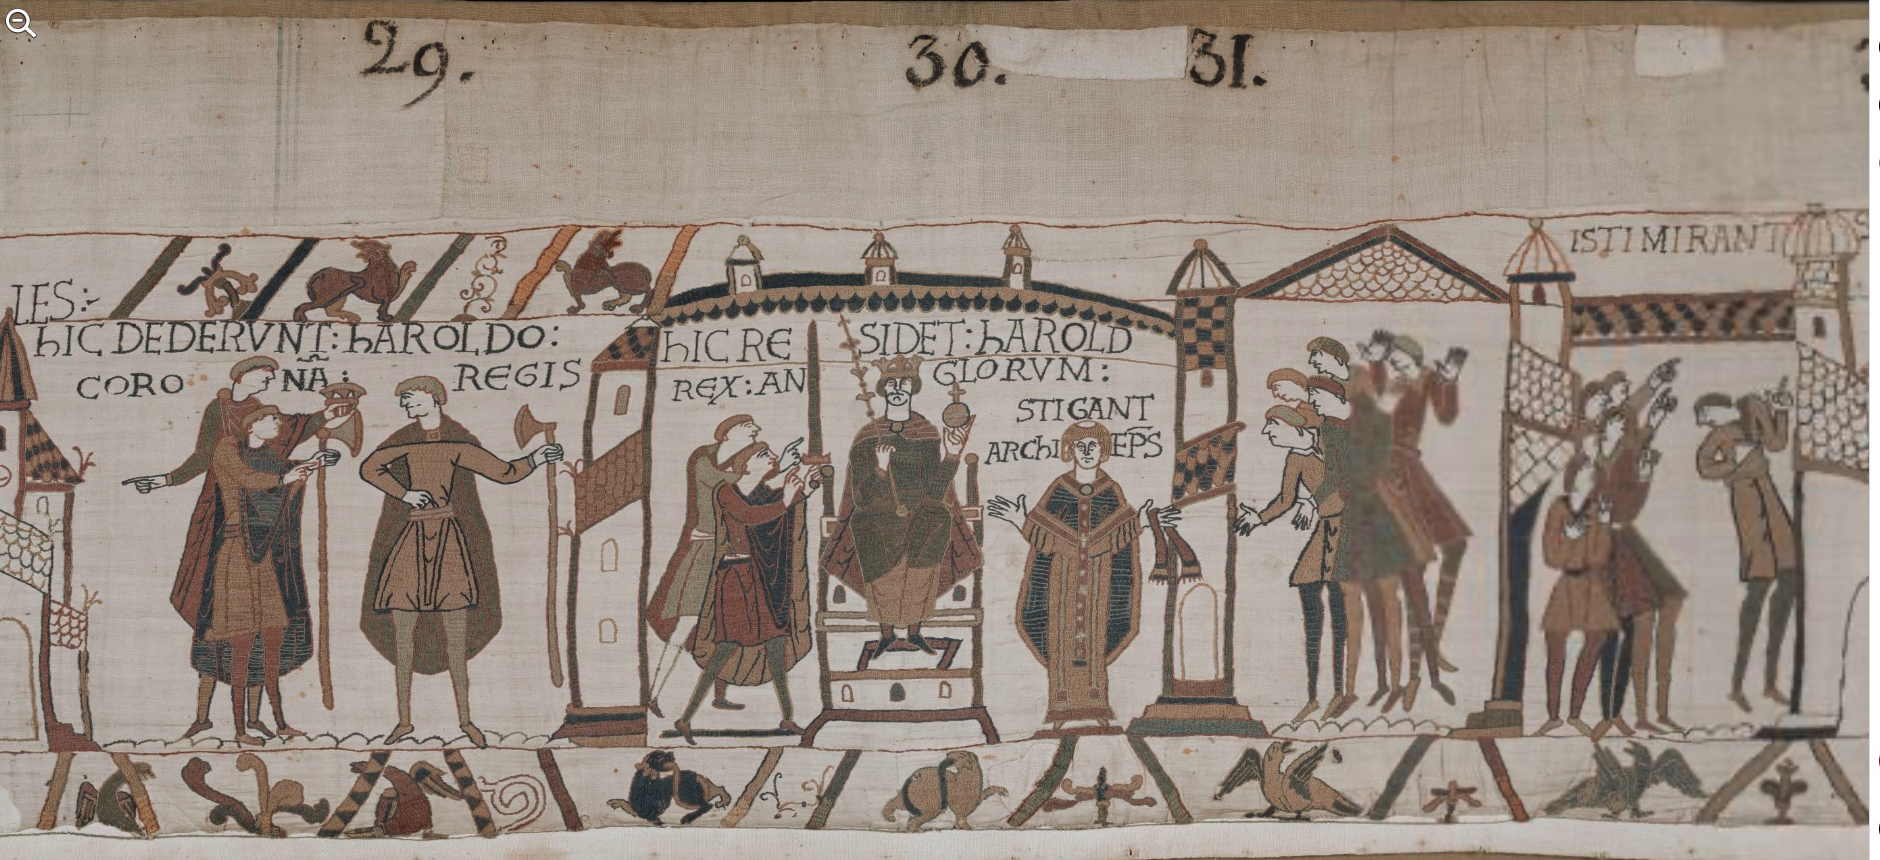
| Scene 29: hIC DEDERVNT hAROLDO CORONAM REGIS | Here they have given the crown of the king to Harold | Ici, ils donnèrent à Harold la couronne de roi [See a larger version of the image] |
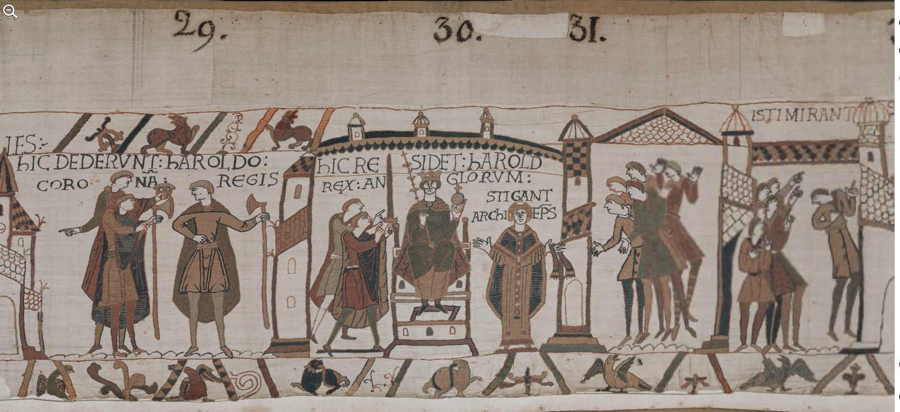 |
| Scene 30: hIC RЄSIDET hAROLD RЄX ANGLORVM | Here sits throned Harold, King of the English | Ici siège Harold roi des Anglais [See a larger version of the image] |
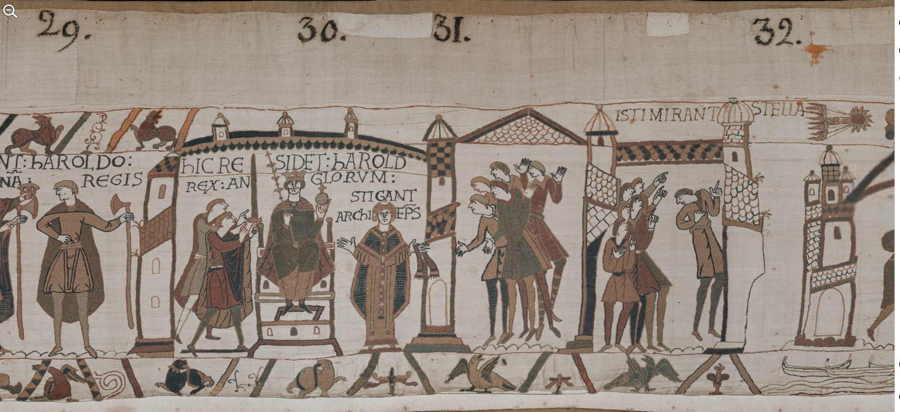 |
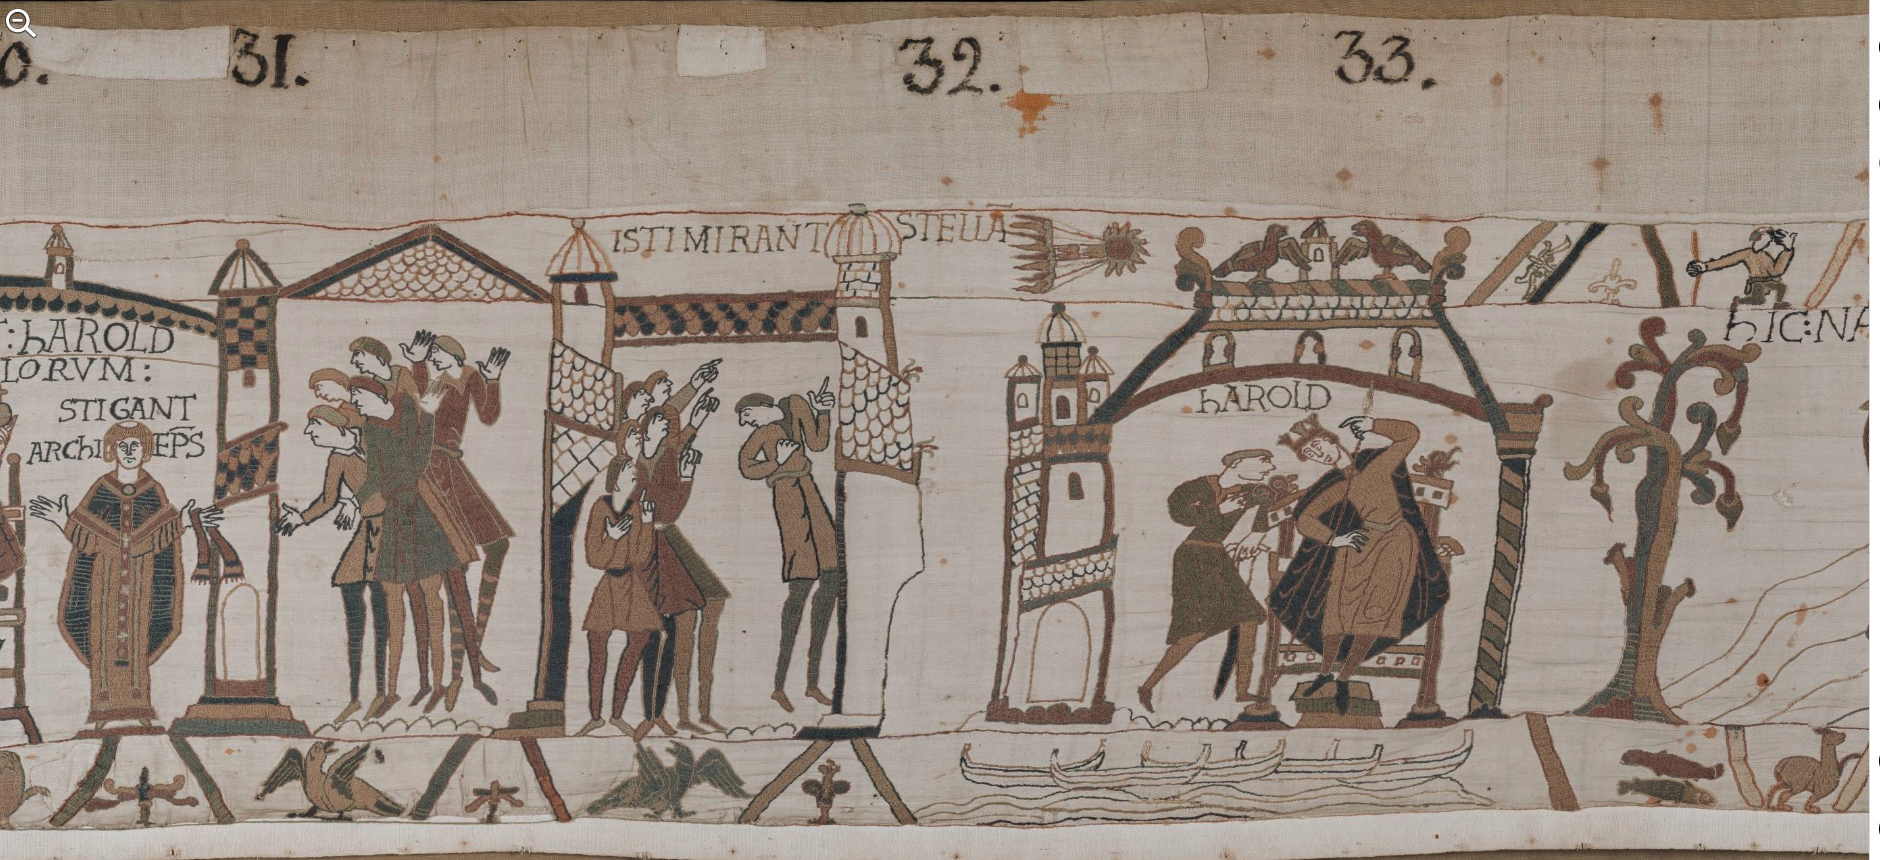
| Scene 31: STIGANT ARChIEPISCOPVS | Stigand, archbishop | L'archevêque Stigand [See a larger version of the image] |
 |
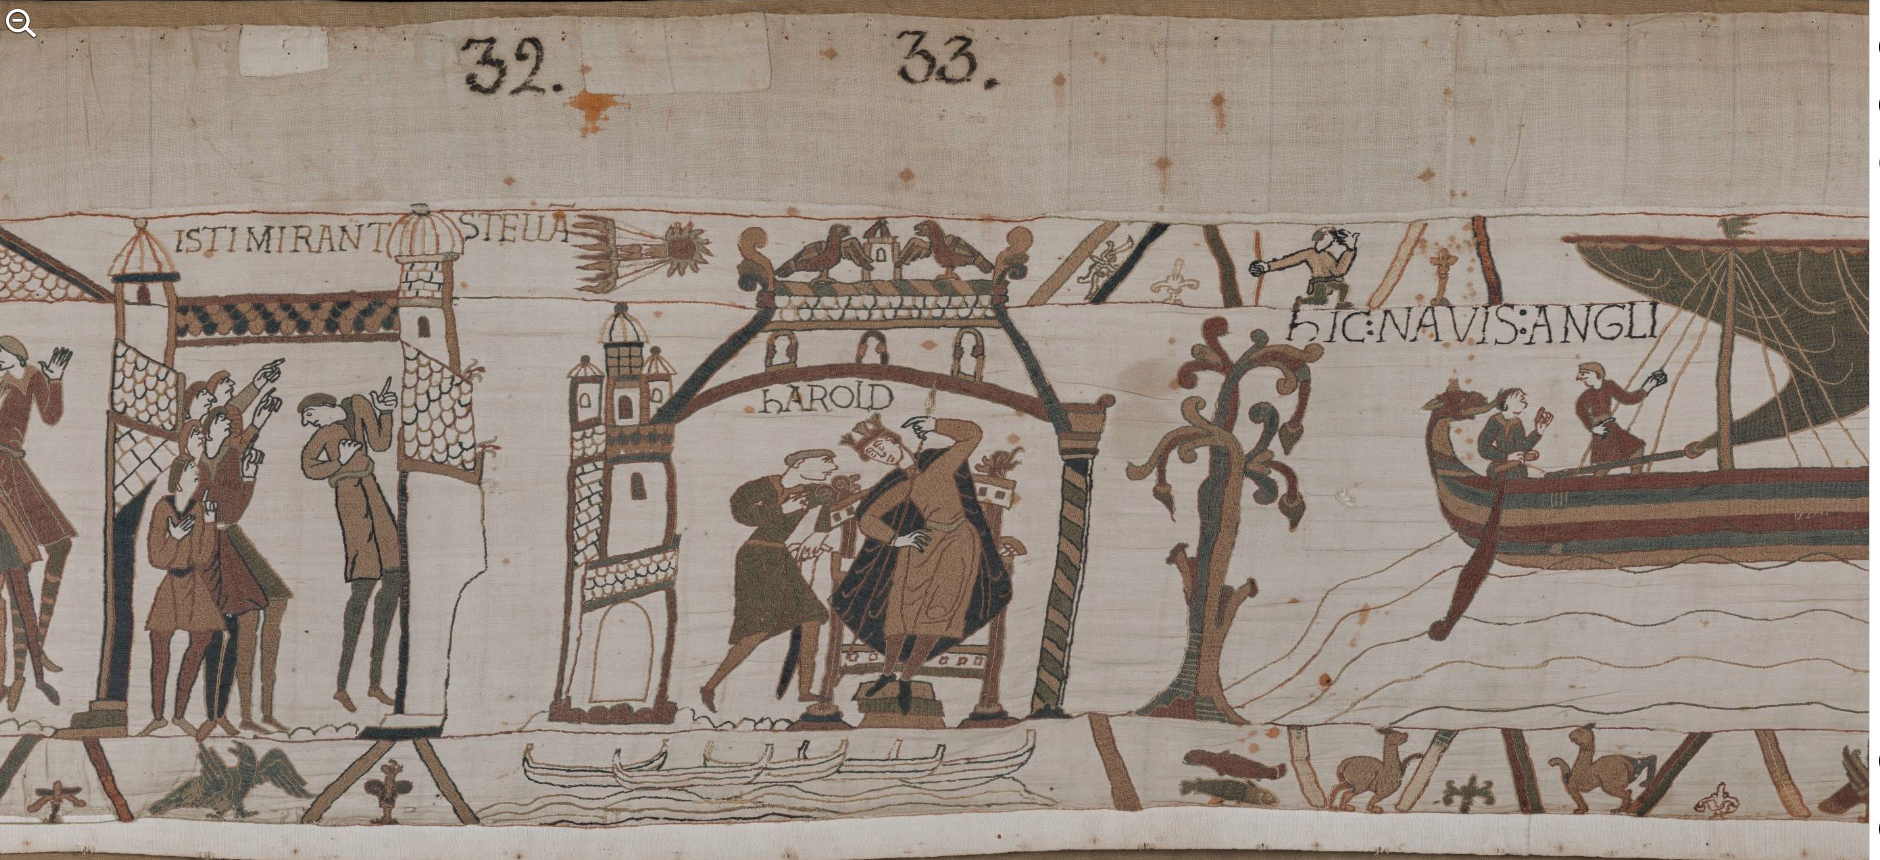
| Scene 32: ISTI MIRANT STELLA | These men marvel at the star | Ceux-ci admirent l’étoile [See a larger version of the image] |
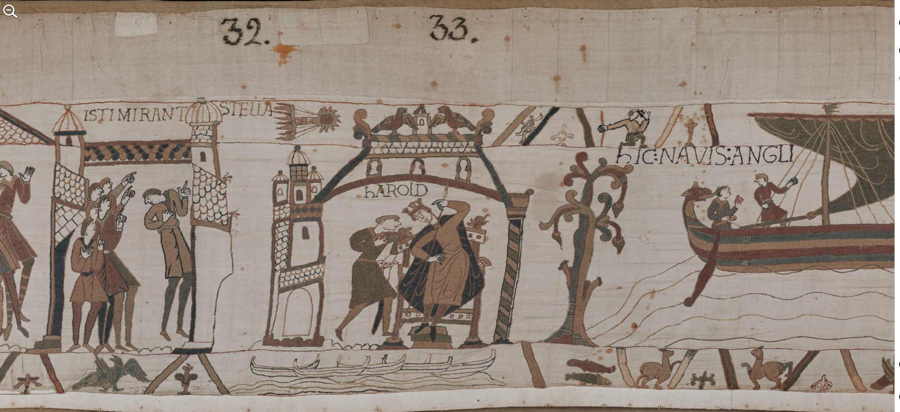 |
| Scene 33: hAROLD | Harold | Harold [See a larger version of the image] |
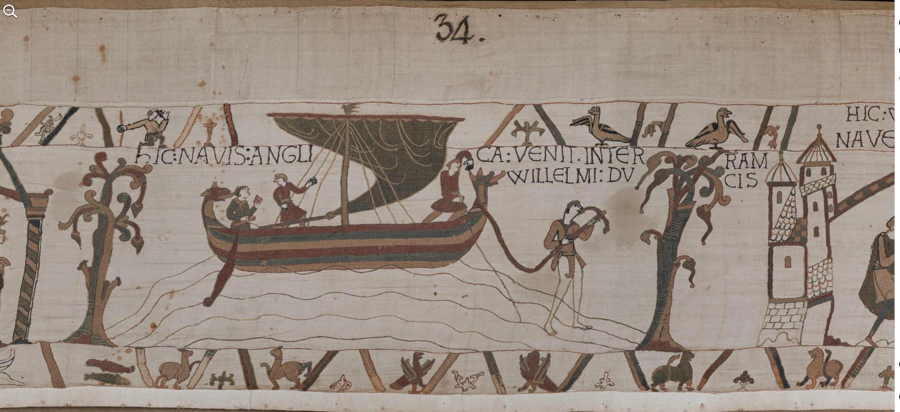 |
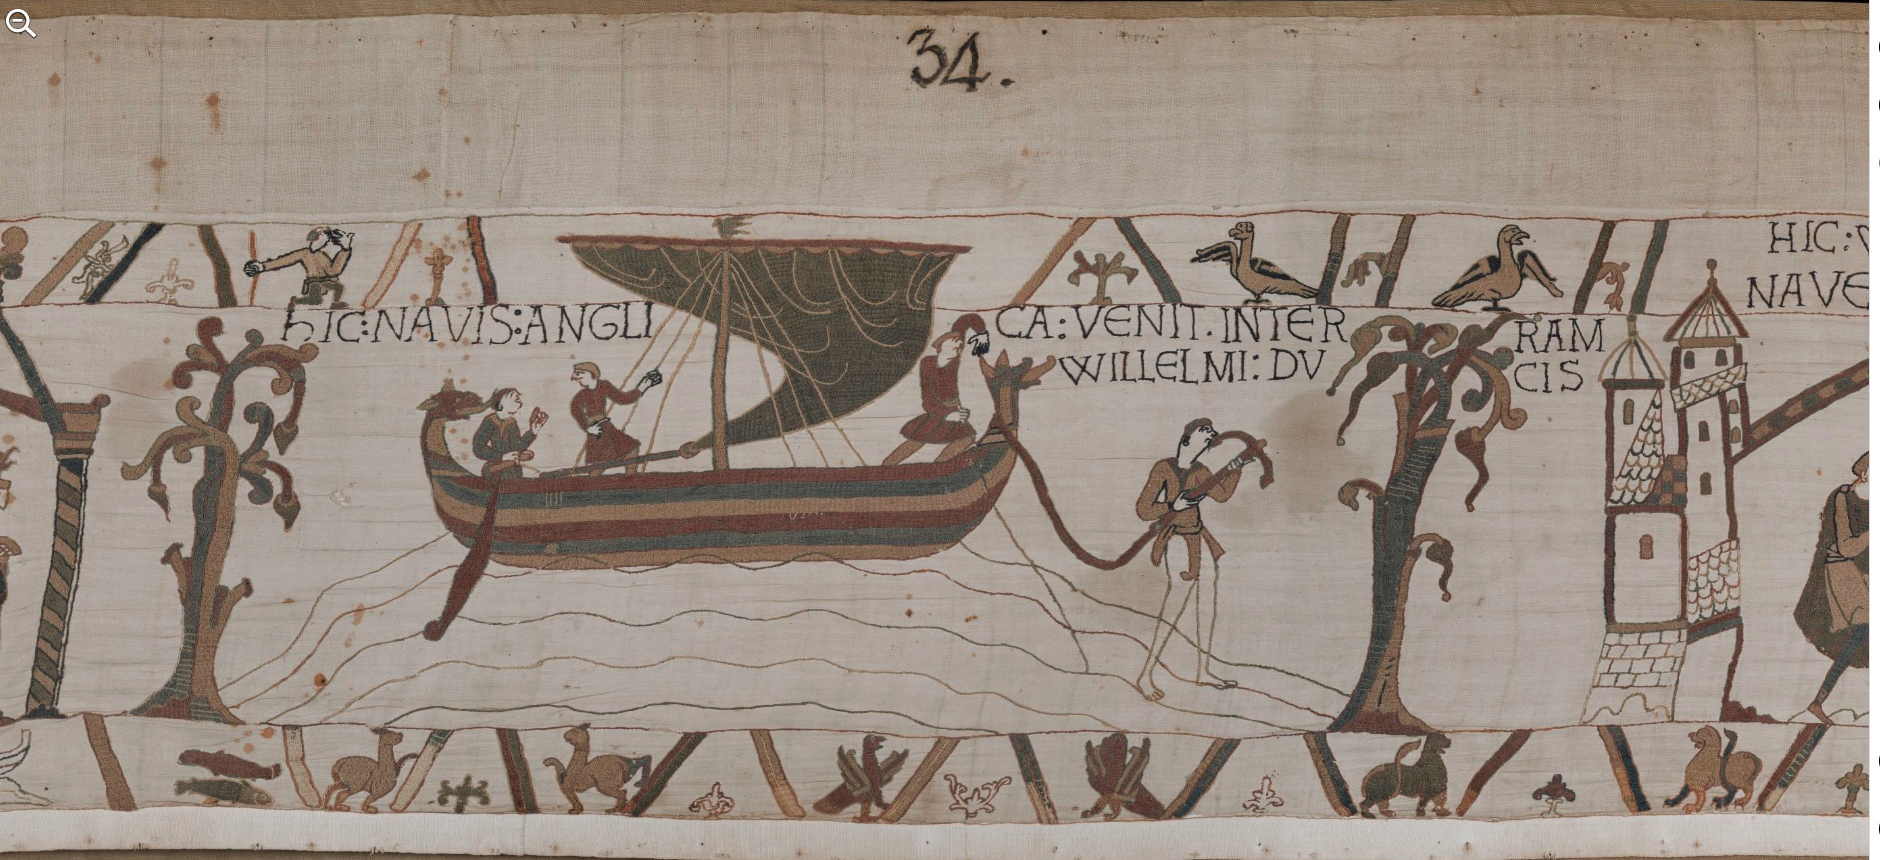
| Scene 34: hIC NAVIS ANGLICA VЄNIT. IN TЄRRAM VWILLELMI DVCIS | Here an English ship came to the country of Duke William | Ici un navire anglais vint dans la terre du duc Guillaume [See a larger version of the image] |
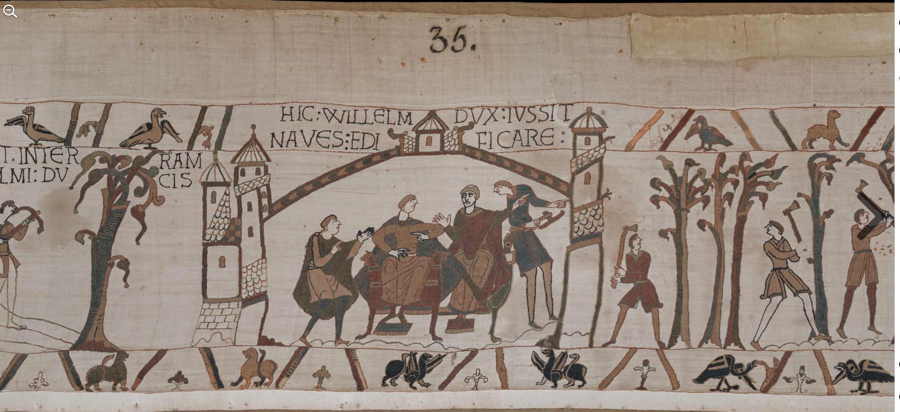 |
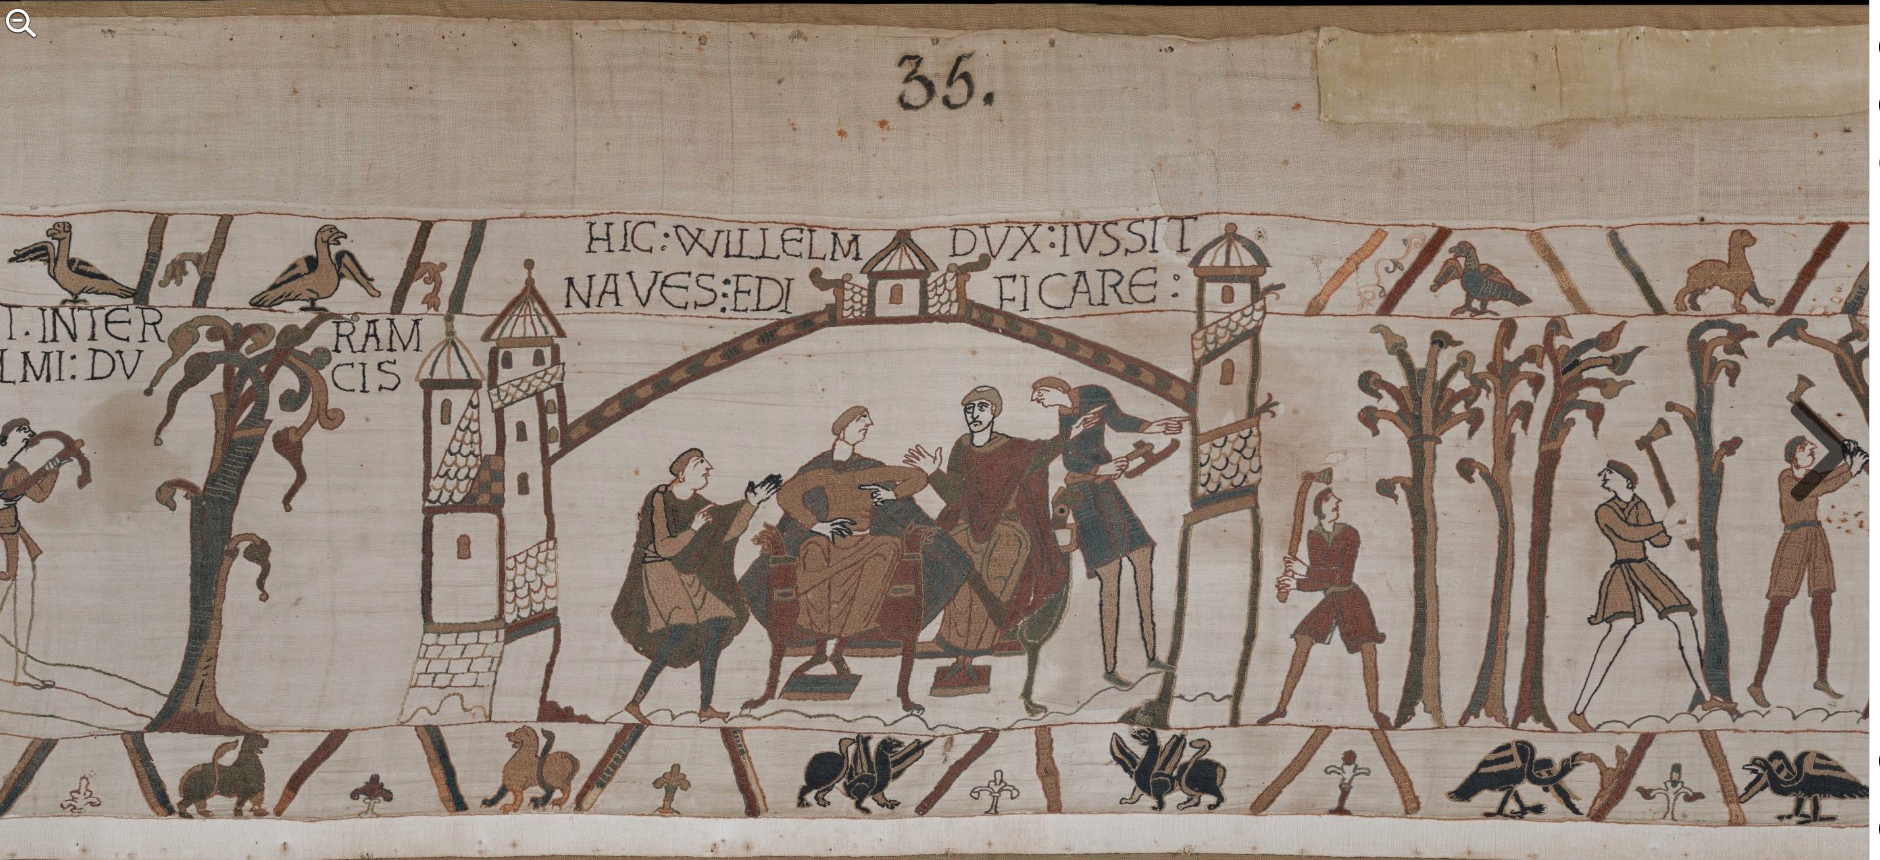
| Scene 35: HIC VVILLЄLM DVX IVSSIT NAVЄS EDIFICARE | Here Duke William ordered ships to be built | Ici le duc Guillaume donna l’ordre de construire des navires [See a larger version of the image] |
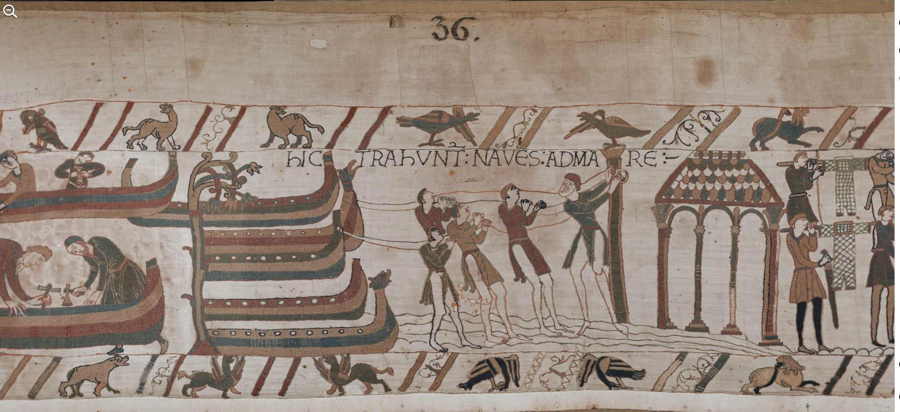 |
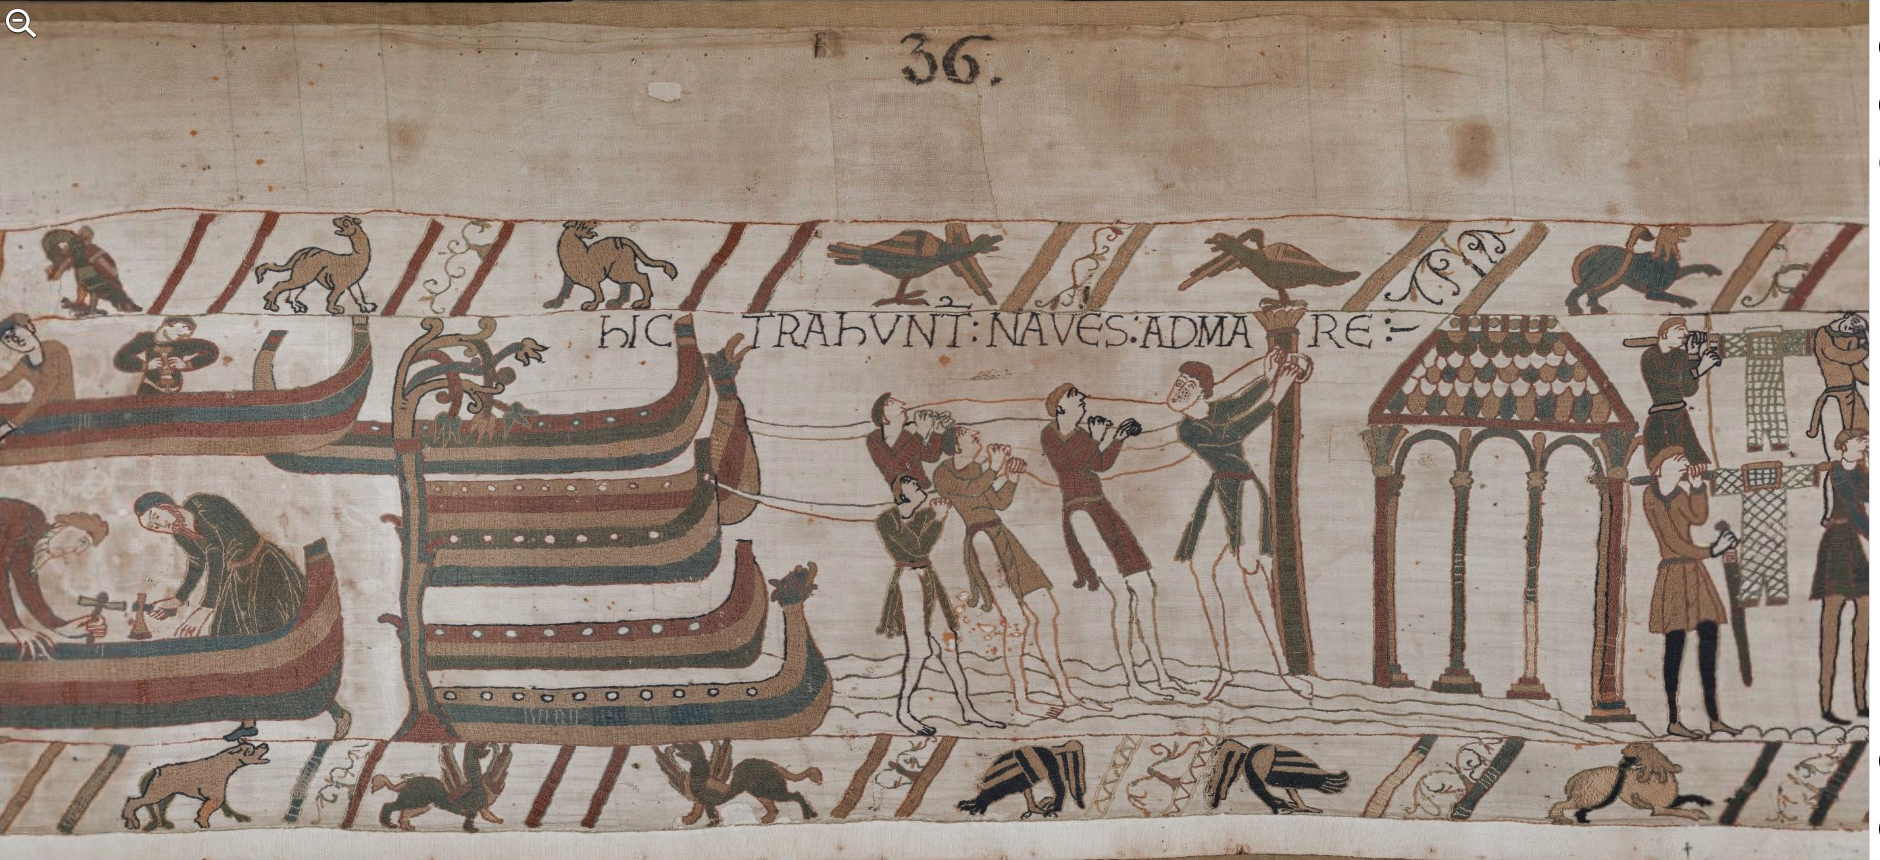
| Scene 36: hIC TRAhVNT NAVЄS AD MARЄ | Here ships are hauled to the sea | Ici les navires sont tirés vers la mer [See a larger version of the image] |
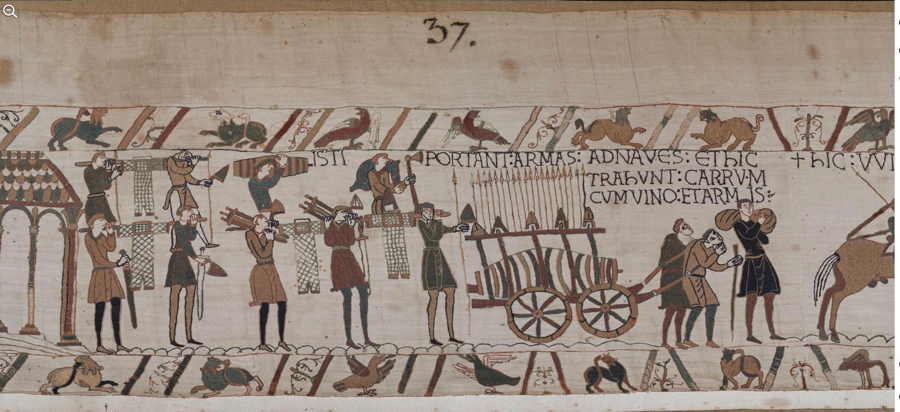 |
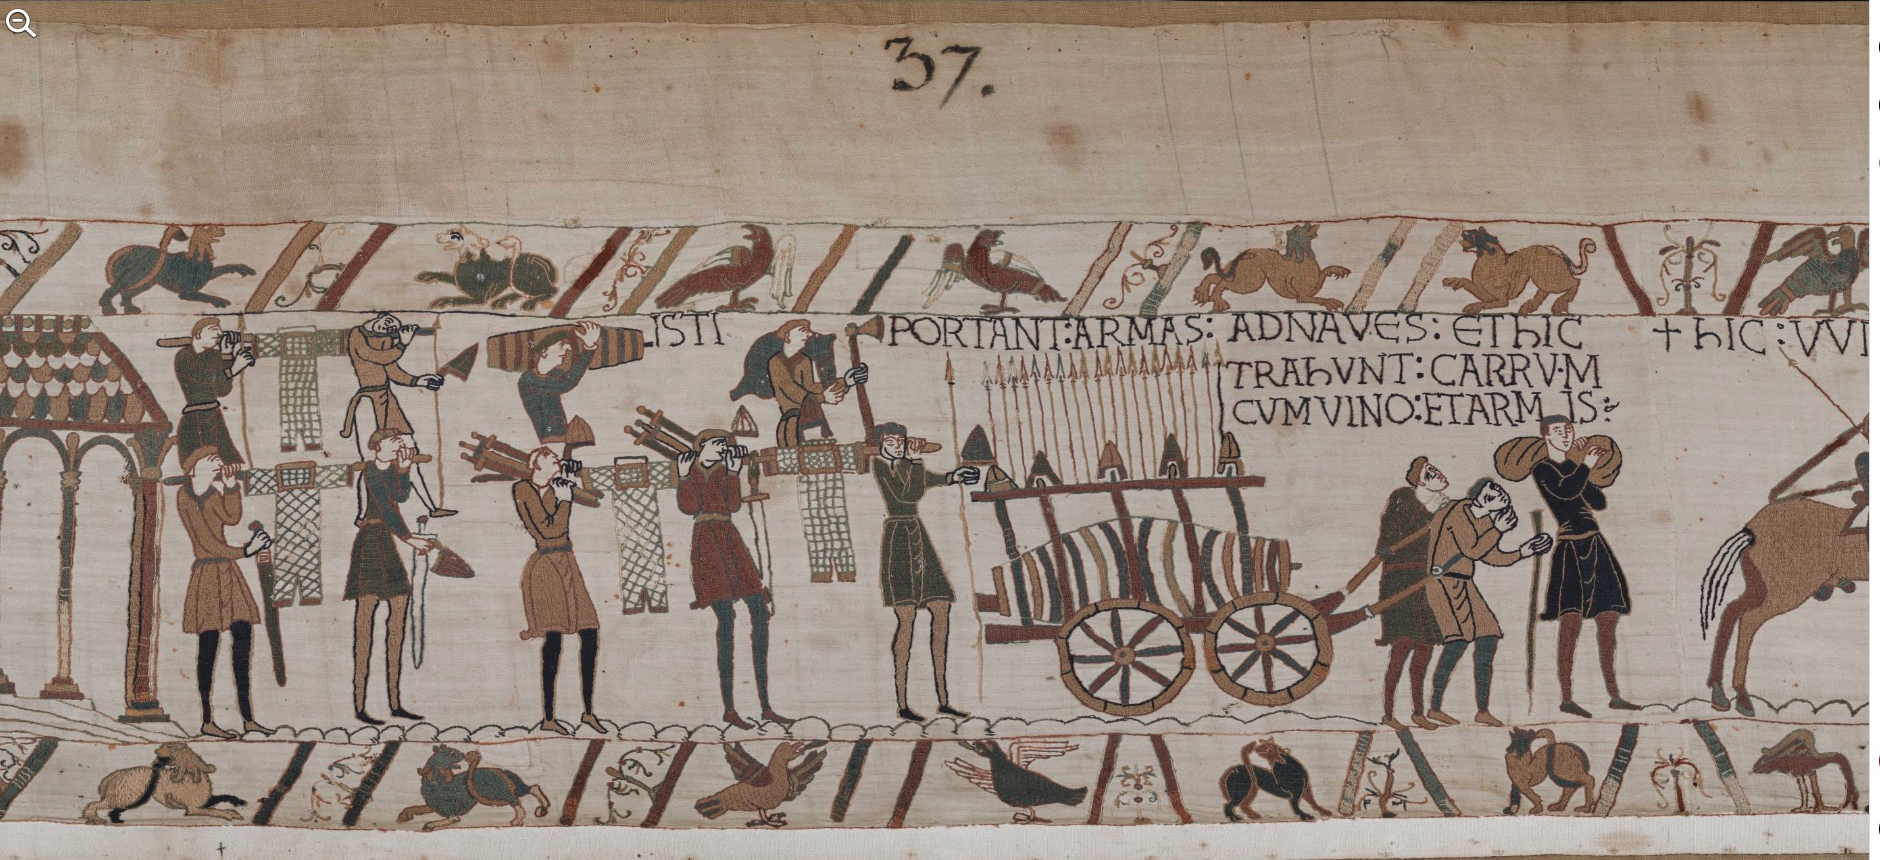
| Scene 37: ISTI PORTANT ARMAS AD NAVЄS ЄT hIC TRAhVNT CARRVM CVM VINO ET ARMIS | These men carry arms to the ships, and here they pull a wagon with wine and arms | Ceux-ci portent des armes aux navires et ici ils tirent un chariot avec du vin et des armes [See a larger version of the image] |
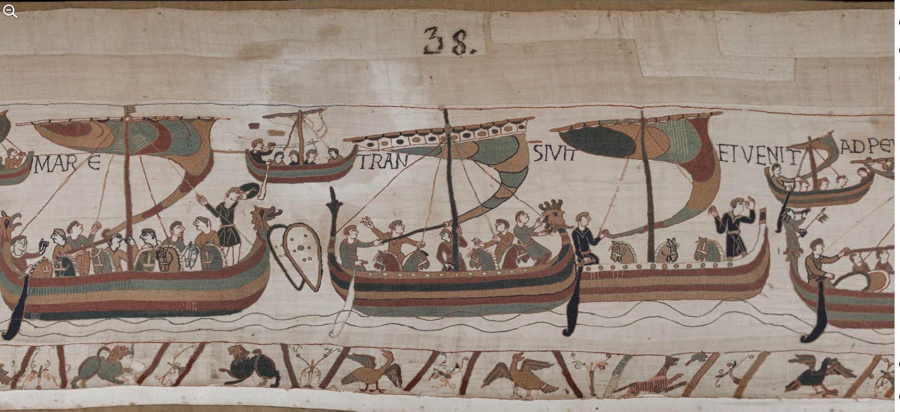 |
| Scene 38: † hIC VVILLELM DVX IN MAGNO NAVIGIO MARЄ TRANSIVIT ET VENIT AD PЄVЄNЄSÆ | † Here Duke William in a great ship crossed the sea and came to Pevensey | † Ici, le duc Guillaume, dans une grande navigation, franchit la mer et vint à Pevensey [See a larger version of the image] |
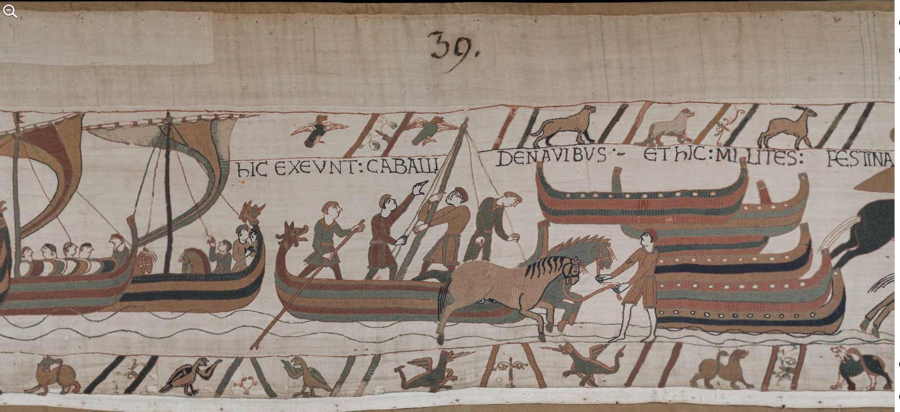 |
| Scene 39: hIC ЄXЄVNT CABALLI DE NAVIBVS | Here the horses leave the boats | Ici les chevaux sortent des navires [See a larger version of the image] |
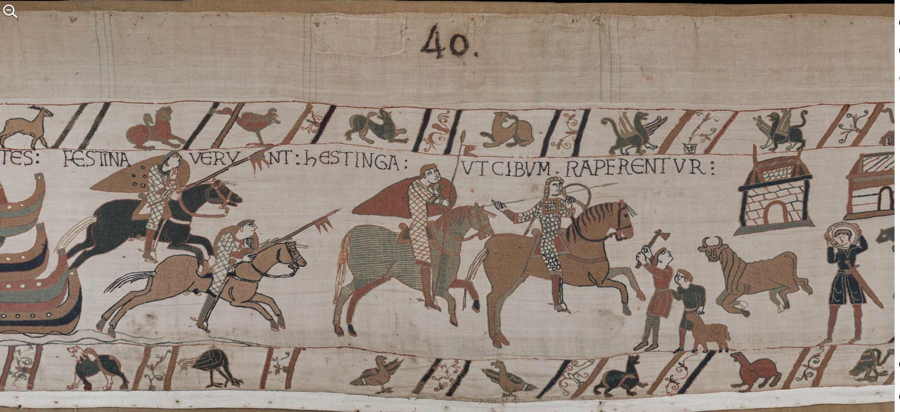 |
| Scene 40: ЄT hIC MILITЄS FESTINAVERVNT hЄSTINGA VT CIBVM RAPERENTVR | And here soldiers have hurried to Hastings to seize food | Et ici les chevaliers se hâtent vers Hastings pour y prendre de la nourriture [See a larger version of the image] |
 |
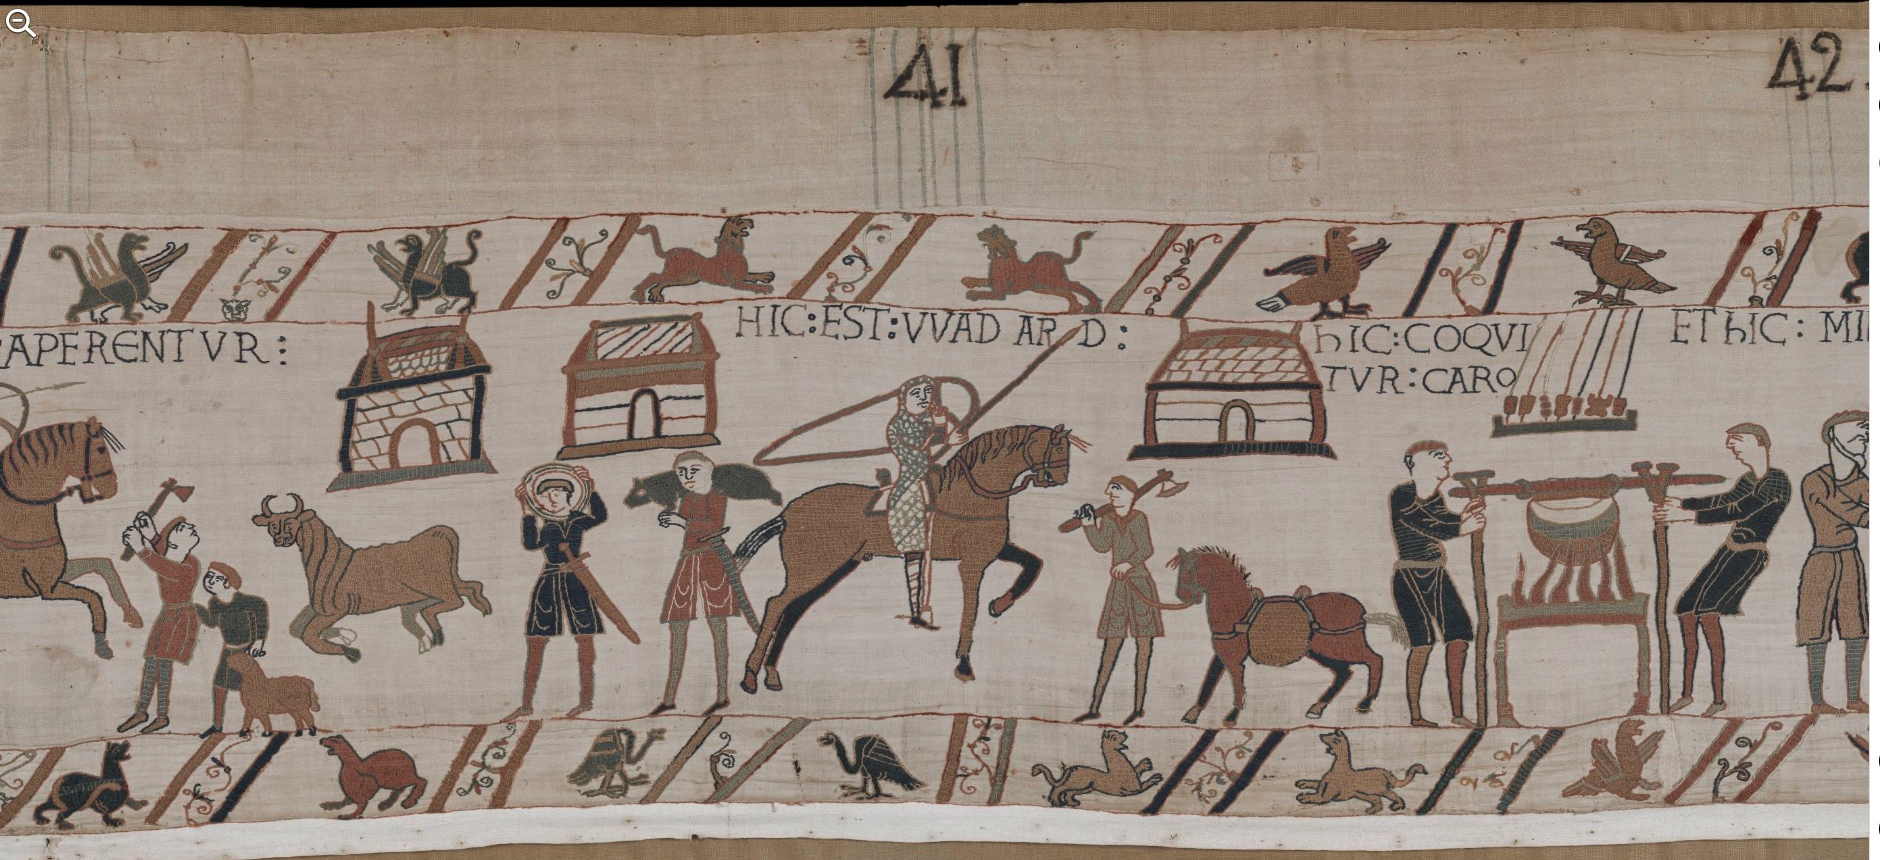
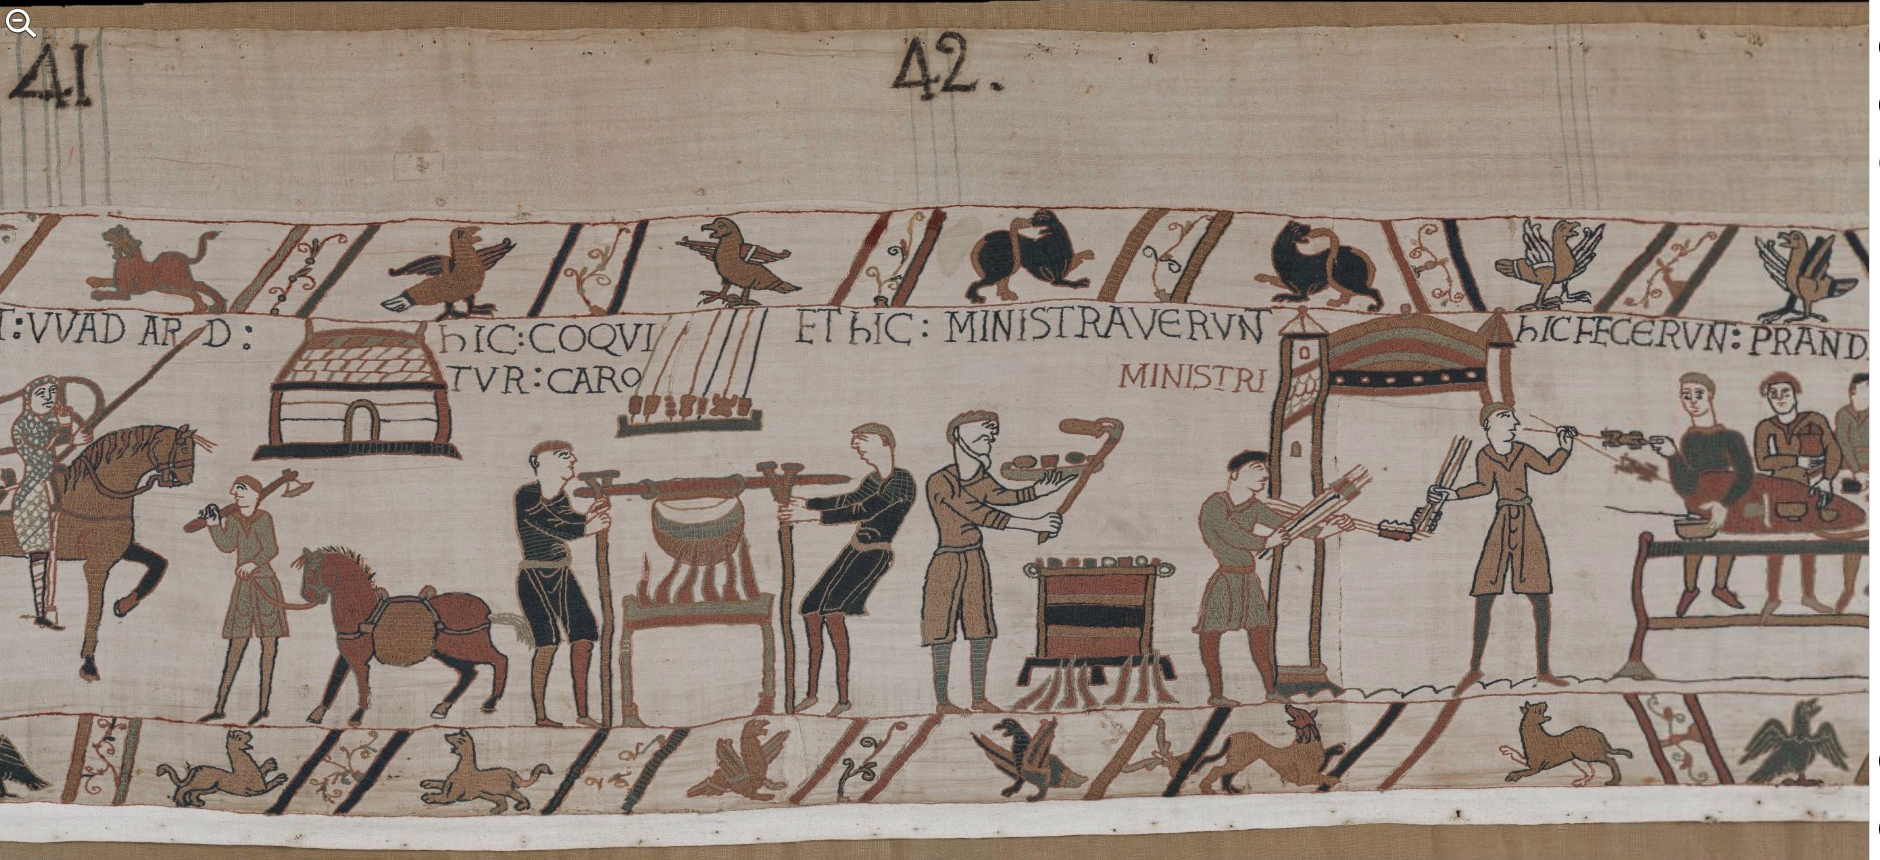
| Scene 41: HIC EST VVADARD | Here is Wadard | Ici est Wadard [See a larger version of the image] |
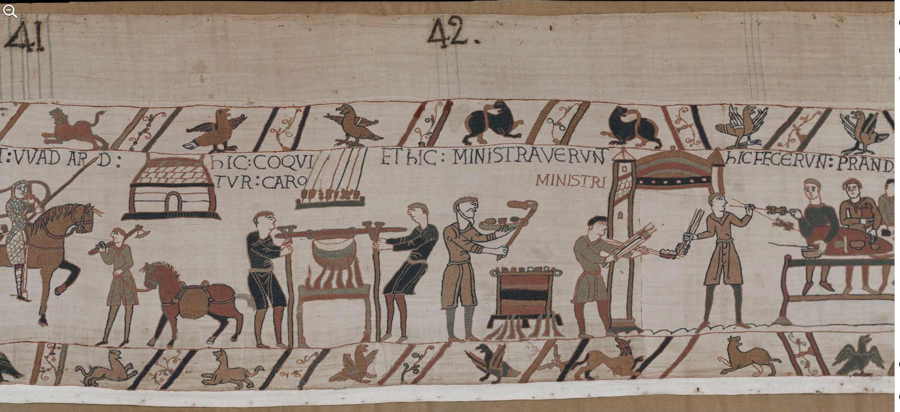 |
| Scene 42: hIC COQVITVR CARO ET hIC MINISTRAVЄRVNT MINISTRI | Here the meat is cooked, And here it has been served ; The servants | Ici on cuit la viande et ici les serviteurs servent [See a larger version of the image] |
 |
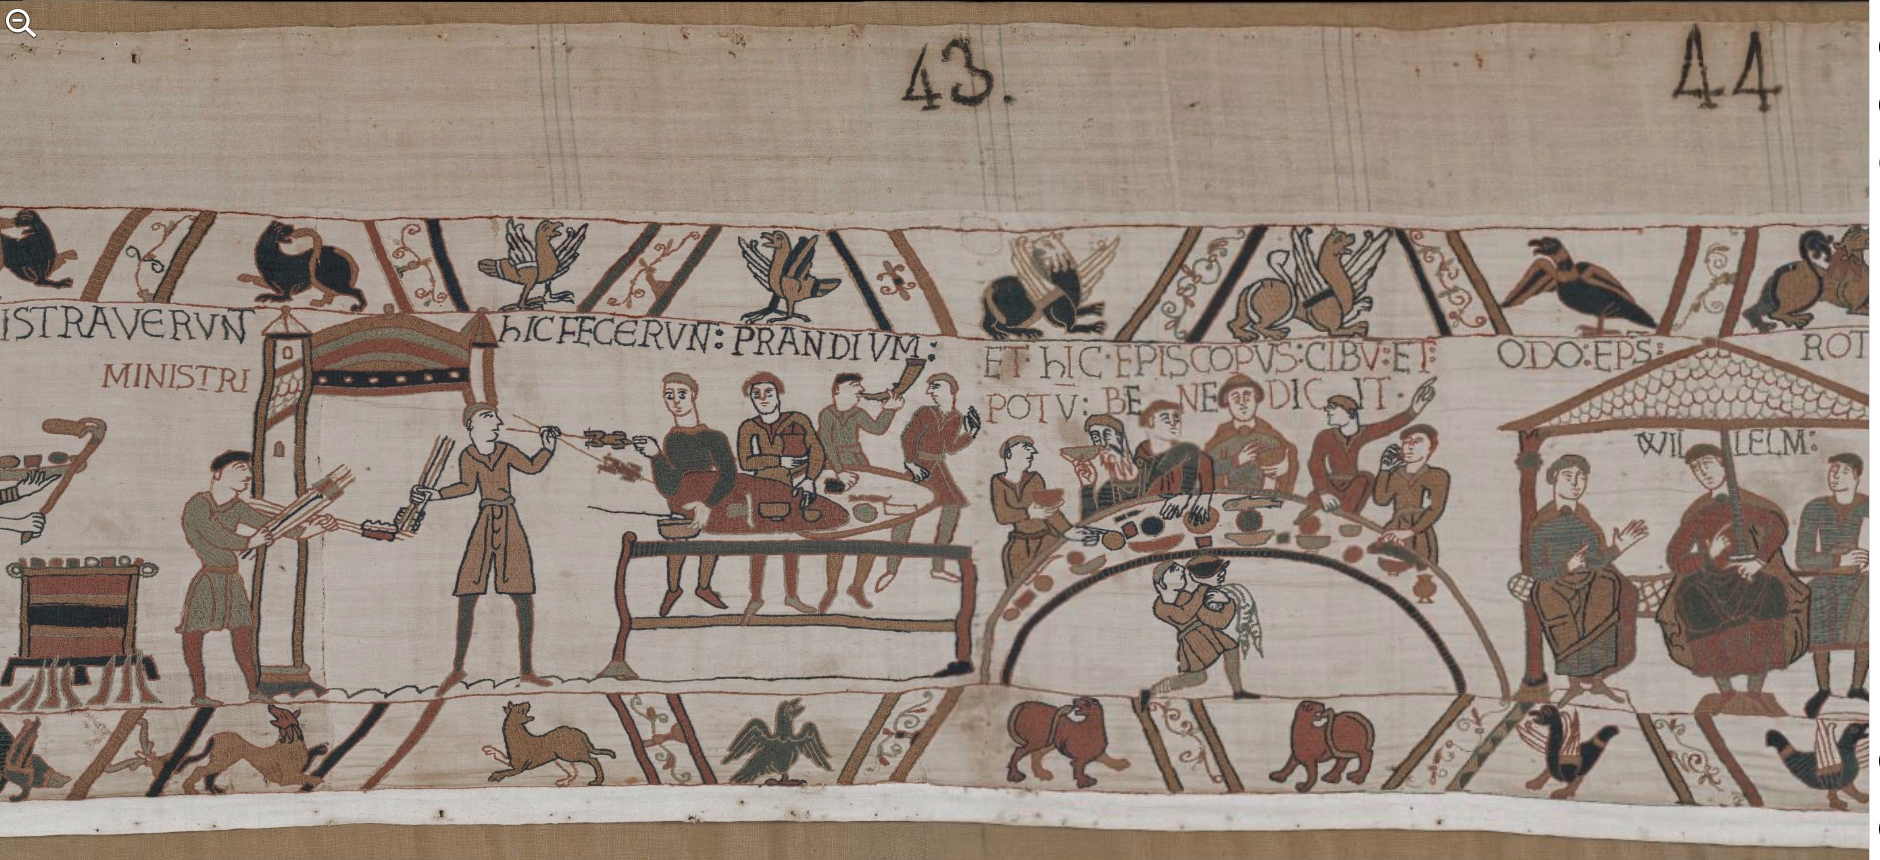
| Scene 43: hIC FECЄRVNT PRANDIVM ET hIC EPISCOPVS CIBVM ET POTVM BENEDICIT | Here they made a meal, And here the bishop blesses the food and drink | Ici ils firent un déjeuner et ici l’évêque bénit la nourriture et la boisson [See a larger version of the image] |
 |
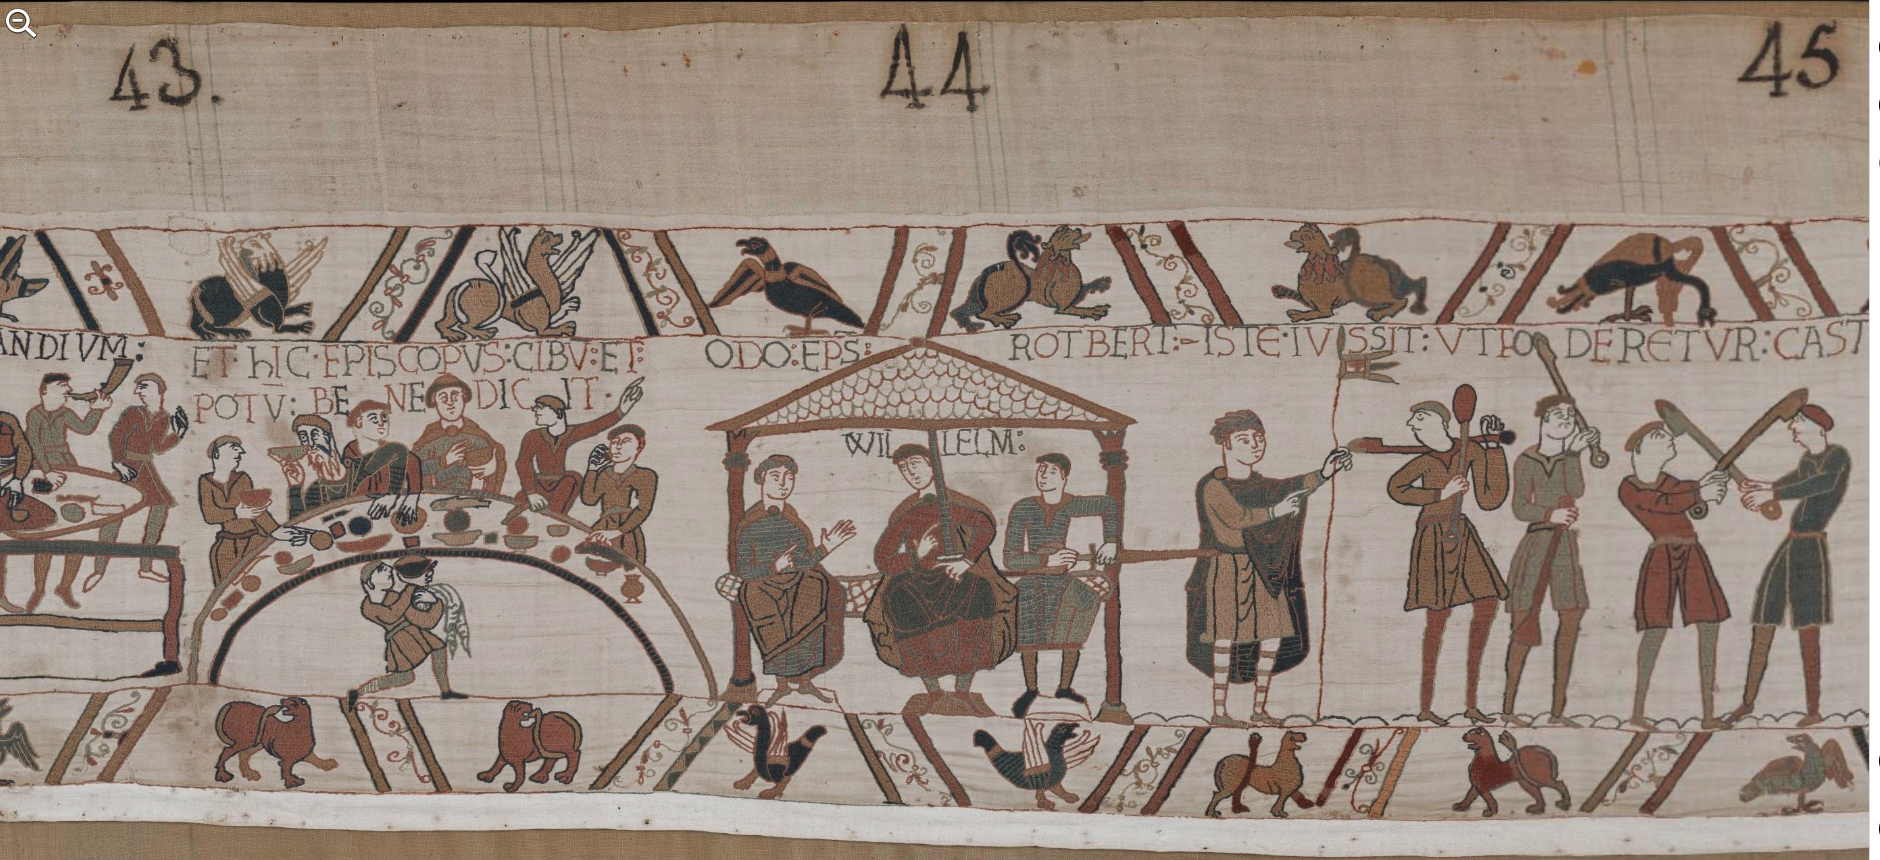
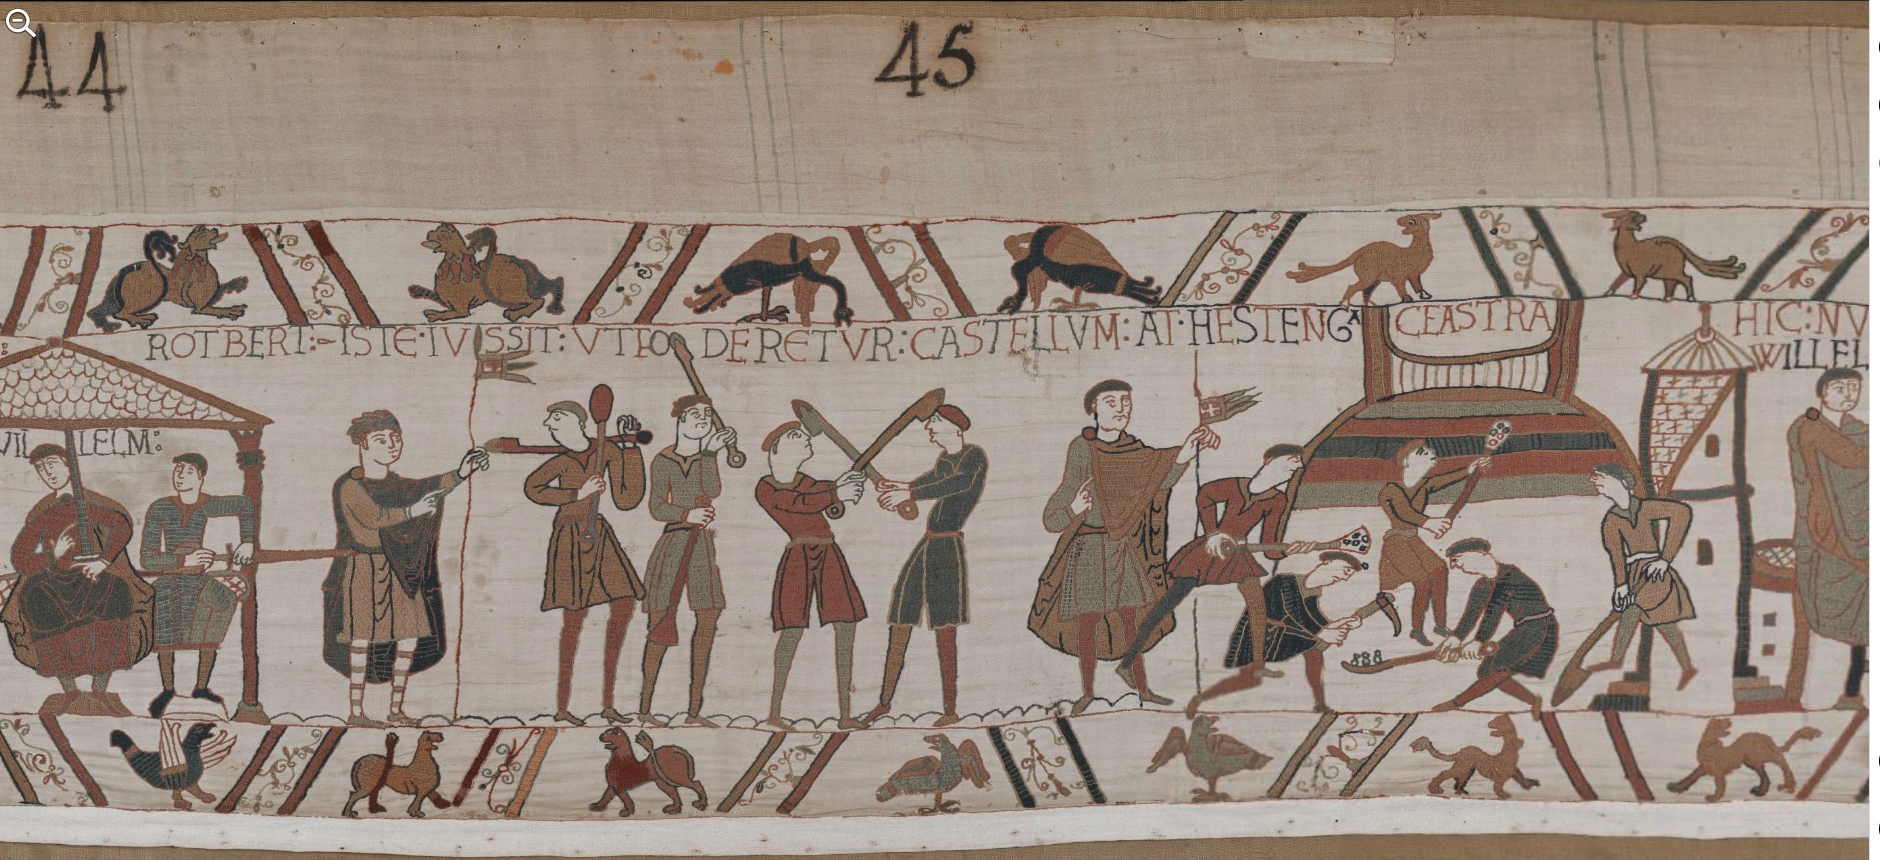
| Scene 44: ODO EPISCOPVS VVILLEM ROTBERT | Bishop Odo, William, Robert | L'évêque Odon, Guillaume, Robert [See a larger version of the image] |
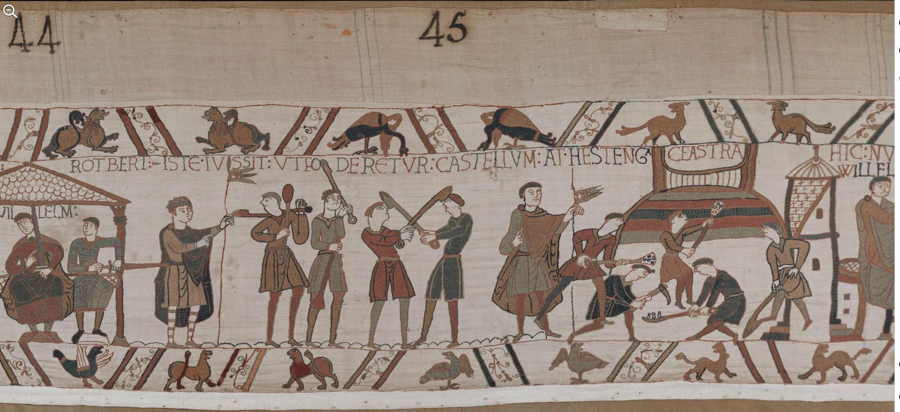 |
| Scene 45: ISTE IVSSIT VT FODERЄTVR CASTELLVM AD HESTENGA CEASTRA | This man has commanded that a fortification should be thrown up at Hastings | Ceux-ci ordonnent de faire les terrassements d’un château à Hastings [See a larger version of the image] |
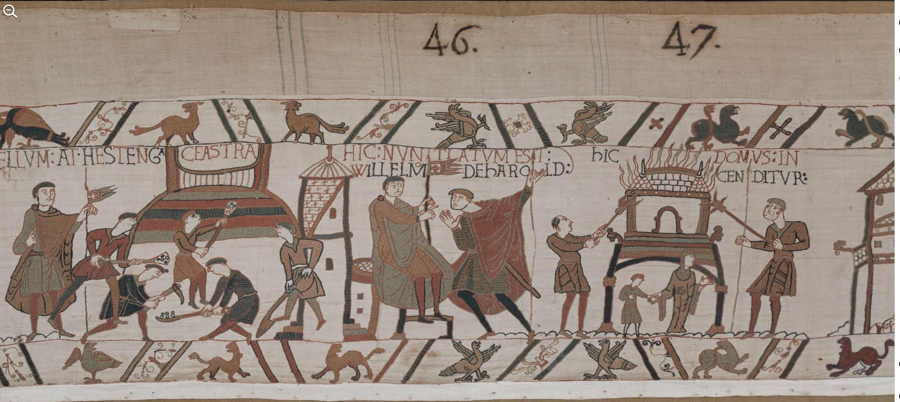 |
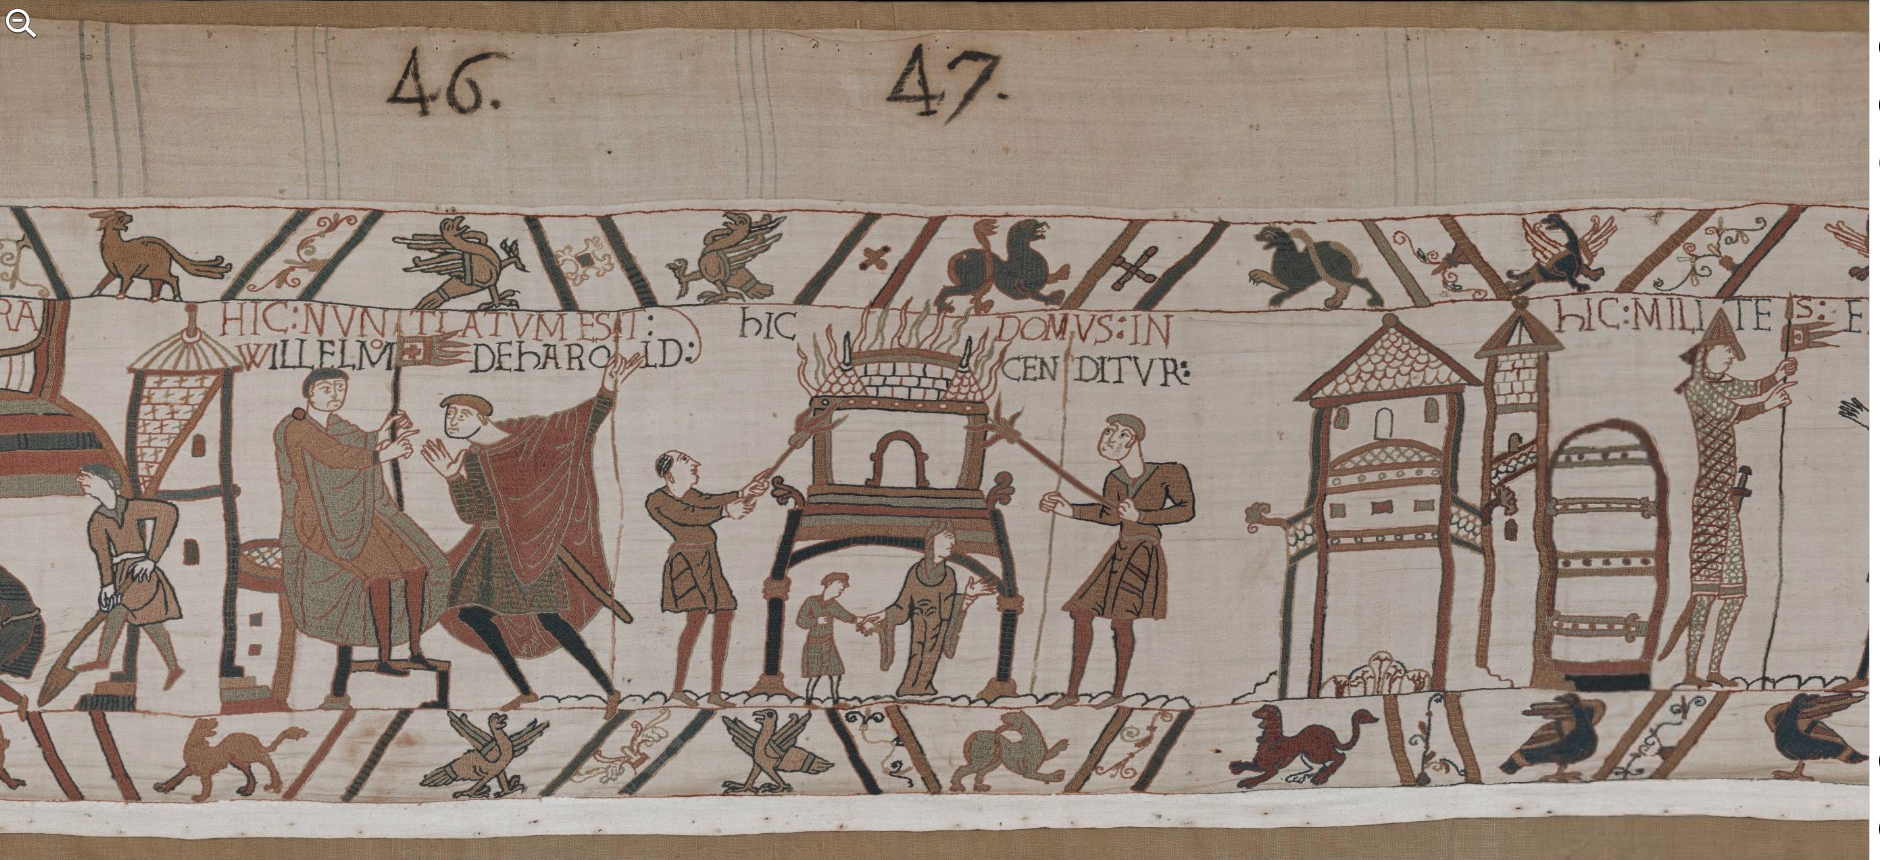
| Scene 46: HIC NVNTIATVM EST VVILLELM DE HAROLD | Here news is brought to William about Harold | Ici on donne à Guillaume des nouvelles de Harold [See a larger version of the image] |
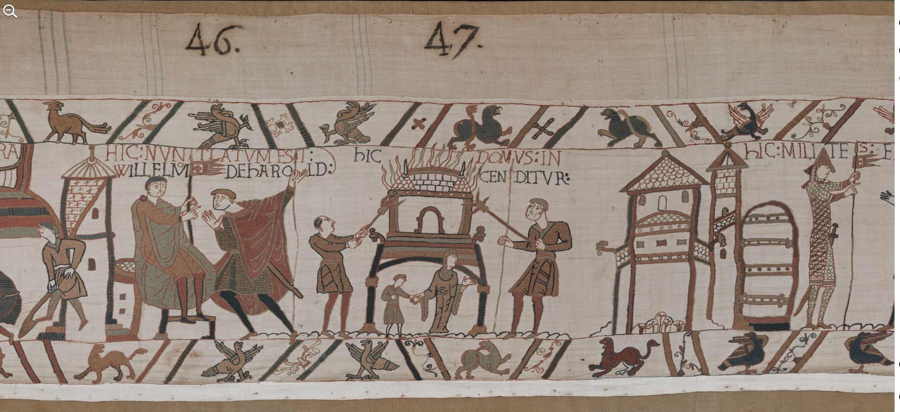 |
| Scene 47: hIC DOMVS INCENDITVR | Here a house is burned | Ici une maison est incendiée [See a larger version of the image] |
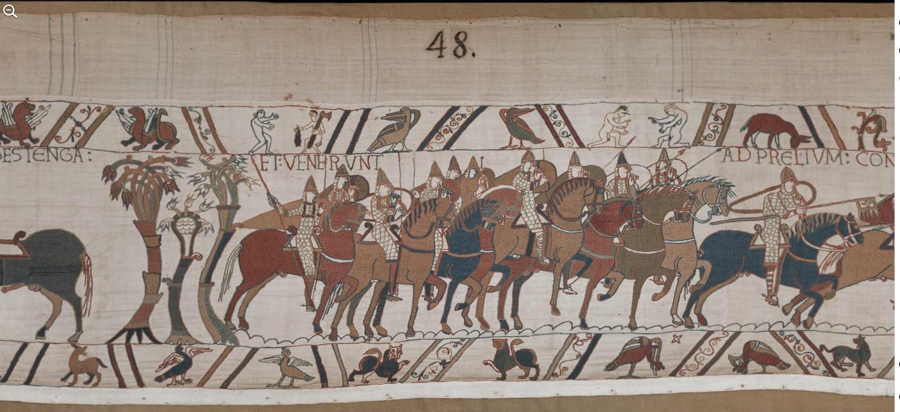 |
| Scene 48: hIC MILITES EXIERVNT DE hESTENGA ET VENERVNT AD PRЄLIVM CONTRA hAROLDVM REGЄ | Here the soldiers went out of Hastings and came to the battle against King Harold | Ici les chevaliers sortirent de Hastings et vinrent se battre contre le roi Harold [See a larger version of the image] |
 |
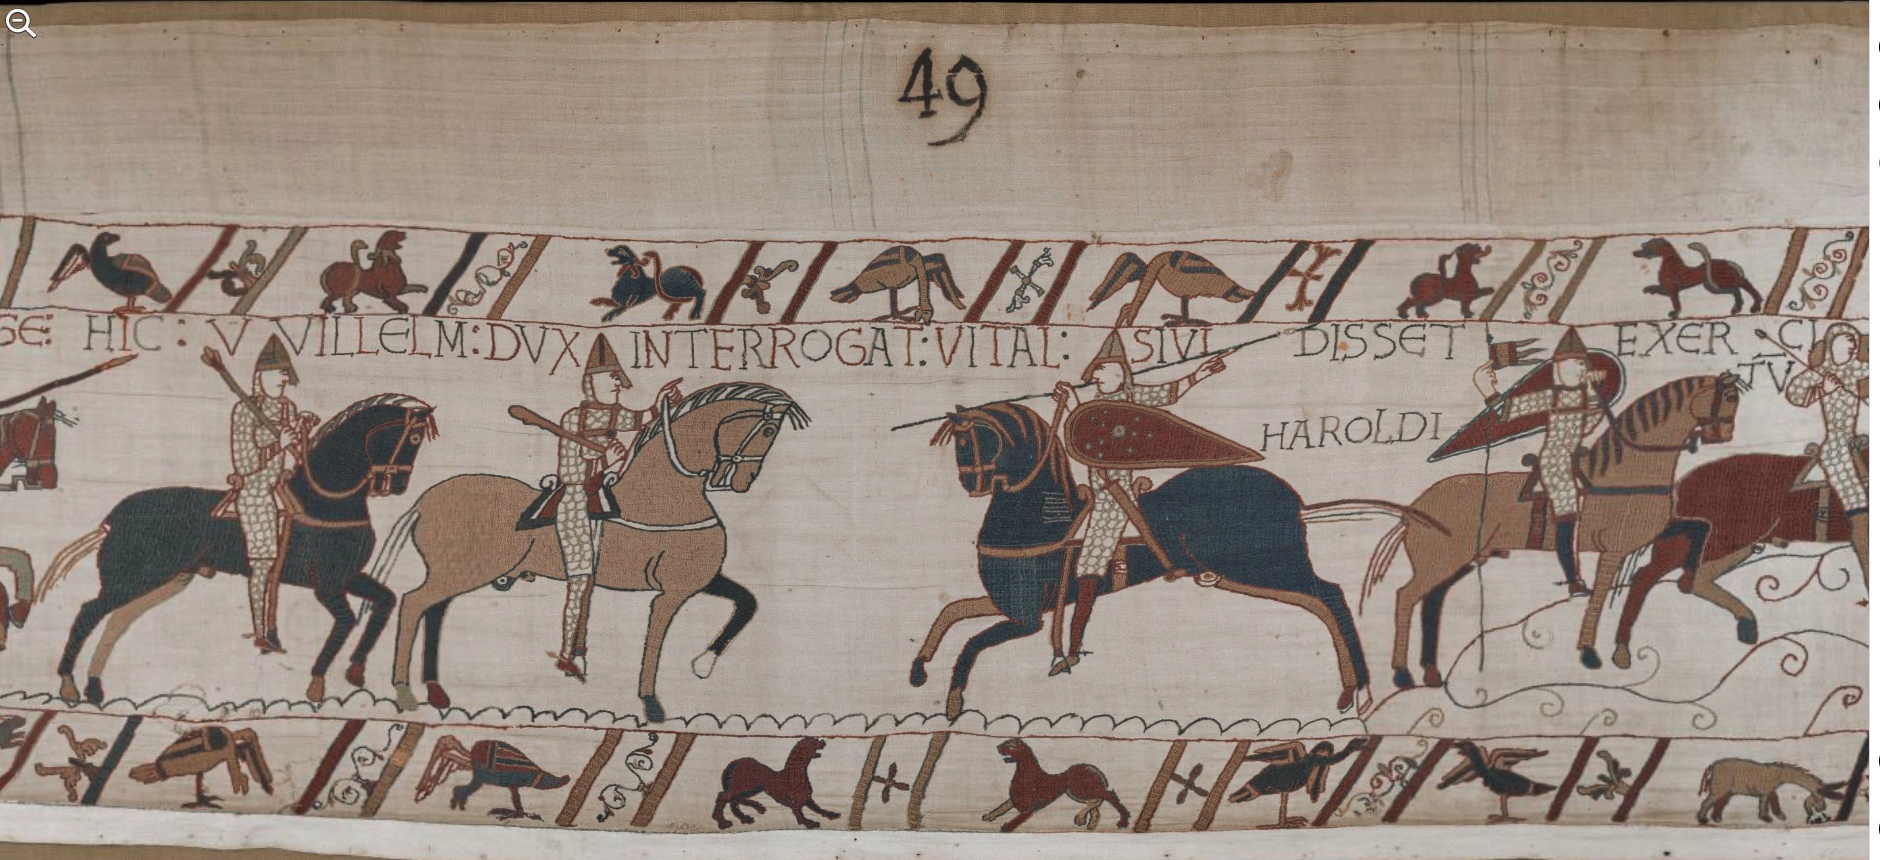
| Scene 49: HIC VVILLELM DVX INTERROGAT VITAL SI VIDISSЄT EXERCITVM HAROLDI | Here Duke William asks Vital whether he has seen Harold’s army | Ici le duc Guillaume demande à Vital s’il a vu l’armée de Harold [See a larger version of the image] |
 |
| Scene 50: ISTE NVNTIAT HAROLDVM RЄGEM DE EXERCITV VVILLILMI DVCIS | This man tells King Harold about Duke William’s army | Celui-ci annonce au roi Harold l’armée du duc Guillaume [See a larger version of the image] |
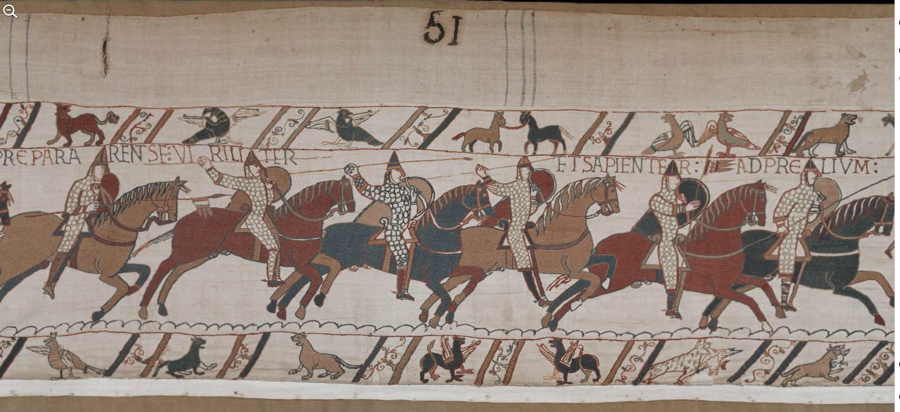 |
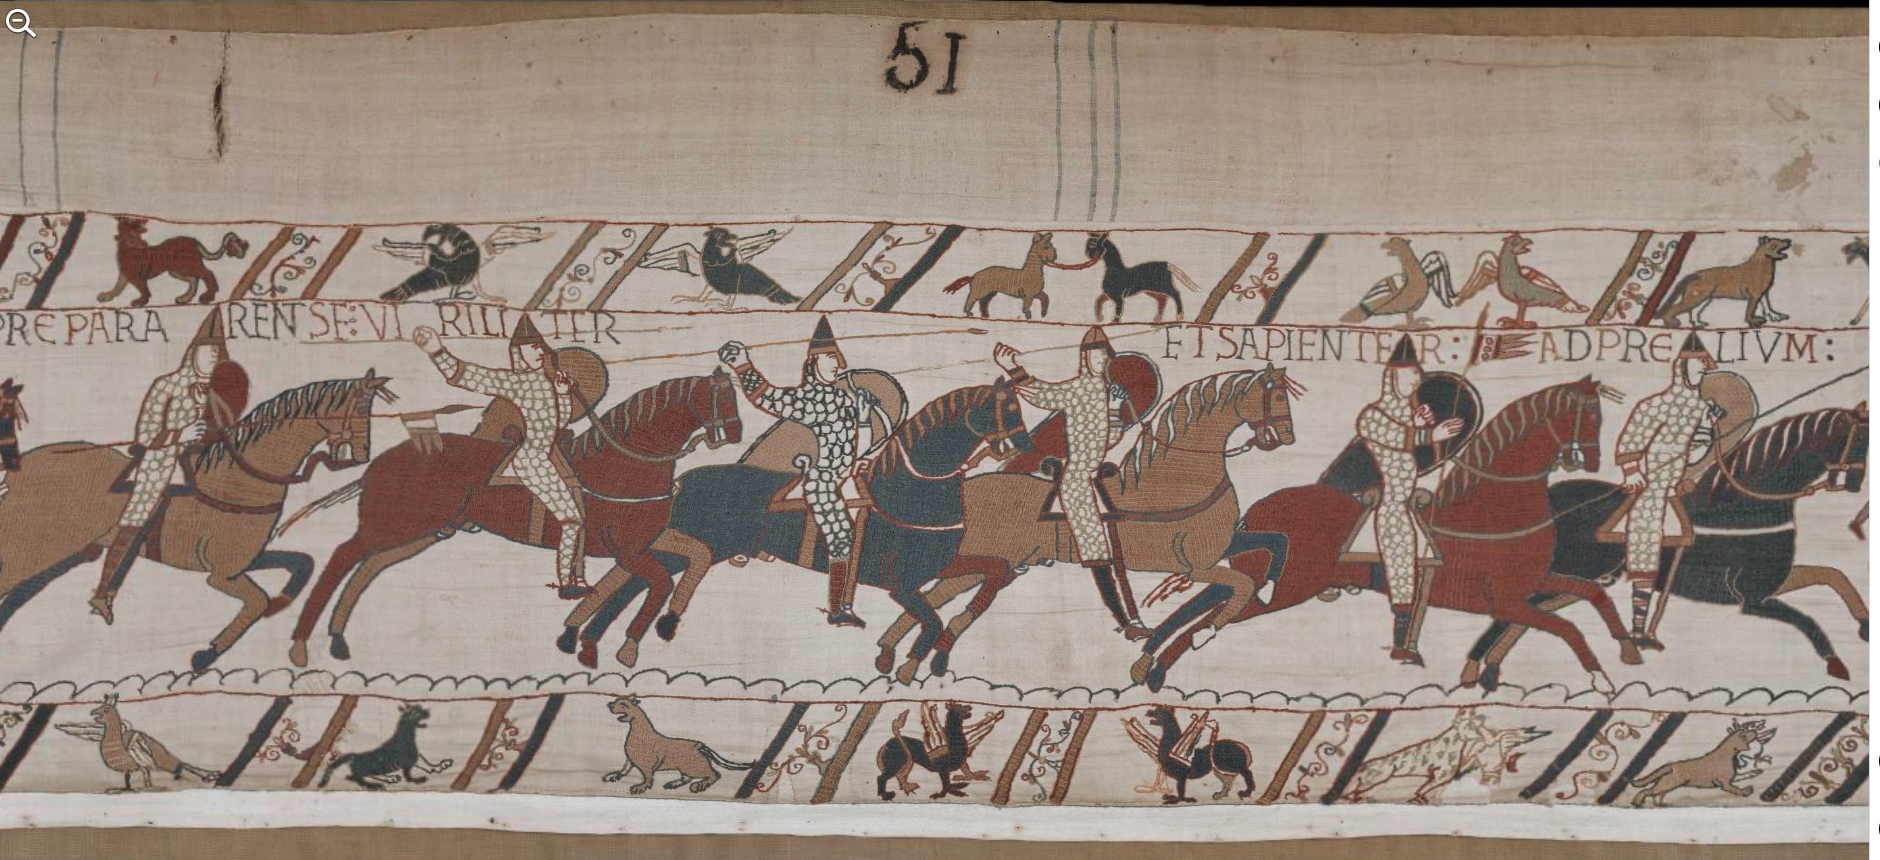
| Scene 51: HIC VVILLELM DVX ALLOQVITVR SVIS MILITIBVS VT PREPARARENT SE VIRILITER ET SAPIENTER AD PRELIVM CONTRA ANGLORVM EXERCITVM | Here Duke William exhorts his soldiers that they prepare themselves manfully and wisely for the battle against the army of the English | Ici le duc Guillaume harangue ses chevaliers pour qu’ils se préparent courageusement et sagement au combat contre l’armée des Anglais [See a larger version of the image] |
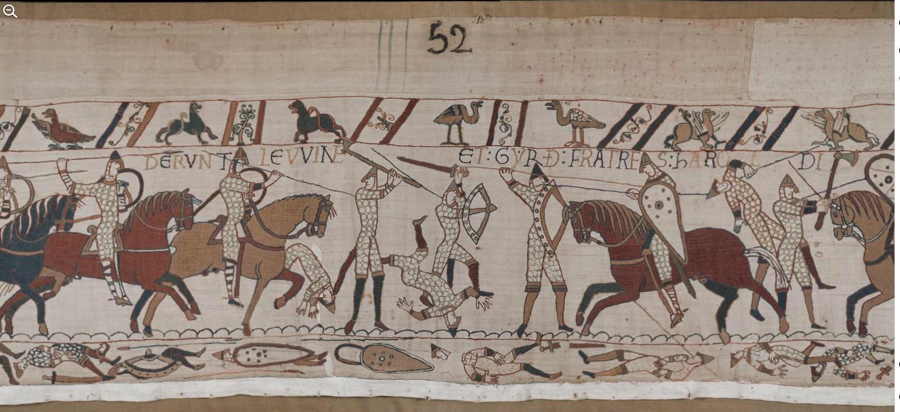 |
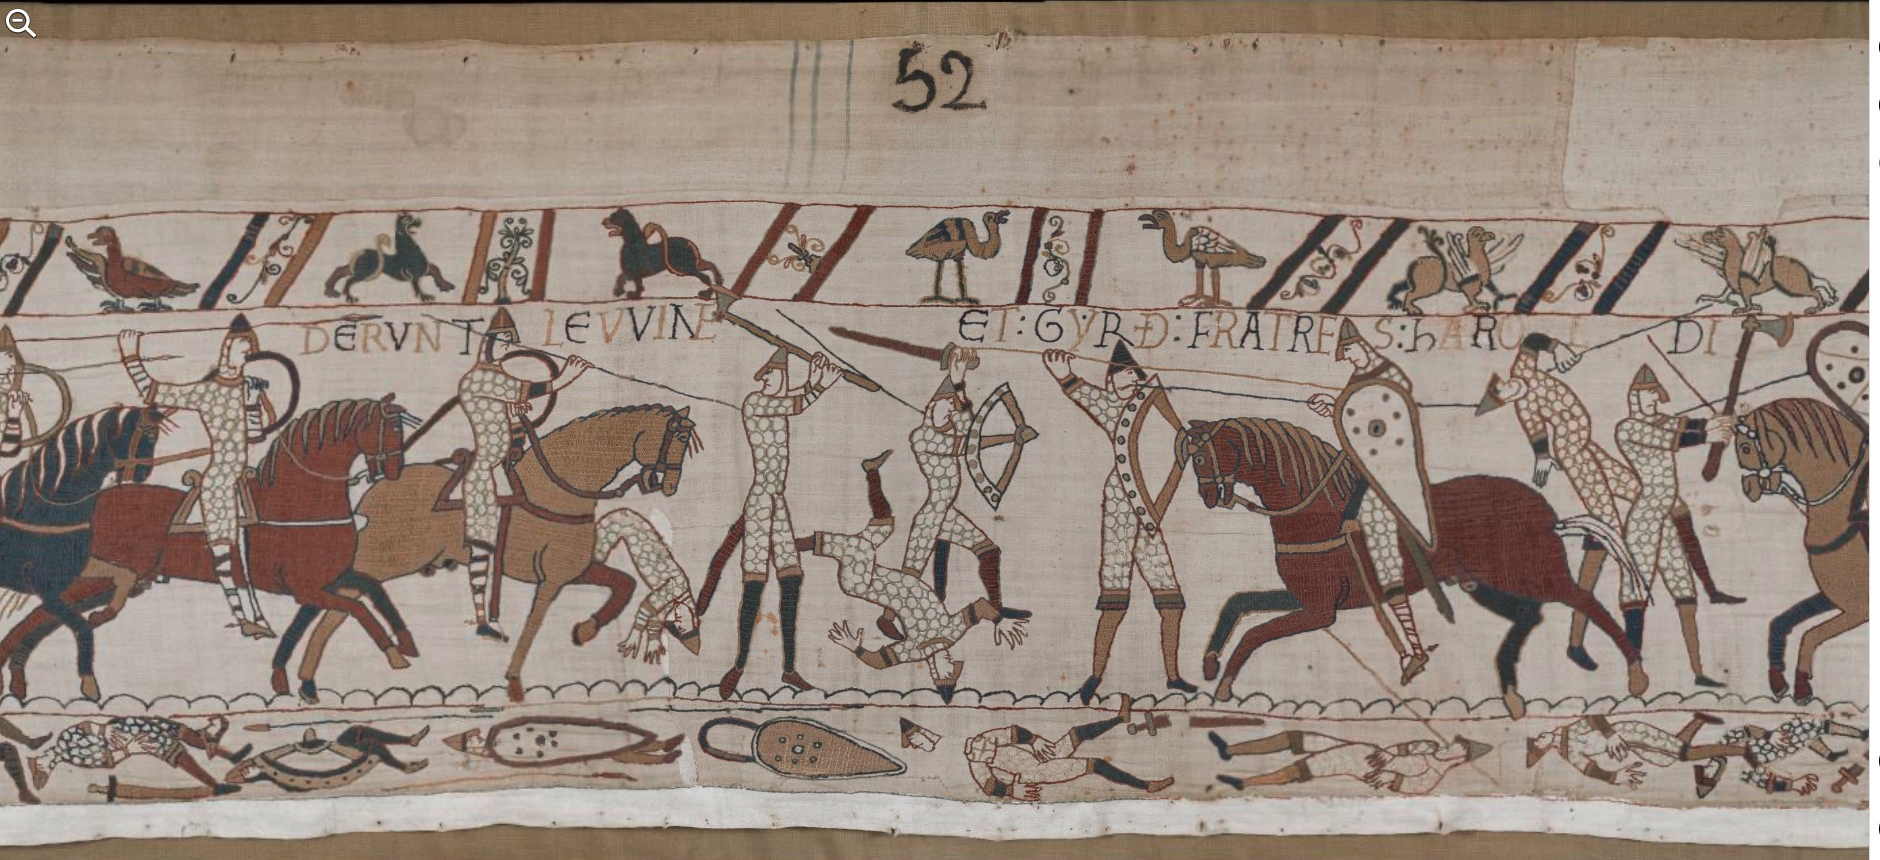
| Scene 52: hIC CЄCIDЄRVNT LEVVINE ЄT GYRÐ FRATRES hAROLDI REGIS | Here were killed Leofwine and Gyrth, the brothers of King Harold | Ici tombèrent Leofwine et Gyrth frères du roi Harold [See a larger version of the image] |
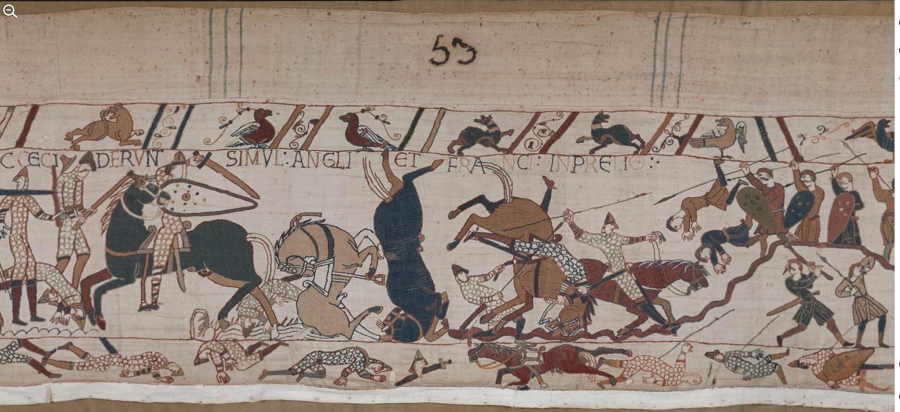 |
| Scene 53: hIC CЄCIDERVNT SIMVL ANGLI ЄT FRANCI IN PRELIO | Here at the same time English and French fell in battle | Ici tombèrent ensemble au combat Anglais et Français [See a larger version of the image] |
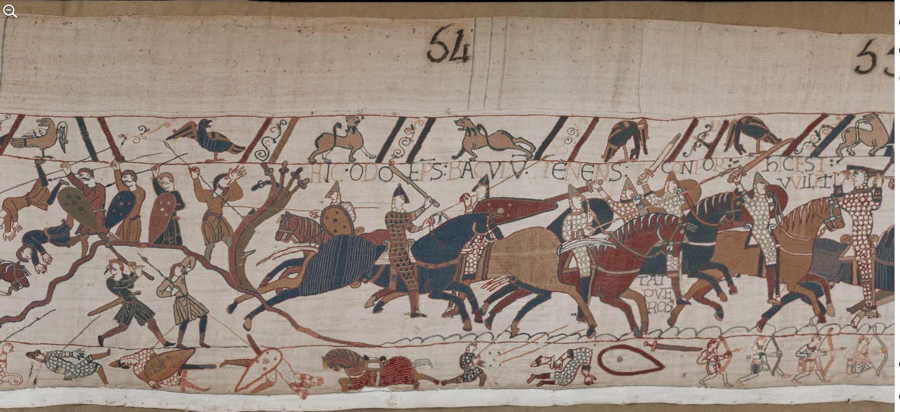 |
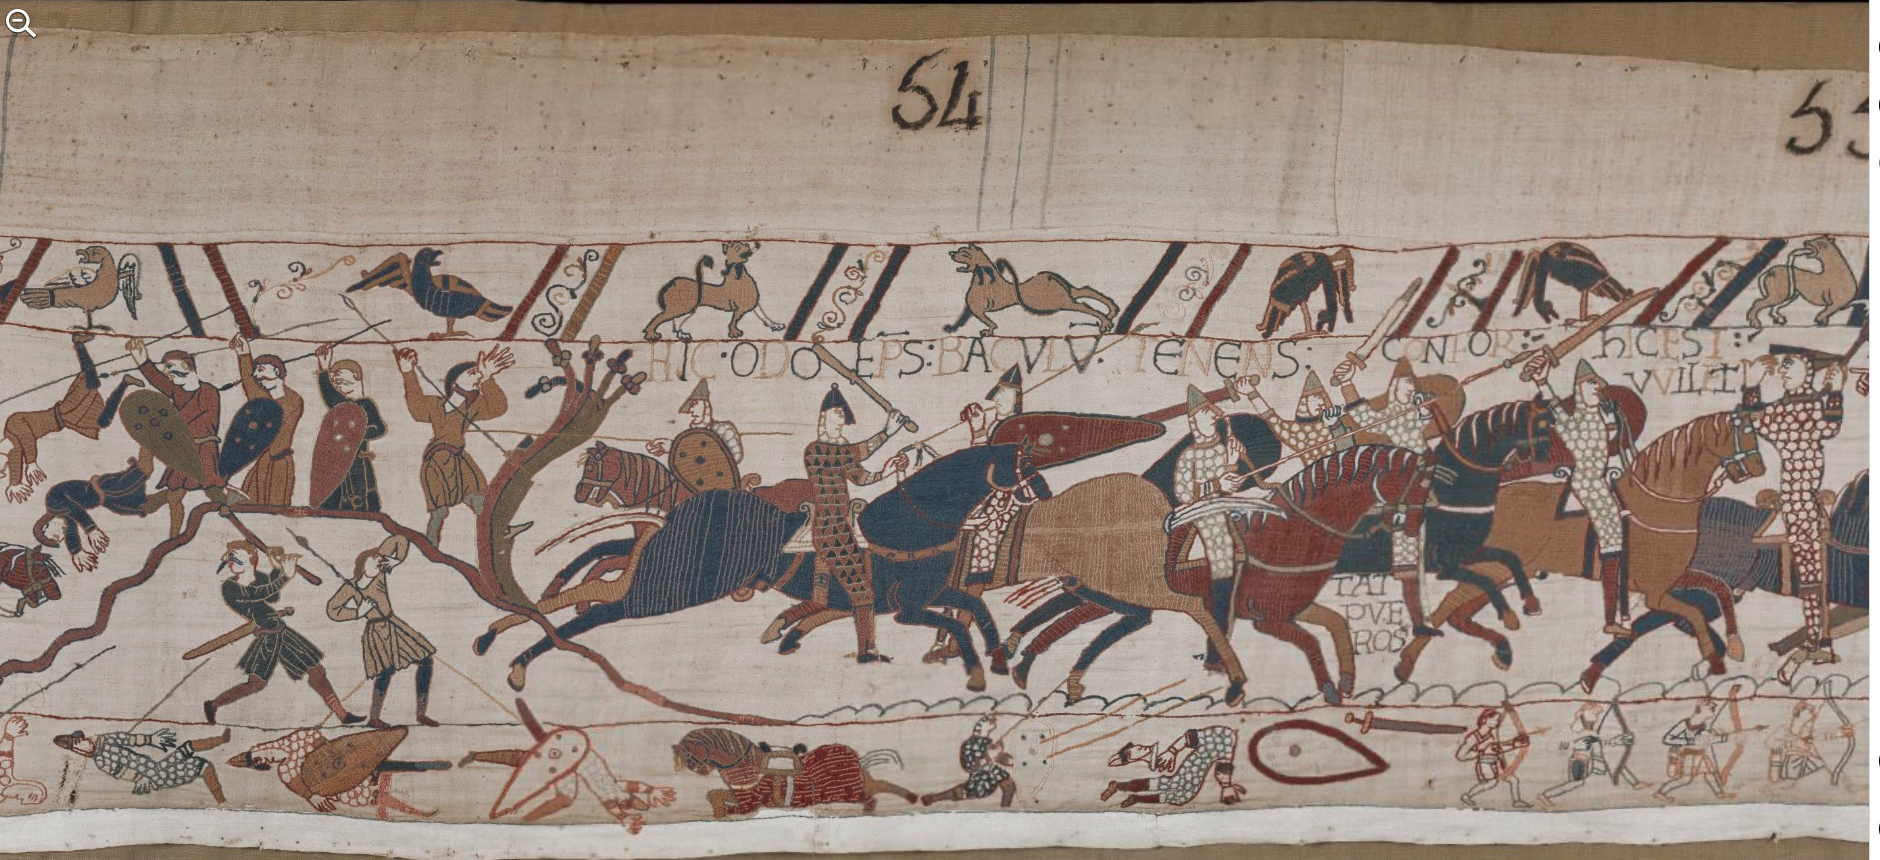
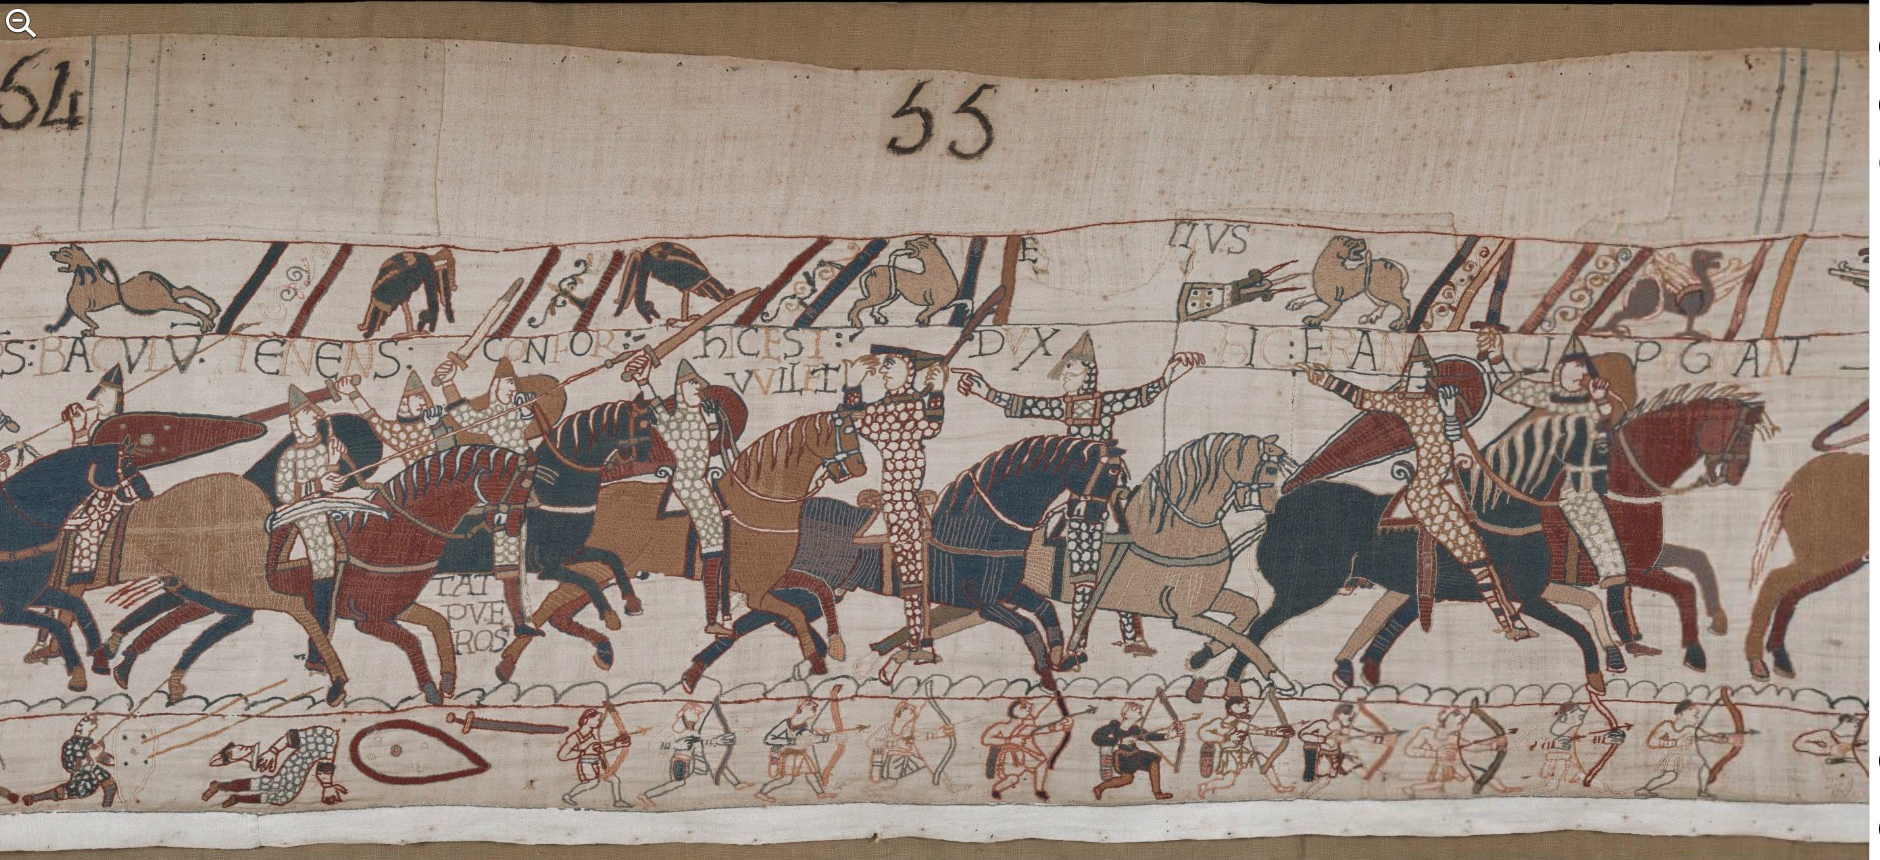
| Scene 54: HIC ODO EPISCOPVS BACVLVM TЄNЄNS CONFORTAT PVEROS | Here Bishop Odo holding a wand encourages the young men | Ici l’évêque Odon tenant son bâton encourage les jeunes [See a larger version of the image] |
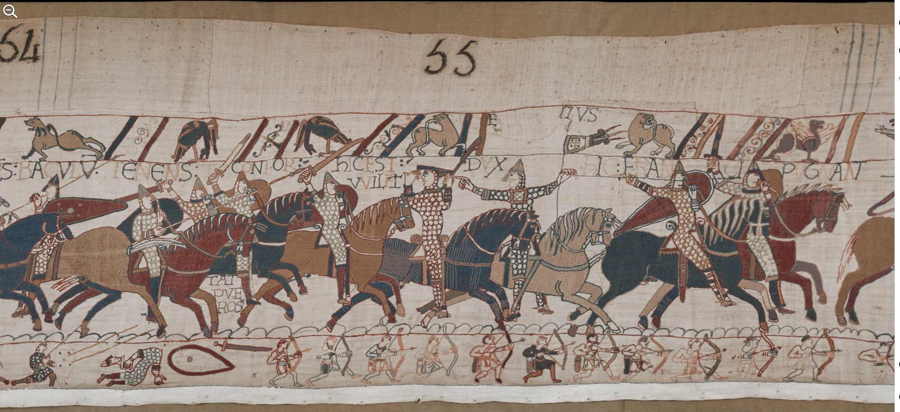 |
| Scene 55: hIC EST DVX VVILLELM E[...]TIVS | Here is Duke William E…tius (Eustace?) | Ici est le Duc Guillaume E…tius (Eustache ?) [See a larger version of the image] |
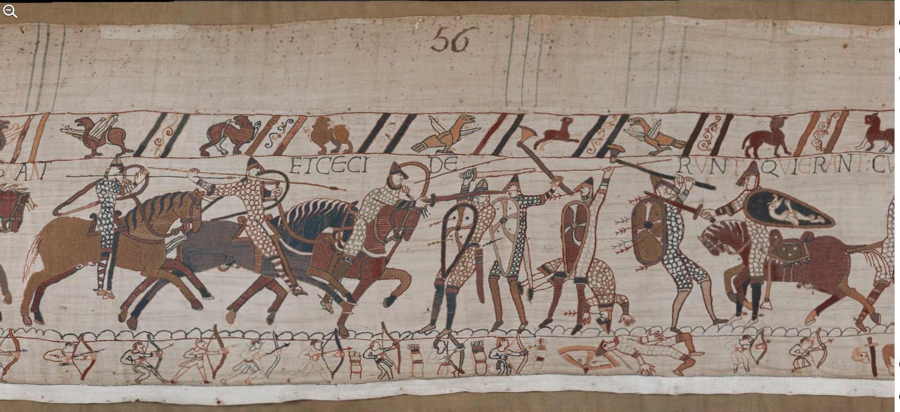 |
| Scene 56: hIC FRANCI PVGNANT ET CЄCIDЄRVNT QVI ЄRANT CVM hAROLDO | Here the French fight and have killed those who were with Harold | Ici les Français combattent et ceux qui étaient avec Harold tombèrent [See a larger version of the image] |
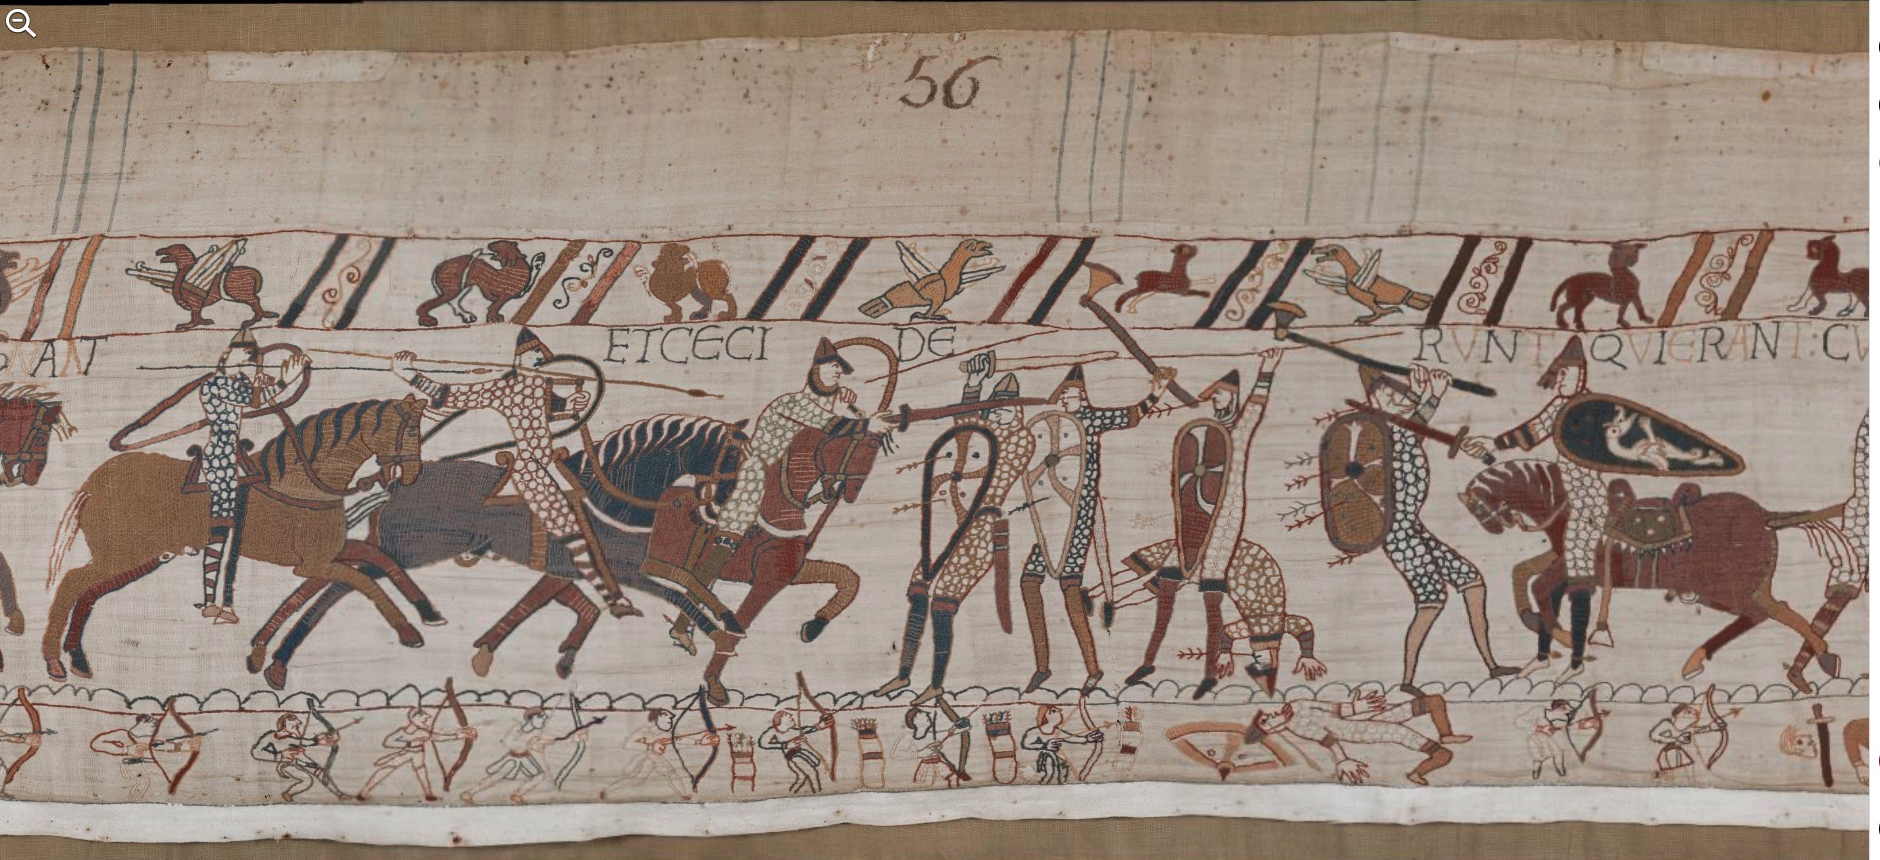
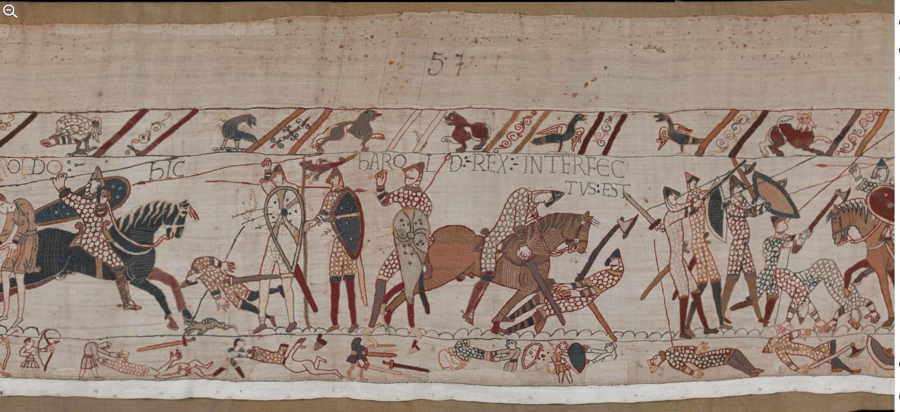 |
| Scene 57: hIC Harold REX INTERFЄCTVS EST | Here King Harold has been killed | Ici le roi Harold fut tué [See a larger version of the image] |
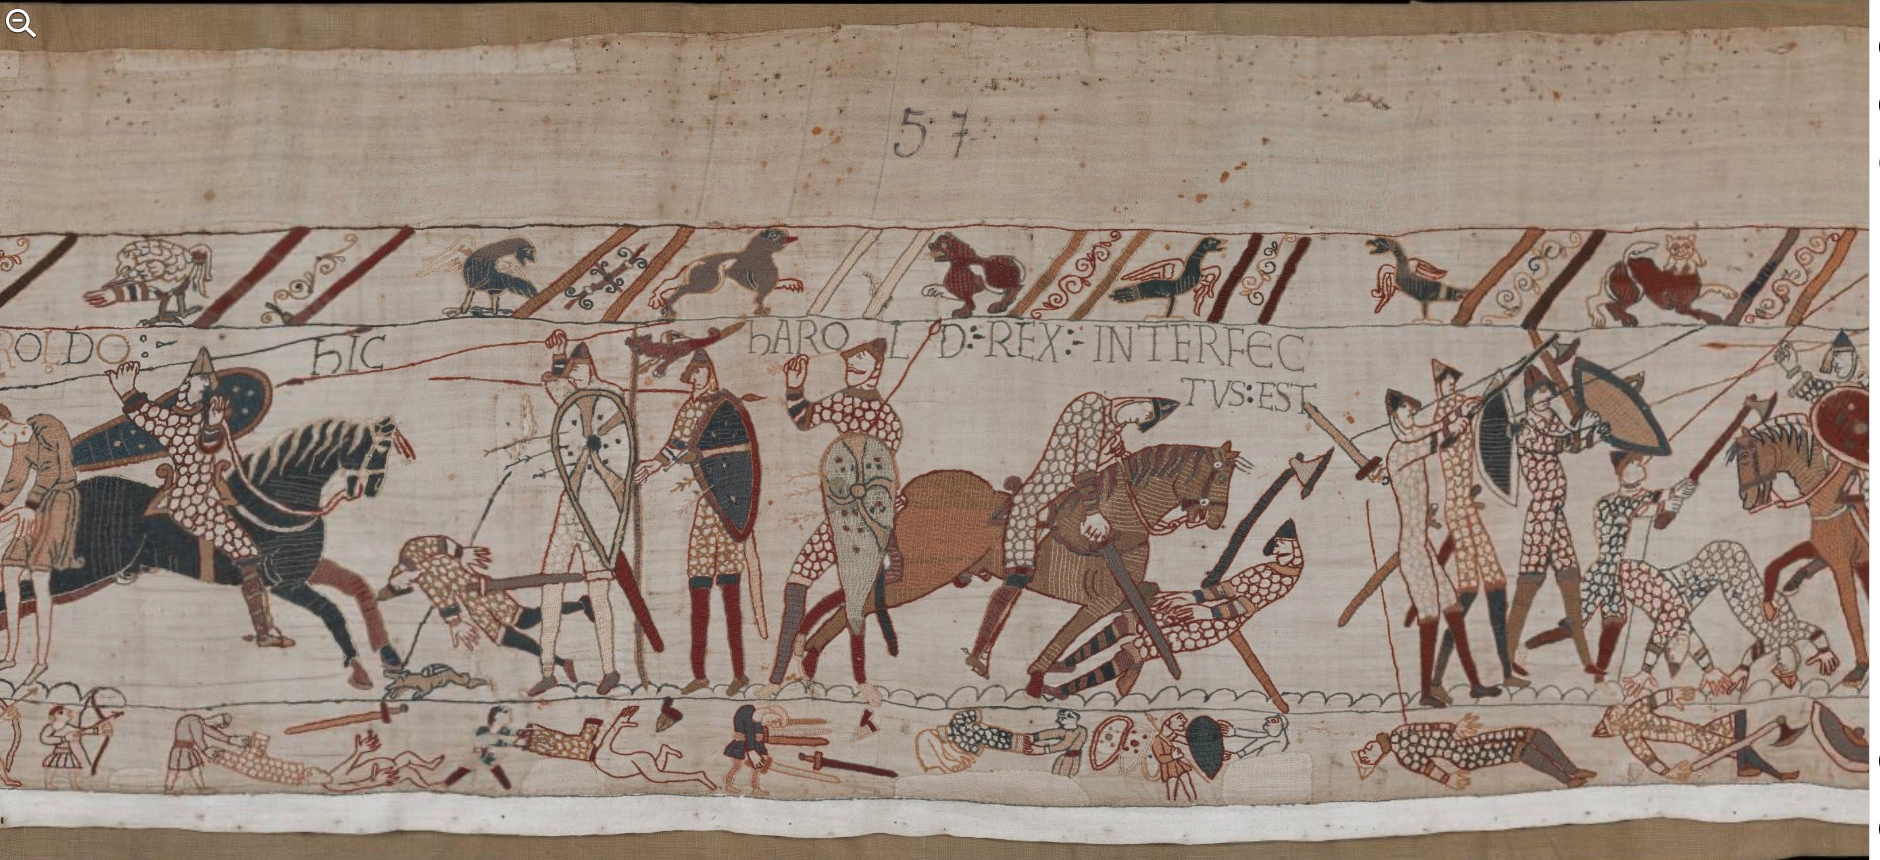
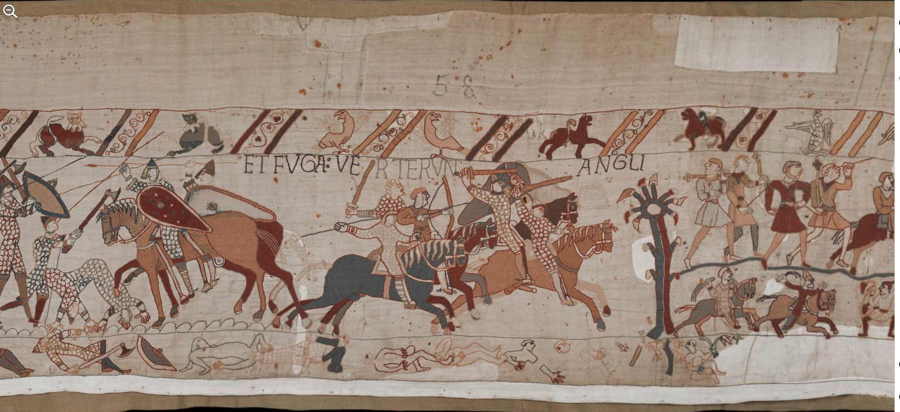 |
| Scene 58: ET FVGA VERTERVNT ANGLI | And the English have turned to flight | Et les Anglais prirent la fuite [See a larger version of the image] |
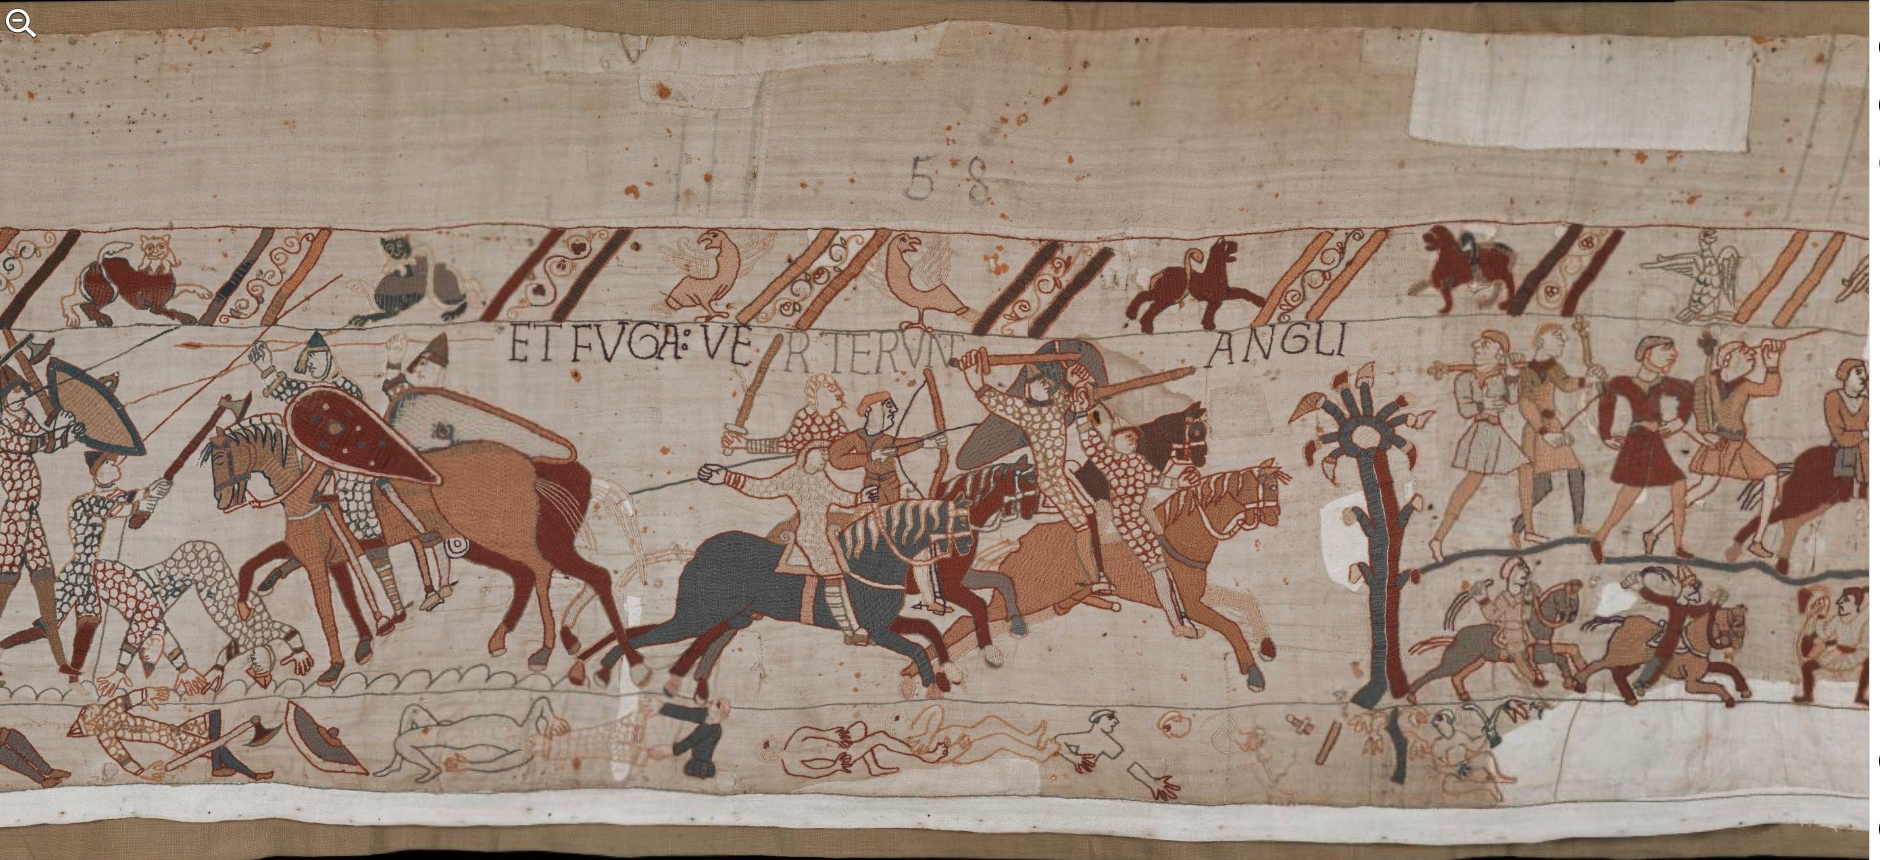