
See the PDF of the slides used in my talk
Introduction
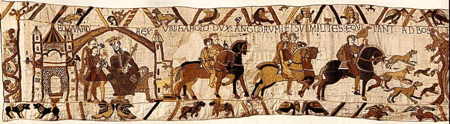
In this talk I want to compare and contrast two important works of art about war, the “Bayeux Tapestry” (or the “Canterbury Embroidery”) (henceforth BT) which is perhaps the “creation” of Odo Bishop of Kent and Bayeux, which was done in the 1070s, and Pablo Picasso’s painting “Guernica” (1937). Even though they are separated in time by some 860 years they have some common elements and themes which suggest that there is a universal human response to war and violence which we should take not of.
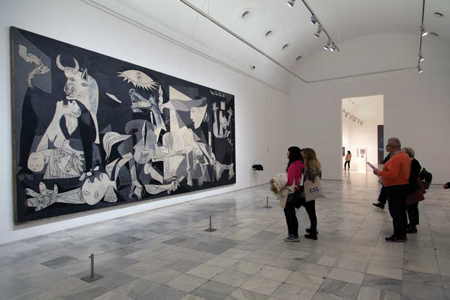
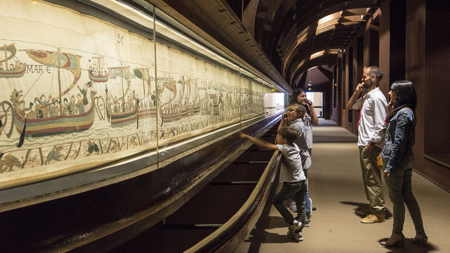
Let us begin by looking at other people looking at these works on public display in museums, before turning to looking at these works ourselves in more detail.
Our “looking” will be done via the digitigised images of these works which are available online. I have use two sites and modified them for my purposes on my own website. They are a version made by the medieval historian Carolyn Schriber who divided the Bayeux Tapestry into 35 discrete “events” which I have modified slightly:
“The Bayeux Tapestry (c. 1070) (Carolyn Schriber Version)”
And the higher quality version made available by the Bayeux Museum, which I have modified slightly on my website as well:
the official Bayeux Museum version: “Official digital representation of the Bayeux Tapestry – 11th century. Credits: City of Bayeux, DRAC Normandie, University of Caen Normandie, CNRS, Ensicaen, Photos: 2017 – La Fabrique de patrimoines en Normandie.” <official Bayeux Museum version
my version “The Bayeux Tapestry (c. 1070) [Bayeux Museum Version]” my version
As we look at these works we should ask ourselves the following questions:
- What do you see in this picture?
- How big is it?
- Why is it this size?
- What is it depicting / telling us?
- Who is telling us about what is being depicted?
- What is the purpose of this depiction / telling?
- Who was the intended audience?
- Is it “art” or is it “propaganda”?
- How should we interpret it?
- What do they have in common?
- How are they different?
- So what?
An Overview of the Works
Let us begin our “looking” with an overview of the works, beginning with the BT.
The Bayeux Tapestry, or rather “Canterbury Embroidery”, was commissioned by Odo Earl of Kent and Bishop of Bayeux, William’s maternal half-brother. It was created in Canterbury, England during the 1070s, probably by monks, in order to celebrate the invasion and conquest of England in Sept. 1066 by the Normans. It is 50 cms high and 70 metres long.
It is difficult to know who exactly was the “creator” of this work as it was a collaborative work administered by William’s half brother Odo. He must have had a team of people working under him, but who created the overall design of the work, how this work was delegated to others to complete, the sequence of events which were to be depicted, and how they were to be depicted, remains a mystery as no record was kept or survived. It is also unknown who organised and designed the very large number of smaller, often animal, images above and below the main middle panel.
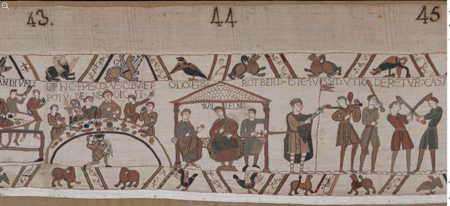
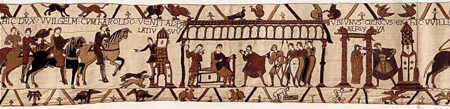
We have two images of Odo in the TP itself, one of him eating and talking to William before the battle (P44) (sitting on the left under the roof of some kind of building or shelter) and another of him in battle on horseback wielding a club (P54).
My interpretation of this images is given at the end of this essay.
One way to look at the BT as a whole is a montage of all 35 panels/”events” of Schriver’s online edition.
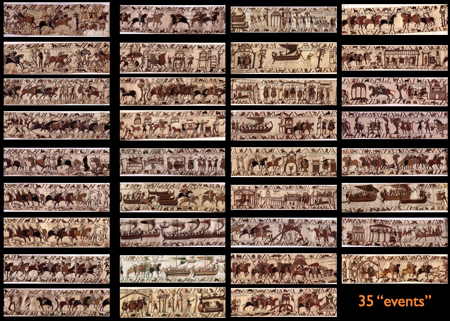
Or even better, to go to the Bayeux Museum website to see the “long ribbon” or “panorama” of images (some 58 numbered “panels” and scroll across them from one end to the other: panorama
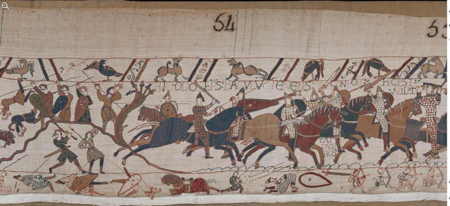
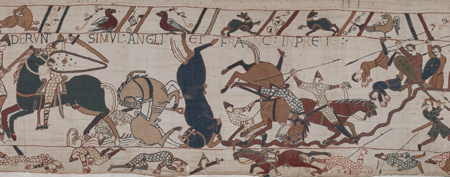
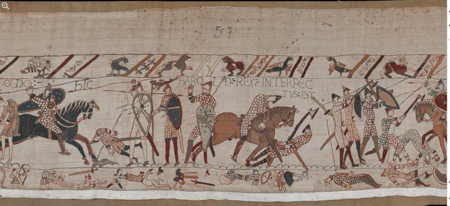
Compare this panoramic view with the view of just one of these panels which contains considerable detail. One such panel is Panel 53 which shows injured horses in battle with the typical added details of images in the top and bottom smaller panels (in most cases animals but here injured and dead soldiers as well):
Now for an overview of the second work “Guernica”.
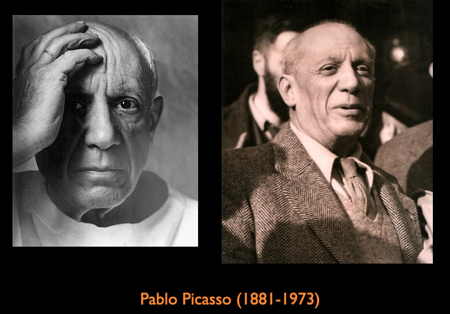
The creator is definitely the famous and great “Cubist” painter Pablo Picasso (1881-1973).
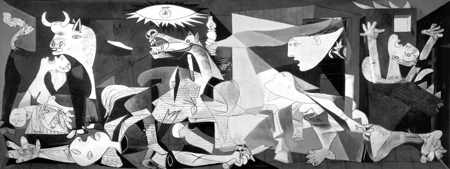
The painting “Guernica” was a mural which was commissioned by the Spanish republican government for the International Exposition held in Paris between May and November 1937. It was intended as a protest of the bombing of the Basque town of Guernica on 26 April 1937 by planes from the German (Nazi) air force to aid Franco during the Spanish Civil War. It is 3.49 metres high and 7.76 metres wide.
A Brief Interlude
This is a heads-up of what is to come: a montage of 5 common elements of the works with 1 example from each work:
- dead and decapitated soldiers
- an injured horse
- a burning building
- a light
- a woman
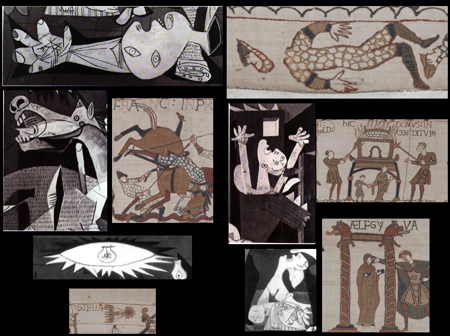
A more detailed discussion of each work follows, in reverse chronological order.
II. Guernica
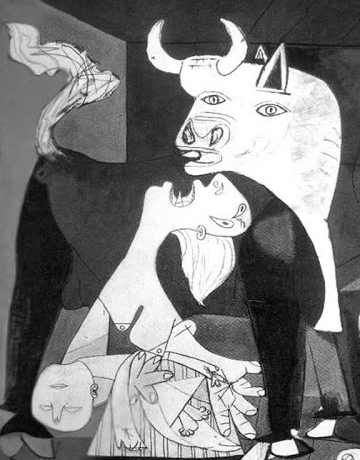
The finished painting can appear confusing to first-time viewers because of the jumble of images and the cubist style used by Picasso:
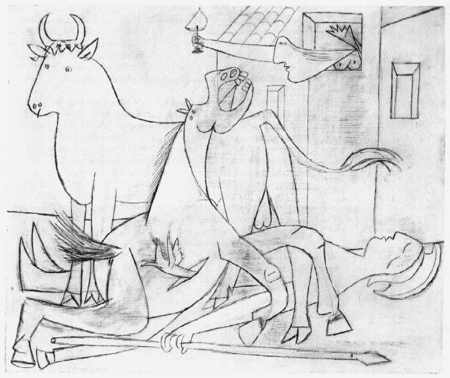
This early sketch from 6 May 1937 as Picasso was planning the final form of the painting gives a simpler idea of what he had in mind:
In my analysis of the painting I have identified ten major components:
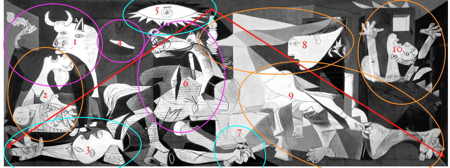
The painting has a pyramidal structure (red lines) and contains the following components:
- the bull
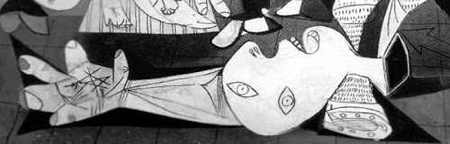
- the grieving woman with her dead child
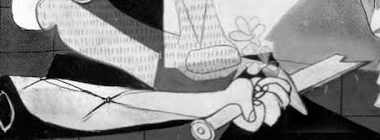
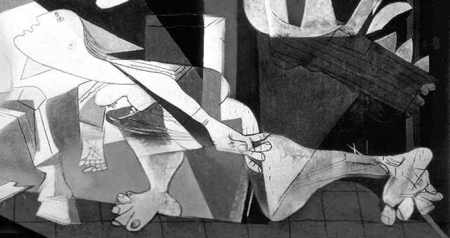
- the fallen statue of a warrior, with its head broken off
- the bird flying from the wound in the side of the horse
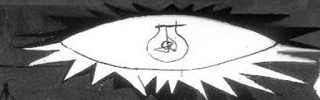
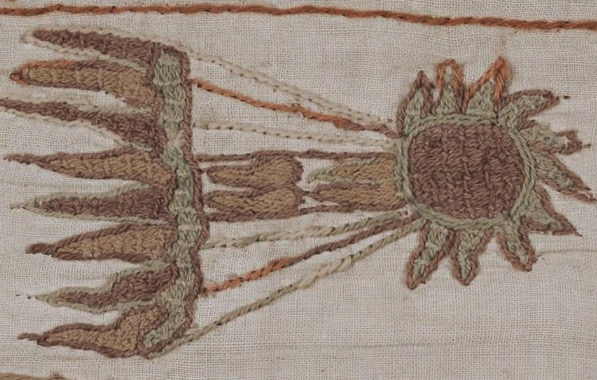
- the image of the sun or electric light
- the wounded horse with a gash in its side
- the sprouting flower
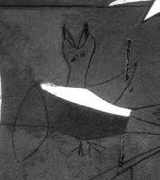
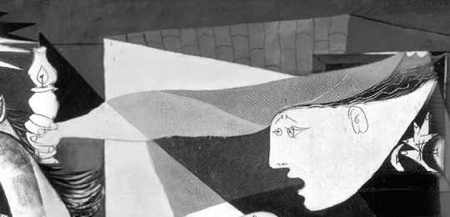
- the woman with the lamp leaning out of the burning building
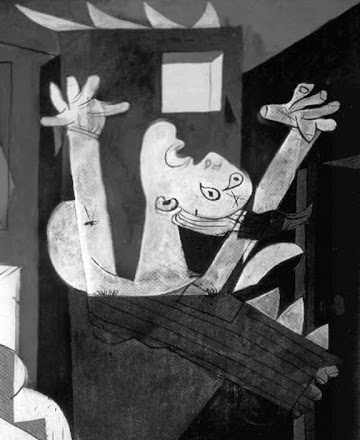
- the woman fleeing the burning building
- the woman falling from the burning building
The significance and meaning of the various images within the painting are not entirely clear and there have been different explanations offered by art critics and historians over the years.
My summary interpretation is that Picasso is showing us the effects of a bombing raid on innocent civilians and animals in a small town, by shining some light on these appalling events, in the hope that this will arouse outrage and opposition among the public, and that this is a warning of what might happen to the rest of Europe if fascism/nazism is not stopped.
Let us examine each one in more detail.
1.) the bull and 2.) the grieving “weeping” woman with her dead child – the bull might be a symbol of the Spanish people and their strength in opposing injustice and misfortune. It seems to be standing in a protective stance to shield the inhabitants of the town; the women is weeping as she holds her child which has been killed in the bombardment of the town. Note that Picasso did many pictures of bulls and horses in his studies of bull fights, and many pictures of weeping women.
3.) the fallen statue of a warrior, with its head broken off – in the sketch shown above the warrior is a real man but here he is a statue which has been knocked over in the blast and broken into pieces. The head has been separated and the arm holding a sword has broken off and is in pieces. This could represent the local armed forces which should have protected the town from attack but did not. The statue and the bull are the only male figures in the painting. The others (4) are women.
4.) the bird flying from the wound in the side of the horse – this might represent the soul of a living creature which is departing the dead or dying body.
5.) the image of the sun or electric light – Picasso is illuminating the events of the bombing with three sources of light; the lamp held over the town square by the woman leaning out of the burning building; the flames of the burning building itself, and this object which is part sun and part electric light bulb. The meaning of the latter is not clear.
6.) the wounded horse with a gash in its side – Picasso did many drawings of horses as part of his studies of bull fights. They are shown as noble animals who serve humans in farming, transport, and entertainment.

7.) the sprouting flower – perhaps a sign of hope for the future if people heed the warnings made in the painting
8.) the woman with the lamp leaning out of the burning building – she has a look of horror on her face as she leans out of the building holding a lamp to illuminate what is happening below.
9.) the woman fleeing the burning building – one of the innocent victims of the bombing is trying to escape the fate of the many others who have been injured or killed. She is running towards the centre of the painting.
10.) the woman falling from the burning building – it is not clear whether she has fallen as a result of the blast or jumped to escape the flames. In either case she will be severely injured or will die as a result.
I. The Bayeux Tapestry / Canterbury Embroidery
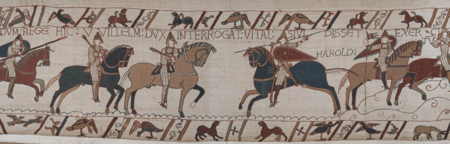
Let us remind ourselves of the scale and complexity of this work of art before we look at some of the details:
We need to keep in mind that there are several “stories” being told in this 70 meter long work. The main story is told in the larger middle panel where the main events are the invasion and conquest of England by the Normas in 1066. There is another “story” being told in the form of the “titula” or “titles” which are in Latin and provide some description of what is happening and who the figures are. The Bayeux Museum version provides a transcription and translation of these “titles”. The third story, or set of stories, are shown in the smaller panels above and below the main panel.
Here there are pictures of animals, scenes of people working in the fields, other people, religious symbols, and towards the end fallen soldiers and horses.
These smaller images were often ignored, or thought to be mere decorations or “doodles” which added nothing to the main story. Closer analysis has shown that they play an important role in the story. I will discuss the meaning of some of these in what follows.
To begin with the main story line, we can identify some recurring themes in the 35 events (Schriver) or 58 panels (Bayeaux Museum):
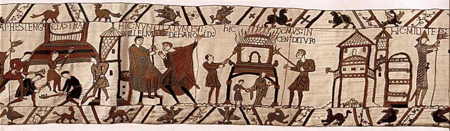
- Kings and Lords in Discussion
- Banquets before and after Battle
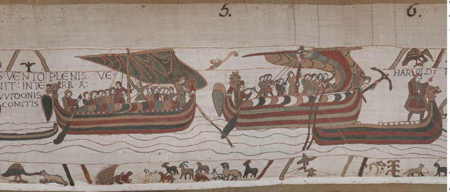
- Travelling in Boats
- Getting Ready for Battle
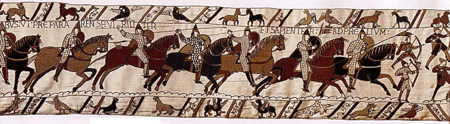
- Battle
- Animals and other interesting and curious images
Here is a sampling to look at (the Part number refers to the Schriver version):
1.) Kings and Lords in Discussion
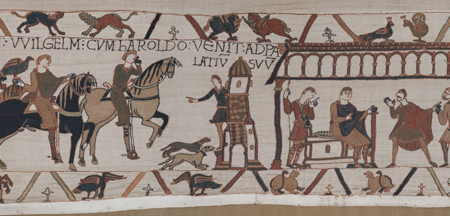
Part 1. Harold Godwinson confers with King Edward the Confessor and sets out on his journey.
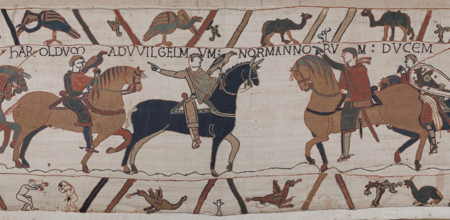
Part 8. Harold and William return to Normandy, where William’s daughter Aelfgifu is betrothed to Harold.
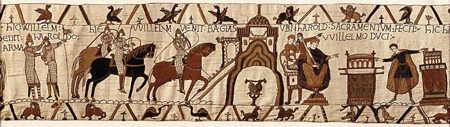
Part 12. During the victory celebration William knights Harold, and Harold takes a solemn oath to become the man of William.
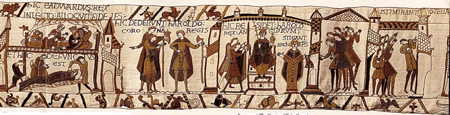
Part 15. Harold is crowned King of England. (Look for Haley’s Comet.)
2.) Banquets before and after Battle
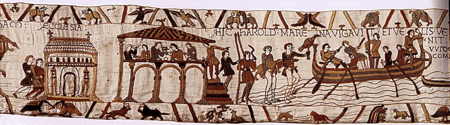
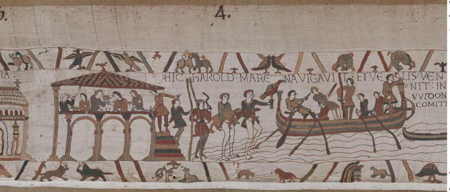
Part 2. Harold and his men prepare for a sea voyage with a final prayer and meal. Then they board their ships, taking dogs and falcons with them.
Part 23. William and his lords (Odo is on the left of the group of three in the middle) celebrate at a banquet.
3.) Travelling in Boats
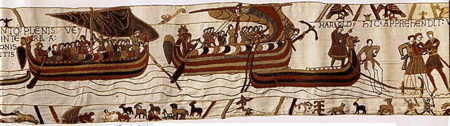
Part 3. Their landing on the coast of France is met by the hostile Guy of Ponthieu.
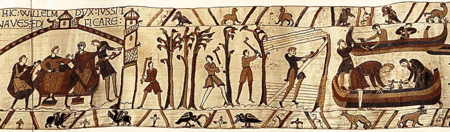
Part 17. William orders the Normans to begin building a fleet.
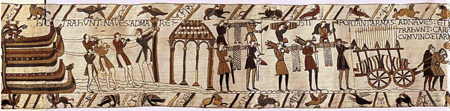
Part 18. The ships take on their supplies.
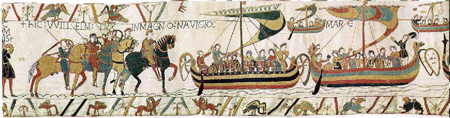
Part 19. The horses board, and the ships set sail.
4.) Getting Ready for Battle
Part 24. The Normans build their camp and prepare for battle.
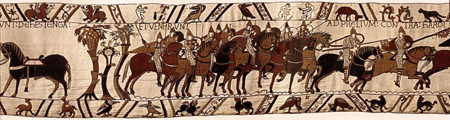
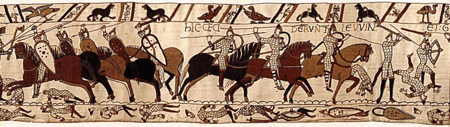
Part 25. The Norman army assembles.
Part 28. The Normans attack on horseback.
Part 29.The Anglo-Saxons meet their attackers on foot.
5.) Battle
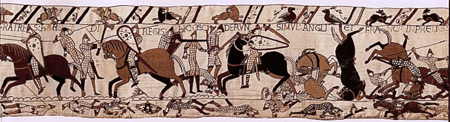
Part 31. The battle rages.
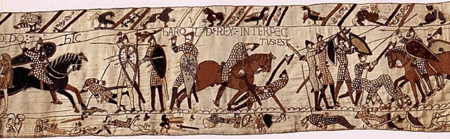
Part 34. Harold is struck in the eye by an arrow and dies.
Part 35. The Normans are victorious.
The Tapestry ends suddenly. The end piece seems to be missing.
6.) Other Interesting Images
A. Medieval Technology
Some of the panels are very interesting to historians because they reveal something about how life was lived in the 11th century. Such as tilling the fields, the kinds of weapons and armor used, the building of boats, and cooking food for banquets. Some are shown in the bottom panel (farming) and others in the main larger panel.

Tilling the field (P10)
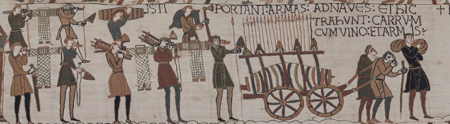
Armor and Weapons (P37)
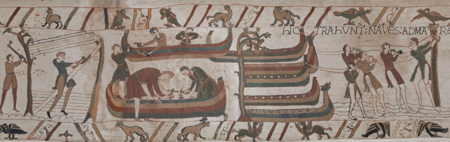
Boat building (P36)
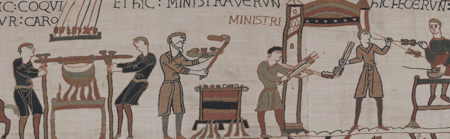
Cooking (P42)
B. Injury and Death in Combat
Since this is a work depicting the invasion and conquest of England by the Normans it is not surprising that images of battle take up considerable space, especially towards the end (Panels 48 to 58).
To link back to Picasso’s painting “Guernica” I want to point out the many images in the BT of dead and injured soldiers and horses, the presence of which suggests that the creators of the Tapestry were sensitive to the cost of war to those “little people” (i.e. not noble) who suffered the consequences.
This one of “Two Dead Soldiers” from the bottom panel of P52 reminds me of the fallen statue of the warrior in “Guernica” which has been decapitated and has its sword broken:

Here is the full panel from which this detail comes:
Because armor and swords were expensive items they were “recycled” by stripping the dead for use by replacement soldiers. Here is a detail from P57:

Here is the full panel from which this detail comes:
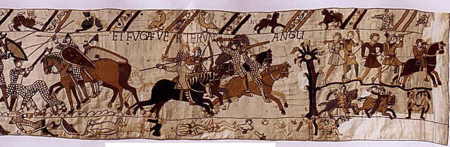
We forget that until very recently (up to and including WW1) horses played a very important role in war as vehicles for the transport of men, food, and other supplies. Their injury, death and suffering is depicted in the BT in graphic detail, as these images show.
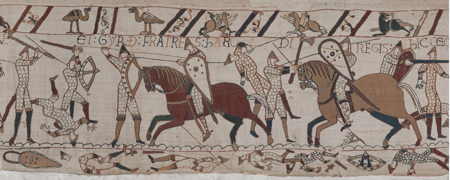
Here are two horses which have been up-ended in combat as their riders are pulled to the ground by soldiers (P53):
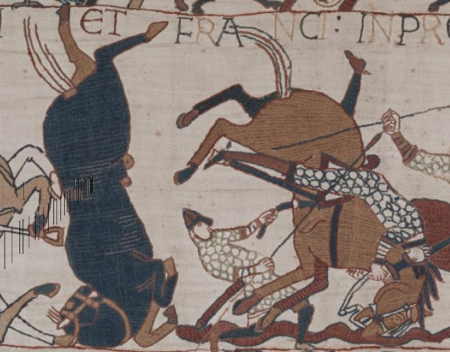
Here is the full panel from which this detail comes:
C. Animals and other curious images
For a long time historians did not understand or appreciate the meaning of the images which appear in the narrow panels above and below the main panel.
Halley’s Comet
One that was quite obvious early on was the propitious appearance of the “stella” (star) or Halley’s Comet which appears above the Coronation of King Harold, which indicates that he has the blessing of God (P. 32 and 33).
Mythical Beasts
There are also many images of mythical beasts which are often shown beneath or above the King and the Dukes. They have powers above that of ordinary animals and act as guardians who protect or warn the King of coming dangers or threats.
Here are some examples:
The Centaur was neither man nor beast, it was an ungoverned creature which was in need of some superior power to guide it and authority to make this creature acknowledge the True Faith.
Here are two Centaurs below Harold and his pack of hunting dogs as he sets off to Normandy. Note he his holding a hunting falcon on his arm. (P3).
Note also that there are many noble beasts in the smaller panels: vultures who are bowing their heads in recognition of his authority, and “pards”(big cats which are not lions (which represent kingly power) but which represent the lesser nobility).
The Wyvern was a two legged, half-lizard, half-bird, with a forked tongue and which spat poison.
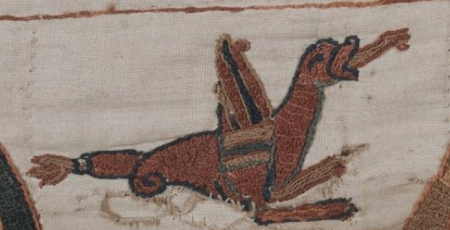
The larger image (P13):
Guy has arrested Harold and then takes him to William: there are vultures (predatory birds) and camels (symbols of strength and endurance) above; and a naked “Adam and Eve” ( a symbol of sinful humans) and Wyverns below. Note that one Wyvern is spitting at Guy and the other at William, but there is a crucifix in between them.
The Gryphon was a guardian of the souls of the dead (especially those of royalty). It had the body, tail, and back legs of a lion; the head and wings of an eagle and talons on its front legs.
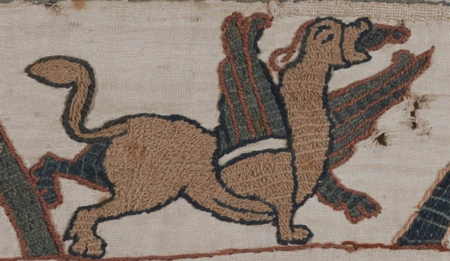
In this panel (P14) William takes Harold to his castle:
Above are lions (symbols of kingly power), Gryphons, and peacocks (also symbols of royalty and nobility). Below are bowing vultures and pads, with crucifixes interspersed.
D. The “Fabulous Animals” of Aesop and Phaedrus
A very curious but important set of animal images were ignored or misunderstood by historians until relatively recently. They are based upon the stories of Aesop whose fables feature talking animals whose actions are used to teach moral lessons to their readers. Aesop was a Greek slave who used animal stories to indirectly criticize the injustices of his own day. He had to do this in order to avoid punishment, death or sale by his owner.
Many of these stories warn how naive, powerless, gullible, and stupid people can lose their property or even their lives at the hands of those who are more ruthless and powerful than they are. The weak are portrayed as a lamb, or a hare, or a beetle; and the powerful as a lion, a fox, or an eagle. Their use in the panels of the BT seems to be deliberate references to these fables by the monks who stitched the stories onto the linen cloth. It is possible that the young monks who did the stitching had leaned their latin by reading Aesop’s fables and had absorbed the meaning of their moral lessons.
It is hard to know who these people were or why they did this. Did they do this on their own initiative, or did they have permission from those who were supervising the project (like Odo, or his subordinates)? Whatever the reason, these Aesopian stories seem to undermine other parts of the story being depicted in the main central frame, that of the legitimacy of the invasion and conquest of the English by the Normans.
The appearance of the wise, cynical, and often subversive Aesopian animals would seem to undercut the pro-monarchical narrative provided by the plethora of lions, pards, eagles, and vultures among the existing beasts, and the gryphons, wyverns, and centaurs among the mythical beasts. The Aesopian lambs, crows, cranes, goats, dung-beetles, and donkeys provides us with a counter-narrative for another reading of the events being depicted in the main panel.
There are a number of “classic Aesopian fables” (possibly 8 or 9) which are scattered throughout the 70 meter length of BT and appear dozens of times. Five of these classic fables are depicted alongside each other in Panels 4-5, so very early on in the story, and would therefore seem to be of some importance. The predators are the fox, the wolf, and the lion (the lion of course representing monarchical authority); those oppressed and hurt are the crow, the lamb, the bitch, the crane, and other smaller animals (representing ordinary working people).
Here are the full panels (P4 and P5):
Beginning from left to right we have:
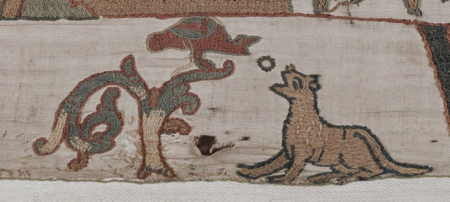
1.) The Fox and the Crow: the fox sees that a crow has a piece of cheese in its beak which it wants to steal; he tricks the crow into opening his beak by telling it that he has heard that crows can sing beautifully (which is not true); the vain crow opens its mouth to sing and drops the piece of cheese; the fox then steals and eats the cheese. The moral of the story is that the more powerful can get their way by tricking those who are gullible and vain and who too easily surrender their property without a fight.
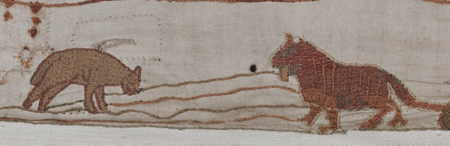
2.) The Lamb and the Wolf: the wolf falsely accuses the lamb of having insulted him; he says he overheard her saying bad things about him while she was drinking from the stream not knowing that he was downstream from her and could hear what she was saying; she denies this was the case and provides evidence to show that it could not have been her; the wolf becomes angry with her vigorous defence and his inability to rebut her, so eats her anyway. The moral is that even if the weak are able to defend themselves well through reasoning and argument, the powerful will ignore this and take want they want anyway.
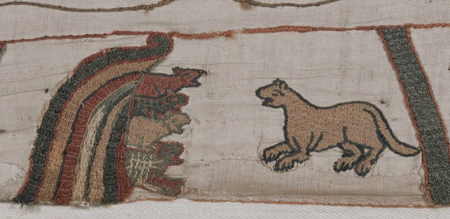
3.) The Bitch and her Puppies: a bitch lends her lair to a pregnant friend who takes advantage of her generosity; after she has given birth to her pups and has raised them to a healthy age she refuses to let her friend have her lair back. The moral is that one should be on guard against being taken advantage of, even by one’s own friends.
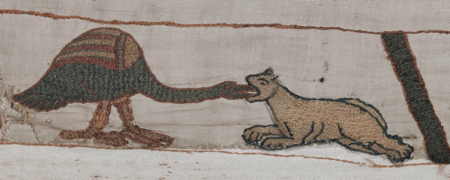
4.) The Wolf and the Crane: the wolf has a bone caught in his throa; he sees a crane with a long beak and asks it to help him, in return for which he promises the crane a reward; the crane uses its beak to remove the bone from the wolf’s throat and asks for its reward; the wolf reneges on his promise and there is nothing the crane can do about it. The moral is that the powerful cannot be trusted, and that if you do something for them there is no guarantee that they will reward you for it, and will more than likely go back on any promise they made.
5.) The Lion and the Animals: soon after the Lion King made himself king of all the animals he wanted to win the trust of his subjects by saying he would give up his habit of eating meat (i.e. eating them) and would distribute justice equally and without favour; after a while he reverts back to his old habits and devours all the animals anyway. The moral of the story is that predators cannot and will not give up their predatory habits, so it is foolish to trust them when they say they will.
In addition to these 5 canonical fables which are referred to early on (P4-5) and several times again, there are other fables which we should note.

6.) The Lion’s share (P7-8). This story is found in the Panel where Guy arrests Harold upon his arrival in Normandy and then is taken prisoner to his castle. In the story the Lion asks some of his subjects to help in hunting for prey; in return for their help he promises them an equal share in what they catch; the hunt is successful but the lion claims the first portion as his right as king; he then claims the second portion as his share of their partnership; and then the third share because he is the strongest, and then finally the fourth because he sees that no one will challenge him. The moral is that one cannot trust the word of the powerful.
There are also a number of more radical Aesopian fables which are alluded to in the BT where the less powerful animals fight back and resist their predators, or undertake a form of passive resistance. These include stories about a goat, a dung-beetle, and a donkey.

7.) The Wolf and the Goat (P6-7). This story is found in the Panel where Harold arrives in Normandy and is arrested by Guy. A wolf catches a goat and allows her to pray before he kills her; she tricks him by calling out for help very loudly; nearby hunters hear her shouts, and they and their dogs hunt down the wolf and kill him. The moral is that a weak but quick thinking person might be able to outwit a predator and call for help (and perhaps get that help) and thus defend their rights.
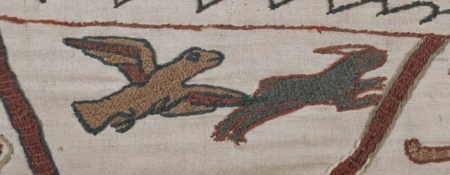
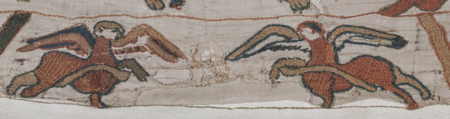
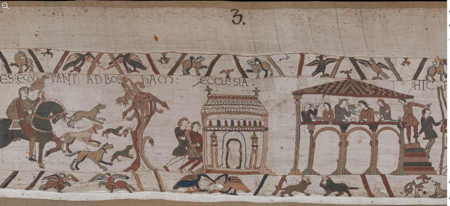
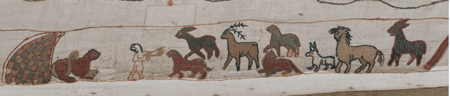
8.) The Eagle, the Hare, and the Dung-Beetle (P49). As the armies of Williams and Harold are about to confront each there is an interesting pairing of these two radical Aesopian stories. To the left is this one; to the right is the one about the Old Man and the Donkey. In this story the hare is escaping capture by an eagle; the hare asks the dung beetle for help and asylum; the beetle courageously intervenes to beg the eagle to spare the life of the hare in the sacred name of Zeus and the right of asylum; the eagle brushes the beetle away and devours the hare; the beetle is so outraged by the eagle’s behaviour in not acknowledging the right of asylum that he follows the eagle back to its nest and destroys all of its eggs in revenge. This happens several times until Zeus intervenes and castigates the eagle for violating the right of asylum claimed in his name. The moral is that sometimes when a less powerful creature stands up to a more powerful one the “Gods” will intervene to defend the weak against the strong. But usually not.
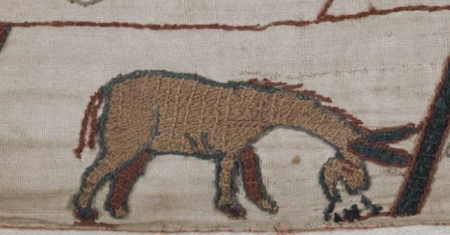
9.) The Old Man and the Donkey. In this story (which appears twice in the BT) the old man learns that an invading army is approaching and tells the donkey they will have to flee. The donkey tells his owner that he does not care who is his master, him or the soldiers of the invading army, as they are all the same and will both mistreat him whatever he does. He prefers to stay where he is and refuses to go with the old man. The moral is that one should be cynical about the nature of power that the strong have over the weak, and that a change of master will not necessarily improve one’s situation in life. Perhaps the best one can hope for is to refuse to obey orders unless one has a compelling reason to do so.
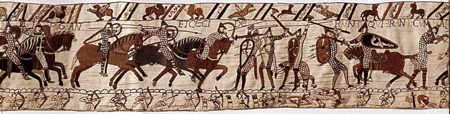
It is interesting that both these stories are referred to in the same panel (P49) which is reproduced below:
The two armies are facing off against each other and the battle is bout to begin. In the narrow panel above, we have the usual symbols of royal power (deferential vultures, lions, and pards). However in the narrow panel below we have a symmetrical arrangement of animals bookended by the “Eagle, Hare, and Dung-Beetle” on the left and “The Donkey” on the left. In between these are 2 vultures, 2 pards, 2 crucifixes, 2 more volumes. What this means is hard to tell but it seems to have been deliberately chosen and arranged.
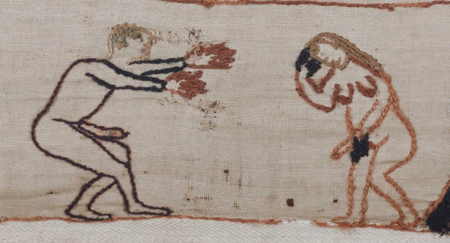
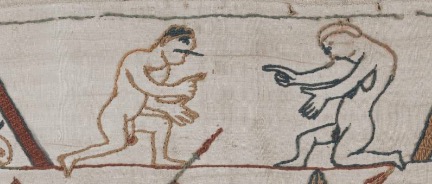
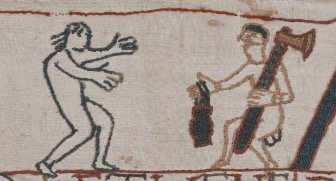
Naked People
I will end with a strange but amusing collection of “naked people” who are scattered throughout the BT. The meaning of these is not clear and I do not have time to go into the matter here. I will just list them, have a chuckle, and move on:

Conclusion
I will conclude by returning to the collection of images from the two works of art which show some interesting similarities in the images of death and destruction chosen by the two different “creators”:
- dead and decapitated soldiers
- injured horse
- burning building
- a light
- a woman
Here its also an appropriate moment to look at the depiction of the “creator” of the BT in the BT and reflect on the possible meaning of the animal symbols which surround his depiction:
Recall that the first is of him eating and talking to William before the battle (P44) (he is sitting on the left under the roof of some kind of building or shelter) and the second is of him in battle on horseback wielding a club (P54).
Above Odo and William are from left to right, a Gryphon, a vulture, and two lions. Below are a pard sucking its tail, two vultures and another pard.
In this panel (P54) where Odo is on horseback wielding a club in battle we see at the top on the left a vulture pointing, on the right a vulture bowing head, and in the middle two pards (not lions); and on the bottom on the left and right are fallen soldiers and their shields, in middle is a large horse and a soldier defending him with shield.
One might interpret this to mean that Odo, perhaps the creator or administrator of the TB project, was a senior noble who was valiantly and successfully defending his brother the King in battle, and his legacy and memory in the form of the BT, even though there are many other visual references which are literally interwoven into the tapestry which might be seen to cast doubt on the legitimacy and worth of this endeavour.
Further Exploring and Reading
At my website:
“The Bayeux Tapestry (c. 1070) Bayeux Museum Version”
“The Bayeux Tapestry (c. 1070) Carolyn Schriber Version”
“Pablo Picasso (1881-1973): From the Spanish Civil War to Vietnam”
“Images of Liberty and Power: the Art of War and Peace”
At my blog “Reflections on Liberty and Power”:
“Pablo Picasso’s “Guernica” (1937)” (25 June, 2015)
“Picasso and the Anti-Vietnam War Movement 1969” (12 July, 2015)